The more plants you begin to grow, you’ll begin to realize the importance of staying organized. As the plant begins to mature, knowing when you started the seed and when it should be mature will aid you in gauging when to begin harvesting or even how old a plant may be and if you should pull it and replace it with another.
We grow hundreds of varieties of plants per season on our property and have found that labeling is essential. Even if you are not planting many plants, knowing what you planted and having a quick reference will be essential to knowing and learning more about your plants. Here’s what we include on our labels and some tips that help along the way:
- Use a label that offers space enough to record data/info
- Record plant variety and kind
- Record start of seedling date
- Record anticipated maturity date for when you should be able to begin harvest
- Optional: Record any special characteristic that helps to identify it — especially if you have more than one variety growing of the same kind of plant (ie: seed stock source, ppm range)
- Use a non-fading permanent marker
- Point the label away from the sun.
- A best practice to do a back-up label as well

The Foundation: Your Actual Choice of Label Style

We love the look of bamboo labels, which is a recyclable material, so if your budget allows, this is a great option. This is cost-prohibitive on a larger scale for our seed production, so we opt to use plastic labels and recycle them. When we are finished using the label, we give them a quick rinse with soap and water and then place them in a sealed jar of 91%-94% rubbing alcohol to soak and process them (clean them) during the winter months. After a bit of soaking in 91%-94% Rubbing Alcohol, you can strip off the permanent ink pen writing when you rub with a cotton ball or paper towel and apply a little bit of pressure.
For those growing in soil, if you have access to an old white window covering blind (the kind you put in the window to shade your home interior from the sun), many Master Gardeners like to cut these down and use them as plant markers / labels using a permanent marker or wax pencil.

Tip: If you use plastic labels like the ones shown above and a permanent marker and you make a mistake, simply use 91%-94% isopropyl rubbing alcohol to remove marker.

Some Tower Garden or Lettuce Grow Farmstand hydroponic / aeroponic home growers will use painter’s tape and write info on that and stick it to the actual vertical garden growing system. We’ve found that if it is outdoors, it can weather and come off if you have a longer season of growth, but it works great if you’re growing indoors. We like this tape and use it for our Grow Order Client Orders that are grown indoors. We like that it is 2″ wide so we can write our client’s name as well as the plant variety, start date, and harvest date all on the same short strip.
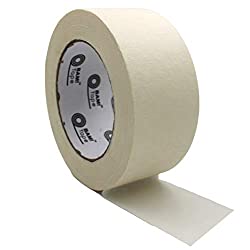
Tip: When placing tape on your vertical garden growing system, try to place ABOVE the port as sometimes water can drip downwards from a leaf. And try to only use tape if growing indoors as weather can cause removable tape to loose it’s adherence to your grow tower.
Do not, I repeat, DO NOT use duct tape on your hydroponic / aeroponic vertical growing system. It may be difficult to remove and will leave a sticky residue.
We’ve also heard of some people writing directly on their Tower as well. The challenge with using an erasable marker is if the Tower Garden gets bumped in any way, you may lose valuable information. The other challenge is that a vertical garden like the Tower Garden or Lettuce Grow Farmstand will need weekly maintenance of wiping down the exterior so that you don’t get minerals building up in the nooks and crevices. The other factor is if you’re growing outside, you may want to periodically spray down your plants with a shower level of pressure of water to not only rinse off the exterior of your hydroponic growing system. This not only cleans your tower but also helps to knock-off any aphids or bugs that may be hiding underneath leaves or in plant crevices. If you were to have removable ink on your growing system, you would lose valuable information with the introduction of water.
So, when looking at your foundation of the kind of plant tag or plant label you plan to use, consider how the weather (rain and sun) is going to affect it as well as water and routine cleanings around where it will remain.
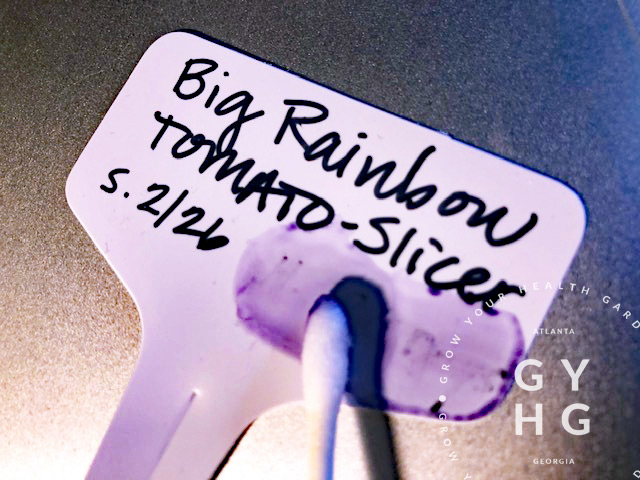
Record Plant Variety and Kind
We always list variety first and plant kind in caps on the second row. This makes for a quick visual check when grouping similar plants together as seedlings or when placing in a growing area or hydroponic system.

Record Start of Seedling Date
We like to put our seed start date in the left-hand corner of our label and the harvest date on the lower right. The key here is just to be consistent as it speeds up efficiency when you’re in the garden checking on plants. Our eyes scan when they read and having information in the same spot on every plant tag or label will save you time in the long run. Consistency is your friend when your looking to make things efficient in your garden.
Record the Anticipated Days to Maturity Date
Often you will see in seed catalogs or on seed packets “Days to Maturity” noted. This notation is not determined from seed start date, but is intended as what to expect from the date of transplant. To figure out days to maturity, use the following loose formula:
Days to Germination + 2 weeks + Days to Maturity = When you can expect to harvest
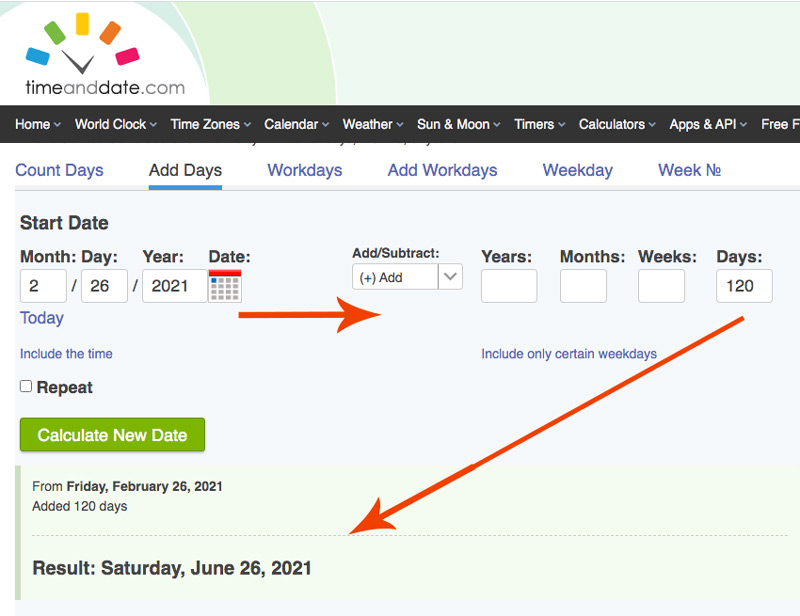
To quickly calculate your harvest date, use the formula above and enter that number into this handy date calculator. (Make sure you use the tab for “Add or Subtract Date”. (See blue line under “Add Days” in example screen shot below.) Begin by entering your date of seed starting and calculate days of germination, plus two weeks for seedling growth, plus days to maturity from seed packet or catalog description. This will give you total number of days. Make sure the Add/Subtract drop down has selected “(+) Add” and then enter a numerical value under “Days” and hit “Enter” on your key pad. Below, you will be given the “Result” date. This is what you will write on your label.
Granted, each plant and growing condition is different (i.e.: plant receives more light and more nutrients and may grow faster than standard days to maturity. Note: If you’re growing hydroponically, realize that plants in general grow 30% faster, so don’t be surprised if you check your anticipated maturity date and your plant is already maturing before that date has arrived.
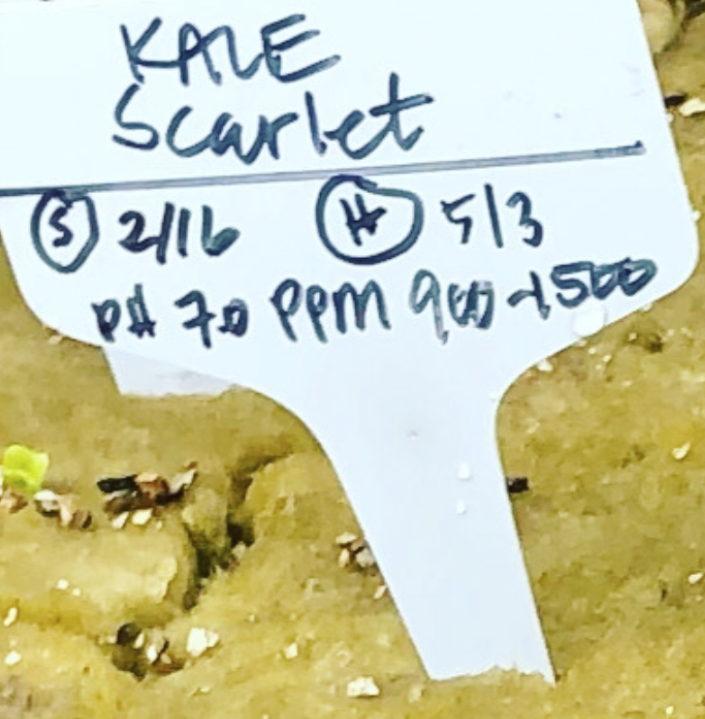
Record Any Special Characteristic that you want to Remember for Future Reference
When I was starting out growing food hydroponically, I would put PPM ranges on my tag to make sure I grouped plants together that liked the same range. Then I sat down one day and did some figuring and came up with these handy charts for reference. Now, I simply refer to the charts to know what plants go best with each other depending on whether it is a cool growing season or warm growing season. I no longer need to put that information on my label and can use that space for other information.
If I am growing a special collection (ie: Tom Wagner Varieties of tomatoes), I may want to grow those plants together so I can observe their growth patterns and development. An indeterminate or determinate tomato would grow differently from one other, so knowing the growing habits of the seedling I’m holding helps me to quickly place it in the best suitable spot in my garden. A micro-dwarf tomato can grow at the top of a vertical garden growing system like the Tower Garden because it is a determinate and will stay a certain small size that doesn’t need support whereas an indeterminate tomato will need to be trellised from the side and grown towards the lower part of the Tower Garden.
Sometimes we grow the same variety using two different seed stock sources. Diversity is good for strengthening seed stock. So sometimes, I will designate the seed stock source so I can compare plants while in the garden to see which line perhaps has more rigor before I do any cross pollination. In these situations, I just use the first letters of the seed stock sources name as a reference (ie: “SSE” would be Seed Savers Exchange).

Think of the Sun with Labeling
You may not realize, but some permanent markers are not very permanent when those UV light waves begin to hit them day after day. My sweet son had gotten me some permanent markers from the dollar store with his own money as a Mother’s Day gift and I used them on a few labels and they faded within months. I had to go over them with another type of permanent marker. Here are some options that should last through the season:
- Garden Permanent Marker
- Permanent Marker (often used on laboratory glass slides)
- Standard Sharpie Permanent Marker
- Retractible Grease Pencil
Another easy thing you can do to prolong your tag’s writing is point it away from the sun — at least until the plant has developed leaves to shield it from the sun’s rays.
The other good practice you can do is implement a secondary label. I’ve heard of some gardeners who grow in soil, bury a second label under the soil level near the plant for future reference. I tend to forget where I bury things if they are not marked, so instead I like to use these Tyvek wrist bands to loop around the plant as it gets big enough. This is especially helpful on plants that take a good while to mature like tomatoes, peppers, and eggplants. You can create a system of your liking using different colors, but I tend to just stick with neon yellow, because it’s quick to find when I need to find it.
As you tackle your seed starting, I hope this has inspired you to consider what information your plant will need to follow it in it’s journey towards harvest. With just a few simple considerations, you can be set up for success and at the end of the growing season have the information you need to make decisions for the next growing season!
Happy Growing!
—Erin