Yet another outbreak due to tainted lettuce salad in the first few months of 2022. At latest report, 17 have been sickened across 13 states and two unfortunate deaths in a recent listeria outbreak according to the U.S. Centers for Disease Control and Prevention (CDC).
The salads, which were recalled by Dole in December and are currently under an active investigation by the CDC, include a variety of different mixes. They were sold in either bags or plastic clamshell packaging, according to the agency, which said they include Caesar salads, mixed greens, and garden salads.
The salads that were tainted are sold under several different brand names such as Ahold, Dole, HEB, Kroger, Lidl, Little Salad Bar, Marketside, Naturally Better, Nature’s Promise, President’s Choice, and Simply Nature, the alert said.
The recalled salads have “Best if used by” dates between Nov. 30, 2021, and Jan. 9, 2022, the CDC said. They also have lot codes that start with the letters “B,” “N,” “W” or “Y.”
For those who suspect they may have the salad in their refrigerators, the CDC recommends to “throw them away or return them to where you bought them.” The agency further recommends that people clean their refrigerators, surfaces, or items that might have touched the recalled products as listeria can survive “in the refrigerator and can easily spread to other foods and surfaces.” If you suspect you have this in your refrigerator or have consumed this product, please reach out to the CDC immediately.
This is not the only incident. The CDC said that it is also investigating another listeria outbreak connected to Fresh Express packaged salads, which occurred in December of last year and led to 10 hospitalizations and one death. That recall includes use-by dates with the product codes Z324 through Z350. Affected brands include Bowl & Basket, Giant Eagle, Fresh Express, Marketside, O Organics, Little Salad Bar, Signature Farms, Simply Nature, Weis Fresh from the Field, and Wellsley Farms, said the agency.
According to the Mayo Clinic, a “listeria infection is a food borne bacterial illness that can be very serious for pregnant women, people older than 65 and people with weakened immune systems.” And that “healthy people rarely become ill from listeria infection, but the disease can be fatal to unborn babies, newborns and people with weakened immune systems.” Symptoms include fever, muscle aches, nausea, chills, diarrhea, while more serious symptoms can include stiff neck, headache, convulsions, and a loss of balance, the clinic’s website says. “Symptoms might begin a few days after you’ve eaten contaminated food, but it can take 30 days or more before the first signs and symptoms of infection begin.”
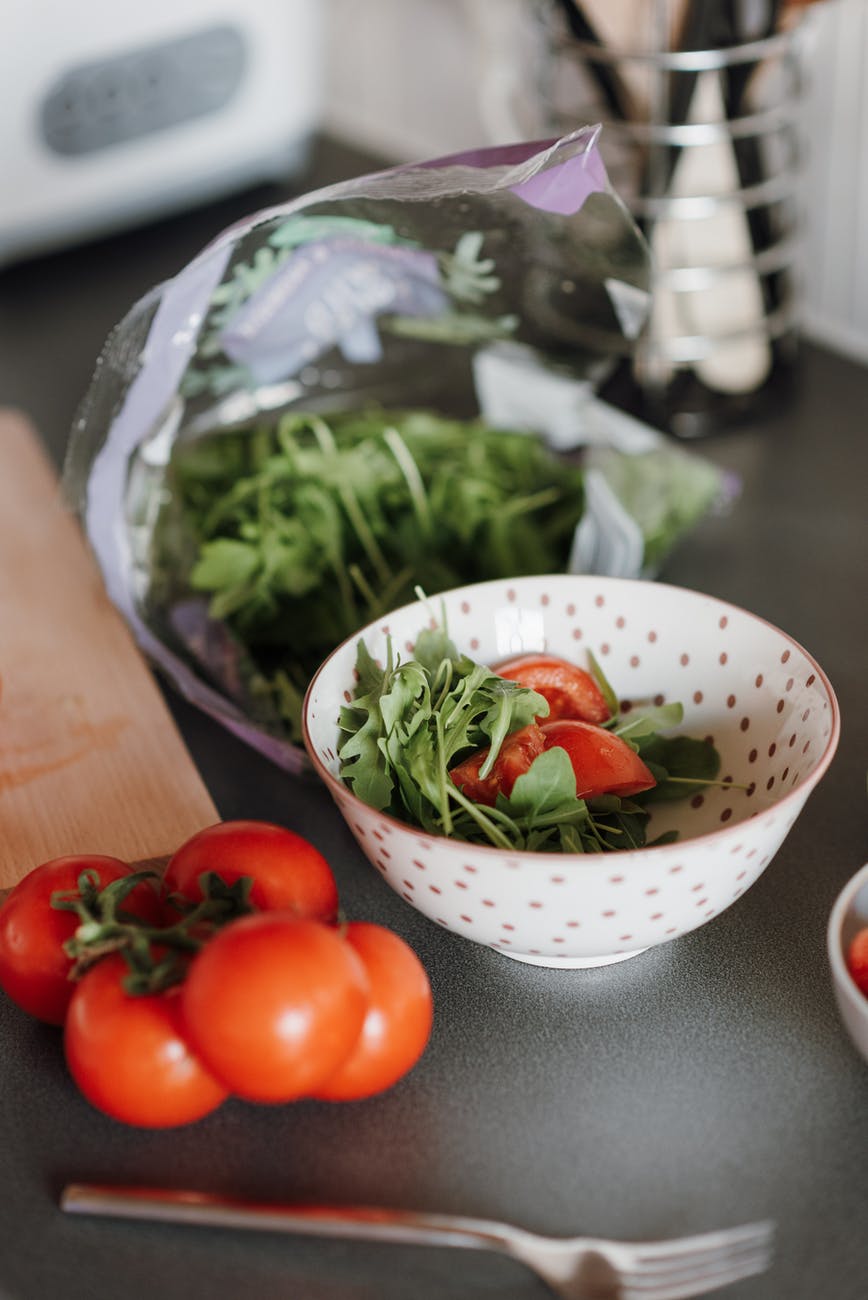
This is not the first time outbreaks that result in the loss of life have been cause by those eating bagged salad or greens purchased from big box retailers. In the busyness of life, we trade food security and nutrition for convenience.
I didn’t learn until about five years ago, that most of our lettuce comes from Salinas, California. For those of us living on the East Coast, that means our greens have to travel approximately 3,000 miles which takes on average about 10 days to go from field to our table. When you think about nutrients lost for every day post-harvest, we are simply eating old food.
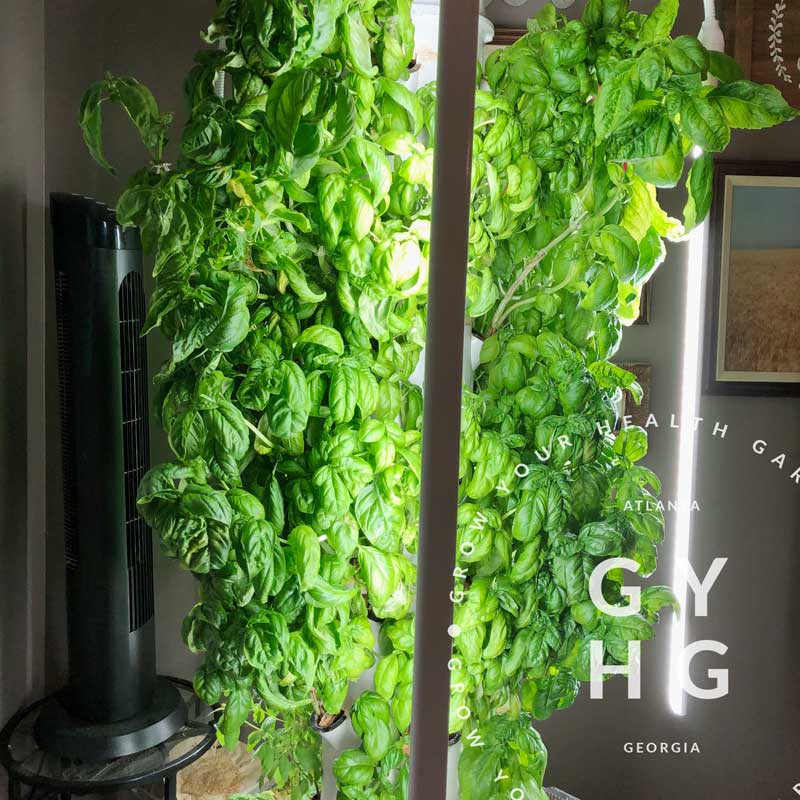
Here’s the thing… it doesn’t need to be this way. With changing a few habits, we can have greens at home in a number of ways, but the easiest by far that I have found is growing greens in my hydroponic / aeroponic growing system, the Tower Garden. I can start seeds for greens every couple of weeks and have a constant supply of greens, right in my home, 365 days a year. And when I harvest the greens, I can simply go from my vertical garden growing system to my table within literally minutes with a quick wash and spin dry if I wanted to do so! (Normally I harvest my greens in the morning when they are at their peak nutrition and the chill them after cleaning the leaves and spinning the leaves dry before fixing a salad.)
I’ve heard it time and time again when people balk at the price of a hydroponic / aeroponic Tower Garden. I don’t blame them. I know I did the same thing at first. And then my husband had a heart attack and suddenly the price of that tool to grow food seemed to PALE in comparison to the medical bills that piled up and the new life of treatment we faced post-heart attack.
I remember, one of THE BEST decisions I made following his heart attack was to purchase three Tower Garden vertical garden growing systems (we got the three Family Pack). We opted for the payment plan and paid on them for only a year. We looked at it as if we were paying for insurance but instead investing in the health of our family. Boy were we right! Now, we are going into our fifth year of growing food in these full- paid-for vertical garden growing systems. They have easily paid for themselves over and again; I cannot begin to describe how many fresh greens we have eaten off of these Tower Gardens!
We learned in growing our own food hydroponically, that our Rainbow Swiss Chard roots were the same color as the stalks! How cool is that?!Bibb Lettuce greens growing on hydroponic Tower Garden.Spinach Leaf from spinach plant grown on the Tower Garden vertical garden hydroponic aeroponic growing system,Basil growing on indoor hydroponic Tower Garden growing system.
If you aren’t willing or able to invest in a growing system like this, at least start with something smaller, like an Aerogarden that can sit on your kitchen counter. There are outdoor options you can cover as well if you prefer that use soil, but I’ve found that using a growing system that circulates the same water and nutrients not only saves water, but it frees me up from having to babysit watering something growing in soil every day. I’m a busy homeschooling mom of five — I need things automated as much as possible. I simply add checking on the Towers 1 – 2x a week to my work flow at home and smile big when I have the food and herbs at my fingertips when it comes time to make dinner. You can learn more here if you’re interested or send us a message and we will reach out to you to answer any questions.
And if you’re buying salad kits…. Stop. Stop trading what seems to be a convenience for what you think is healthy. They are not healthy. You’re eating old food. Unless it says right on the packaging that it was grown locally, do not buy it. Grow it at home. And be careful of anything that had to be processed (ie: cut and assembled). You’re putting a lot of faith into someone else.
Learn how easy it is to grow your own greens at home. Let us help you on that path of discovery. Just ask in the comments below and we will be happy to answer any question or click on the pictures below which will take you to further information.
Both of these systems can grow food indoors. The Flex system on the right can ADD additional sections on top and grow higher (more food per square foot) with the proper pump. Be sure to reach out to us at hello@growyourhealthgardening and we’d be happy to answer any questions about growing food the EASY WAY hydroponically in a vertical garden like the Tower Garden growing system.
Full disclosure: I am a Tower Garden Rep (Erin Castillo). Helping families lead healthier lives using modern tools and hydroponic / aeroponic organic growing methods.
Grow Your Health Gardening (GYHG) Seed Co. has been identified as February Star Seller on Etsy for the second consecutive month of 2022 and received a perfect score of 100 percent in every category for exemplary customer service.
To achieve “Star Seller of the Month” status, orders had a perfect score offering on-time shipping guidelines 100% of the time (a one day turn-around with USPS tracking on every order), communication response within 24 hours was 100% of the time, and Grow Your Health Gardening Seed Co. received 100% 5-Star Ratings from customers who received their seed orders. We provide the same wonderful service on our online store! (Which is our primary store.)
Here’s some of what our customers are saying about Grow Your Health Gardener Seed Co.’s service and quality grow with organic methods seeds:
★★★★★ “These small seeds arrived in great shape. I planted just a few of them right away. They are already coming up! I am so happy with these rare tomato seeds!” — Sully
★★★★★ “My seeds came perfectly marked with a lovely thank you note and a helpful chart of past repelling plants. I could not be happier with my purchase and cannot wait to plant my little seeds with my kids and watch them grow. Thank you!!!” — Crystal
★★★★★ “Got here really quickly! Would buy form again! Can’t wait to start growing ^_^!” — xstiney
★★★★★ “Wonderful seed company with lots of information that comes with your seed order. Also check out the website. They have tone of wonderful seeds and information on it.” — Royal W
To purchase hydroponic-adapted seeds and seeds grown in the soil in the Southeast Zone 7B, you can order on Etsy.com or better yet, for the latest updates and product releases visit Grow Your Health Gardening‘s online store.
Live screenshot of Etsy Star Seller Dashboard for Grow Your Health Gardening
The Star Seller badge is Etsy’s way of recognizing sellers with a proven record of providing a great customer experience. To become a Star Seller, your store must meet certain criteria for messages, shipping, ratings, orders, and sales. If these core fundamentals of delivering great customer service are achieved, a shop may receive a badge that shows buyers that a shop has consistently provided an excellent customer experience.
Beauty Lottringa growing on the vine. Such a pretty tomato!
We are loving eating BLTs (Bacon, Lettuce + Tomato with Mayo on a slice of bread) fresh from the garden with tasty hydroponically-grown heirloom tomatoes! (So juicy!)
And this rare variety from Russia called Beauty Lottringa makes a tasty AND beautiful plating! Can you believe that each tomato has less than five seeds in it?! WOW! I personally love how each slice looks like a red flower.
Slice of Beauty Lottringa on a BLT Sandwich. This variety only has about 5 seeds or less on average in each tomato!
BLT Sandwich with Black Passion and Beauty Lottringa featured in photo above. To shop all our hydroponic-adapted exclusive line of seeds visit store.growyourhealthgardening.com
I’m still debating on whether to sell this variety because of the low seed count, but I may end up doing a giveaway, so be sure to visit store.growyourhealthgardening.com and sign-up for our email updates and tips to be the first to hear when our new hydroponically-adapted line of seeds release or if we do a give-away on this particular variety.
Do you love BLTs as well? What is your favorite slicer variety?
Y’all! We are SO EXCITED about our new line of hydroponically grown herbs and seasonings grown using organic methods and coming soon (this week) to our store!
Research at The University of Minnesota found that hydroponically-grown herbs have 20-40% greater amount of aromatic oils when compared to herbs grown in conventional fields. This translates into higher quality herbs with a more robust flavor versus soil-grown herbs.
Learn how to grow your own arugula at home hydroponically / aeroponically from certified hydroponic grower, Erin Castillo of Grow Your Health Gardening and GYHG Seed Co.
Why you should be growing your own arugula instead of buying from the grocery store or Big-Box Retailer
You know how you go to a fancy restaurant and they bring you your salad course and before they leave your table they offer fresh pepper for your salad and with your permission proceed to grind cracked pepper onto your salad? Think of arugula as your cracked pepper of the salad world.
Why Grow Arugula and How To Use It
I wanted to feature Arugula, because I just don’t think people understand how versatile this plant truly is and that it is beneficial in so many ways. It is chalk-full of beneficial nutrients (which we will cover later in case you wanted to know) while also being low in calories.
It is ideal for new home gardeners in building confidence of gardening skills as it grows quickly from seed (aptly nicknamed “Salad Rocket” in some countries) and can begun to be harvested off of and tossed into salads with other greens when the leaves are still young and small at 2″-3″ in length. (Note: If you leave the center 3-4 leaves, it will continue to produce as a cut-and-come-again plant.) Arugula is often found in the produce aisle in salad greens mix and called “mesclun”.
Mature Full-Grown Leaves and How to Use Them
I as a mother of five know that life can get busy, so if you fall behind on harvesting leaves when small and the plant gets more mature, that’s okay! It will be “spicier” or “peppery” in taste as a mature plant. Take these 6″-8″ long leaves and slice them from tip to base into 1/4″ or thinner strips and sprinkle over your salad or mix in (think of it like your freshly ground peppercorn). Diced leaves can even be added to dishes that call for cilantro or parsley, or mixed into pastas, side dishes, put on top of sandwiches, in wraps and/or added to soups. Its flavor compliments goat cheese, balsamic vinaigrette, tomatoes, olive oil and garlic, making it perfect to blend into dips or spreads.
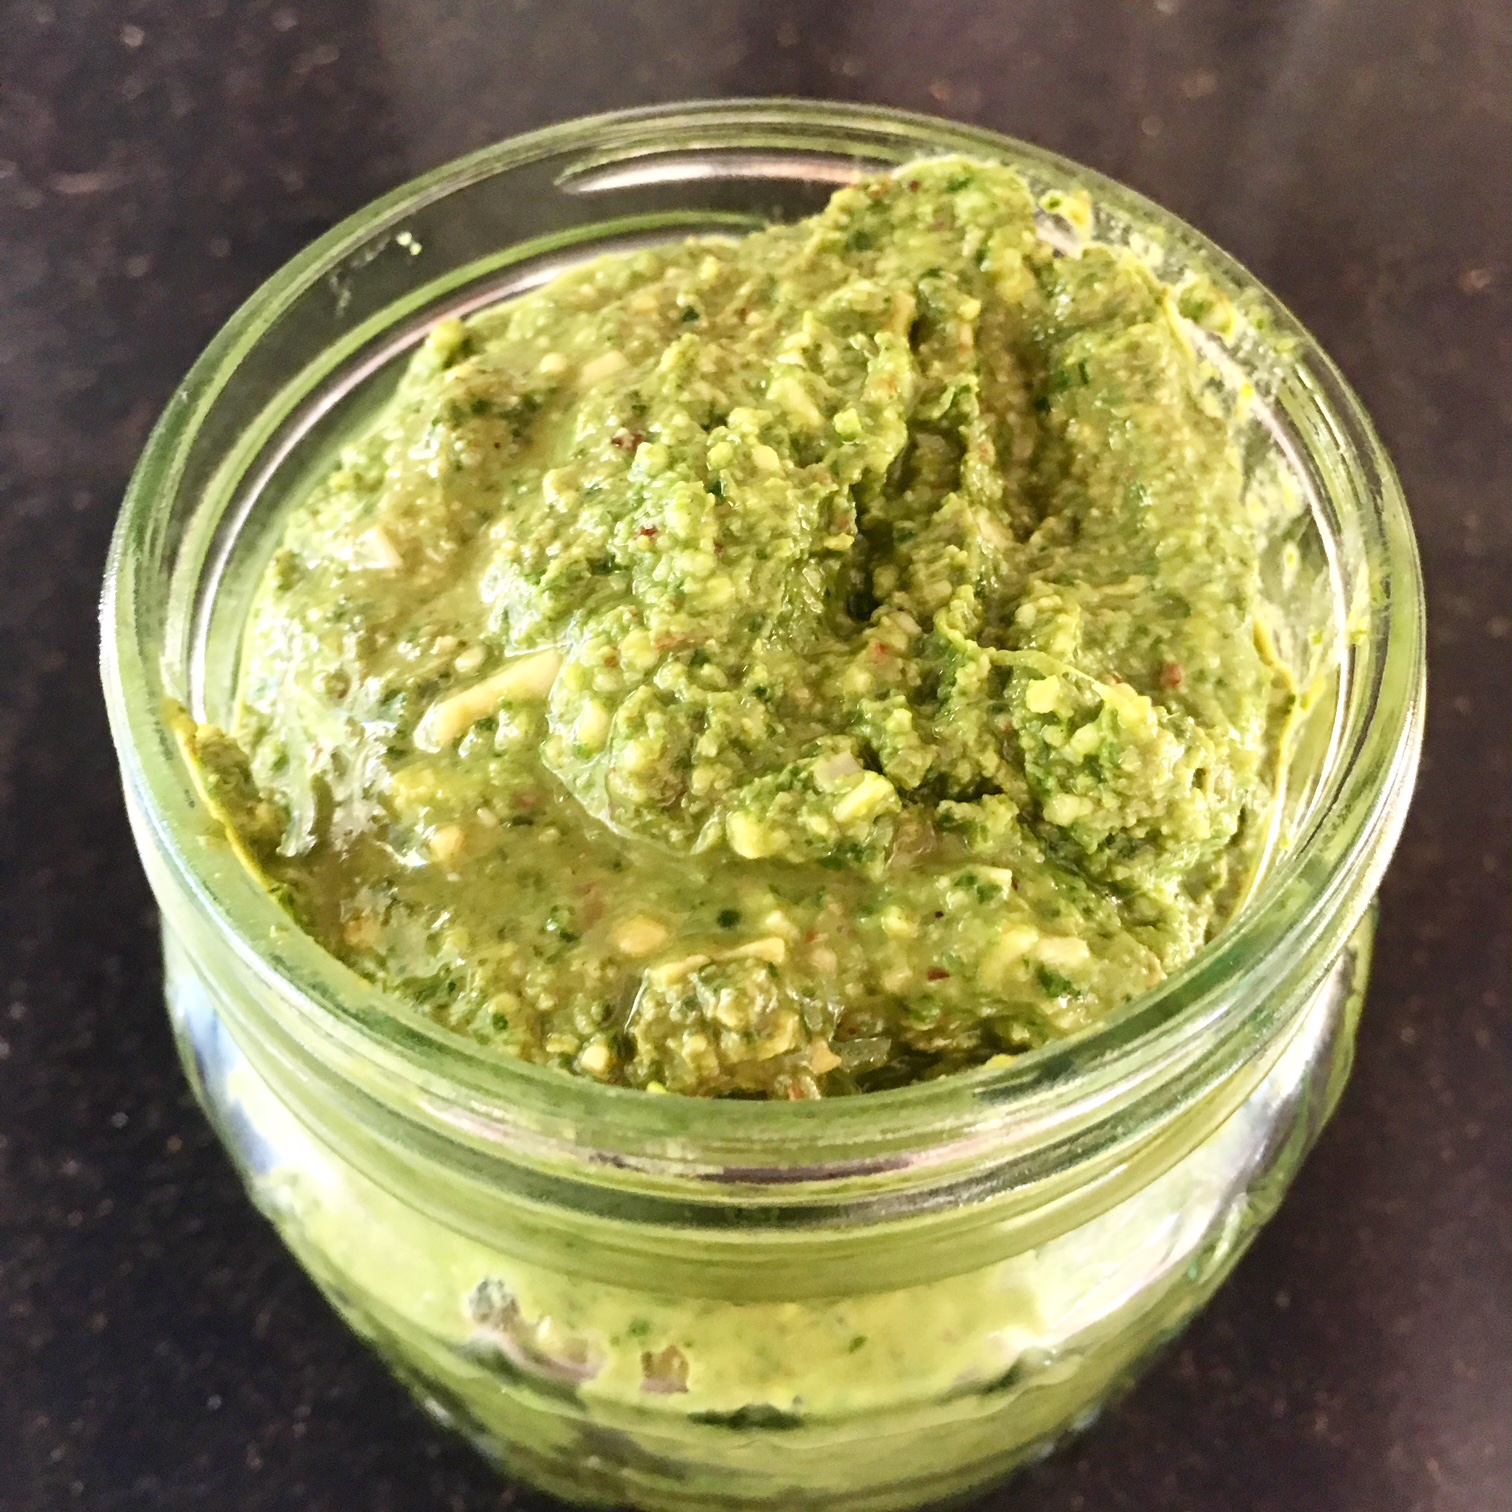
Arugula can also be added to your basil pesto as added flavor or if you like the peppery flavor, you can substitute arugula in place of basil and make an entire pesto out of arugula leaves. We like this happy medium of a pesto recipe in particular over at PCOSbites. It’s great if you are looking for something that isn’t the same ol’ pesto recipe, but full of nutrients while still tasting delicious. We think of it as the new “elderberry syrup” as an immune-boosting meal for our family.
We also love to add arugula baby leaves to our sun-dried tomato, goat cheese, and pine nut mini pizzas! The kids don’t bat an eye-lash at the greens on their personalized pizzas because these taste so good!
Mature leaves can also be cooked or sautéed much like you would cook collards. With a TBSP of sherry, soy sauce, minced garlic, and vegetable oil + 1/2 tsp of salt and granulated sugar you can have a quick healthy side dish to accompany your sun-dried tomato mozzarella chicken. YUM!
If you don’t plan on eating a salad and just want to move it out of your system to put something else in, simply clean harvested leaves with water and pat dry with paper towels and spread out on a dehydrator. Dehydrate at 110ºF for 6 hrs until it breaks crisp (no moisture left in leaves.) Do not crush leaves, but place in a glass jar with an oxygen absorber and put in your spice and seasoning cabinet. When a recipe calls for pepper or if you’re making a soup, simply add in your dried arugula. BAM! (As Emeril would say…) or YUMMO! (As Rachel Ray would say…) You will get a hint of that pepper flavor as well as all the amazing nutrients that this little power-packed leaf holds.
Tip: After you dehydrate your arugula, don’t crush the leaves. Store the leaves as one piece as much as possible. When you “crush” or break up the leaves, it releases the flavonoids and other beneficial nutrients. We want those to stay in tack until we are ready to consume it in our cooking, so I always encourage folks to hold off crushing your leaves for this reason. This is also why you may notice your home-grown herbs and spices have so much more flavor than the crushed and processed ones from the grocery store.
—Erin Castillo, Owner Grow Your Health Gardening and GYHG Seed Co.
Nutritional Benefits You’ll Get from Eating Arugula
So, we’ve covered how to use arugula. Let’s briefly touch on why you should be eating this green. According to the USDA, a half cup (approximately 10 grams) of raw arugula has about:
2.5 calories
0.4 gram carbohydrates
0.3 gram protein
0.1 gram fat
0.2 gram fiber
10.9 micrograms vitamin K (14 percent DV)
237 international units vitamin A (5 percent DV)
1.5 milligrams vitamin C (2 percent DV)
9.7 micrograms folate (2 percent DV)
16 milligrams calcium (2 percent DV)
In addition, this leafy green contains some iron, magnesium, phosphorus, potassium and choline. It also is rich in phytonutrients offering 1,424 mg of Beto-Carotene B
Did you know that one cup of Arugula can meet over a quarter of the daily recommended value of Vitamin K? Vitamin K is essential to blood clot formation and bone formation. Some researchers even believe that vitamin K may be a key factor in bone development, more so than calcium. I want my children to have strong bones as they grow and I encourage them to eat salads daily. One way to help provide their bodies with what they need is to mix in some arugula into their daily salad.
Tip: If you’re having difficulty getting your children to eat greens, involve them in the growing process. Give them a garden that is completely their own area to tend and help them grow plants from seed. As they feel more connected to their food, their natural curiosity will kick-in and they will willingly try the food they have patiently waited for to grow.
—Erin Castillo, Owner Grow Your Health Gardening and GYHG Seed Co.
How to Grow Arugula in a Hydroponic System
In this article, I’ll focus on growing it hydroponically, because that’s my preferred method of growing, but a lot of the same tips can be applied to growing in soil.
You can grow arugula in any hydroponic or aeroponic system. In a vertical garden growing system like the Tower Garden or Farm Stand, you’ll want to place this plant towards the top as you will most likely be harvesting from it continuously and keeping the plant size small.
Starting your arugula from seed: Choosing your arugula variety
If you’re growing in a hydroponic / aeroponic system, we strongly recommend you opt of seed that has already adapted to these growing conditions. Can seed from soil-grown parent plants grow hydroponically? Absolutely, but plants adapt epigenetically each growing season, so you’ll have a stronger healthier plant if you start out right with seed that has already adapted to the growing conditions you want to match. According to growers at the Seed Savers Exchange, seed DNA can hold 5+ years of growing seasons in which it can tap to survive and thrive. Choosing your seed stock source is more important than most realize.
Our arugula seed has been grown outdoors in the cool season of the Southeast in Zone 7 (not mentioning the zone here because it’s a perennial, but to help you get an idea of where the seed is grown so you can best match it to your own growing conditions.) GYHG Seed Co arugula seed can handle heat and humidity to a point before it bolts, but definitely plan on growing this during the cool season and start your seedlings 2 weeks before your last average frost date with the intention to move it outdoors as a transplant.
How many plants should you plant:
If you are wanting arugula on hand to pick fresh and mix into salads, I recommend planting four plants on a rotation (see below charts.) Place in upper level of Tower Garden or Farm Stand.
This is also a seed that you will want to plant on a continual basis on a four to five week cycle, so if you don’t have a Seed Starting Station set up already, you will want to read up about how to get one set up here. We recommend to plant four plants and keep them in your upper level of your Tower Garden or Farm Stand vertical garden growing system.
Week 1
Week 2
Week 3
Week 4
Week 5
Start 2 rockwool cubes
Nurture Week 1 seeds
Start 2 rockwool cubes
Nurture Week 3 seeds
Start 2 rockwool cubes
Transplant Week 1 Seedlings into TG
Transplant Week 3 Seedlings into TG
Harvest baby leaves
Harvest baby leaves
Copyright 2021 Grow Your Health Gardening
Week 6
Week 7
Week 8
Week 9
Week 10
Nurture Week 5 seeds
Start 2 rockwool cubes
Nurture Week 7 seeds
Start 2 rockwool cubes
Nurture Week 9 seeds
Pull Week 1 Plants. Transplant Week 5 Seedlings into TG
Pull Week 3 Plants. Transplant Week 7 Seedlings into TG
Continue pattern of pulling older plants and transplanting seedlings
Outdoor planting in a hydroponics system: If planting in the spring, you will want to start your seeds indoors or in a greenhouse so that your seedling start will be about two to three weeks old by the time your last spring frost date rolls around. If planting in the fall, you’ll want to factor in your harvest date range and count backwards 4-6 weeks from your frost date.
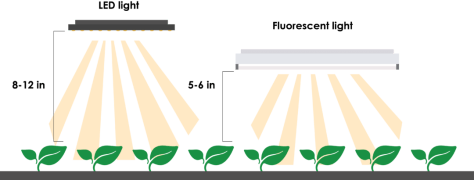
Arugula likes to live around 45° to 65°F (10-18°C). Plant arugula so that it comes to harvest in cool weather. It may fail to germinate if it’s too warm. Use a UV light system of some sort to grow your seedlings indoors keeping the light source 8″-12″ if LEDs and 5″-6″ away from seedlings if fluorescent lighting.
How many seeds to plant per rock wool: We recommend planting about 3-5 seeds per rock wool cube. Arugula typically germinates within 4-8 days. Be sure to use seed that is packaged for the current growing season as it will aide your ability to germinate the seeds. You can always remove any excess seedlings down to two plants as the plants mature if you are concerned about crowding. Our philosophy is start out with more and thin down as needed (but don’t toss those microgreens you pull — they are healthy for you to eat as micro-greens).
How much nutrients you should give your seedlings: Keep rockwool moist to the touch but not drenched. When you see a sprout, you can add a tsp of kelp to your water and water the young seedlings while giving them bright light from a grow light.
Thinning out your seedling starts: As the seeds germinate and grow, you will want to pull (or also called “thin out”) the weaker seedlings from the rock wool. (Remember, this is not a wasted plant — you can simply enjoy eating it as a microgreen.) You will want to leave leave 1-2 plants per rock wool to grow to maturity.
Transplanting your seedlings into your hydroponic system: Seedlings should be ready to transplant to your Tower Garden or hydroponic system about 2–3 weeks after sprouting. Seedlings plants should be about 1-2 inches tall, with 3-4 true leaves, before they are ready to leave the nest and enter into the hydroponic / aeroponic Tower Garden or other related system.
Finally, remember that arugula plantings should be staggered in roughly 2-3 week intervals in order to ensure a continuous harvest. If doing a spring planting, your growing season will be longer than a fall planting. You can extend your fall outdoor planting season by adding a professional grade heater to your Tower Garden reservoir keeping water temps in the 50-65º F range for the root zone to continue to uptake nutrients — just be sure to cover your Tower Garden outside with a weather protection blanket like this when freeze warnings appear.
Nutrient levels for optimal growth throughout the growing season for arugula:
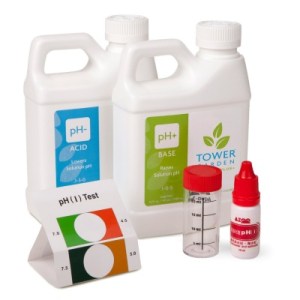
Nutrients: EC: 0.8 – 1.2 (We recommend Tower Tonic Mineral Blend™ for a well-balanced nutrient solution to feed your plants the proper N-K-P and micro-nutrients. You can purchase a 1 gallon set of Part A and Part B here.)
PPM: 560 – 840 (We recommend Tower Tonic Mineral Blend™ for a well-balanced nutrient solution to feed your plants the proper N-K-P and micro-nutrients. You can purchase a 1 gallon set of Part A and Part B here.)
pH: 5.5-6.2 (pH is essential to help the plant uptake nutrients.)
Light: (Amount of sun or light exposure throughout the day) Hydroponic arugula should get between 10 and 14 hours of light per day.
Arugula Temp Tips: (Root zone temp is essential to help the plant uptake nutrients)
Maximum Temp 75º Degrees Fahrenheit
Optimal Day CycleTemp 65º – 70º Fahrenheit
Optimal Night CycleTemp 60º – 65º Fahrenheit (Note: arugula can handle some frost so long as the root zone stays above 50ºF, so use a water heater in your reservoir if you want to try pushing the limits on it growing in the cold.)
Seed Storage 40º to 70º degrees Fahrenheit
Germination 60º to 75º degrees Fahrenheit
Companion plants:
SOIL Growers: Note — Do not grow in soil with pole beans or strawberries. Good companion plants are bush beans, celery, carrots, nasturtium, mint, dill, lettuce, cucumbers, onions, rosemary, potatoes
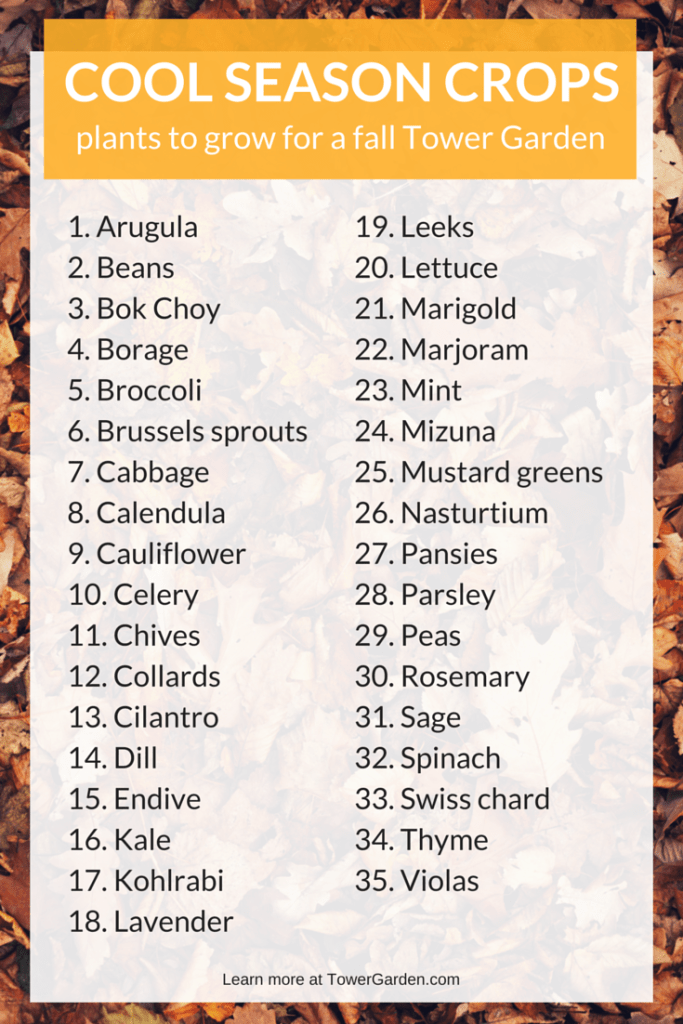
HYDROPONIC Growers: See first chart on Cool Season Plants on this page for reference of what grows well at similar PPM ranges and pH ranges in a hydroponic / aeroponic system.
Harvesting your arugula:
Make a note of how many days to maturation on the variety of arugula you are planting and mark your calendar or in your gardening journal. When your plants have reached the baby leaf stage, take a sanitized clean pair of hand trimmers or scissors and cut the outer leaves of your arugula plant, leaving at minimum three center leaves to continue to grow. The plant will continue to produce leaves for you but will become spicier as the plant matures. If you don’t want spicier leaves, simply pull the mature plant at 5-6 weeks of age and replace the plant with a new transplant (see chart above). Ideally, your arugula should be eaten within a few hours of harvest; however, if storage is necessary, the correct conditions to prolong shelf life are rapid cooling down to 34°F (we accomplish this with an ice bath of water) and then spin the leaves dry and place between dry paper towels in a sealed lettuce container with and 95-98% percent humidity.
How to store arugula that is not consumed right away:
If you have more arugula producing faster than you can eat, there are a couple of options: dehydrating or freezing. To dehydrate your arugula leaves, place on a dehydrator rack at 110º F for 6-24 hours. When the leaves are crunchy (you can break them in half), remove from the dehydrator and place in a tightly sealed pouch or Mason jar with an oxygen absorber. Dehydrated arugula can be used in soups and ground into a powder to add to pestos, soups, or even on meats for additional nutrients.
You can also freeze your crop in an air-tight bag or container and use in smoothies or defrost and use in recipes that may call for herbs.
Let us know if you have any questions in the comments below and happy growing!
July is just around the corner and it’s time to start thinking about the fall garden if you can believe it! Here in the SE, we are blessed to have two growing seasons if the timing is planned right.
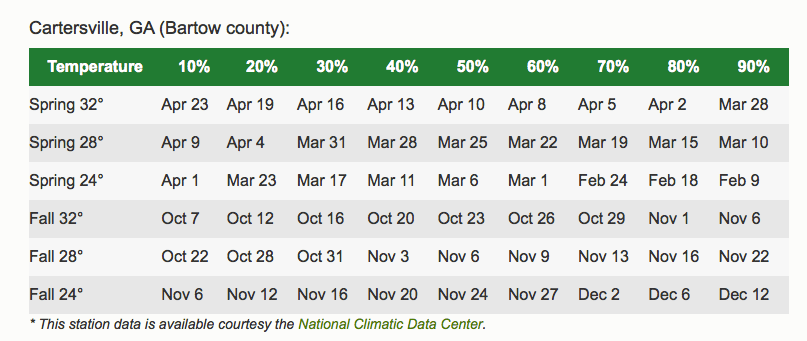
THINKING ABOUT WHAT YOU WILL PLANT FOR YOUR FALL CROP AND WHEN TO PLANT IT: All it takes to maximize your growing season is to know when your frost dates are for spring and fall. You’ll want to google what your last frost or freeze date is for your area. There is the traditional Farmer’s Almanac you can use, or I like Dave’s Garden’s resource as it gives a range of dates based on statistical data of when the first and last frost date has occurred. You’ll want to check this date each season prior to planning when to start your seed. I tend to lean on the 30-40% dates as my target date to plan off of and watch as the time gets closer. For our purposes, we will be looking at a freeze possibly happening between Oct 16-Oct 20, so I’ll split the difference and use Oct 18th as my first frost date and count back from this date based on the number of days (found on seed packet) for the plant will reach maturity and add in a 20 days for the plant to produce and bring a harvest in before a cold snap hits.
FINAL PLANTING OPPORTUNITY OF WARM SEASON PLANTS: If you are growing in the southeast (we are in Atlanta in planting zone 7B), plant the following vegetables no later than July 20th to allow time to mature before frost: tomatoes, okra, corn, pole beans, lima beans, cucumbers, squash and snap beans. If you have a sucker growing on one of your existing tomato plants, now is the time to start a new tomato plant which will continue to grow and fruit until hit with a freeze. Toward’s the end of July, start your final crop of snap beans as these can be planted by August 15 as seedlings into the garden for fall harvest.
Now is the time to also plant Zinnia seed. These heat loving annuals sprout in six days and bloom in a few weeks in the heat of the summer. Plant more Caladiums and Coleus as they’ll look better in the fall than the plants often started in May.
You can also plant another crop of Gladiolus for another flush of blooms for summer and into fall. Now is also a good time to divide Daffodils using caution not to cut into the bulbs as you dig into the ground.
AN EASY TASK TO LIMIT PESTS AND DISEASES: As you are harvesting your crops and cleaning off any dead leaves or removing leaves that have been attacked possibly by insect pressure, be sure to place these leaves in a 5 gallon tote to toss at the end of the day. You don’t want to leave dead leaves on the ground next to your growing plants as they will attract insects and promote disease which can transfer to your healthy growing plants. Keeping the ground around your plants tidy is a simple way to keep your plants thriving through the growing season.
CONTINUE TO FERTILIZE: For annuals, you’ll want to continue to fertilize at two-to-six-week intervals. When using granular products, make sure to water afterwards to encourage the nutrients to filter down to the root zone of your plants. For soil, you can use “organic” fertilizers like manure (cattle or chicken), blood meal, and/or fish emulsion. Dr. Tim Smalley, horticulture professor at the University of Georgia, has shown that composted hen litter continues to release food for four years after a 2-inch layer is worked into flower beds. Patio tomatoes (in a container) need to be fed consistently because constant watering rinses fertilizer out of the soil.
WATERING PLANTS: Be sure to keep tabs on watering soil-based plants. If you have had a good heavy rain, your watering tasks are probably eased for the day, but if it hasn’t rained, you’ll want to make sure you water deeply as needed to prevent drought stress. You can prevent root rot by watering deeply once per week and mixing plenty of organic amendments into the soil before planting and adding mulch to the soil surface beneath growing plants.
For plants growing in a hydroponic or aeroponic vertical gardening Tower Garden system, be sure to check your reservoirs at least twice a week as things warm up outside. If you’re growing tomatoes, tomatillos, eggplant, squash, kale, or beans, you’ll want to check your reservoir daily (or every other day) and top off the reservoir and add nutrients as these are “heavy feeders” meaning they take up a lot of nutrients when they are producing fruit, veggies, or legumes. Even though you are adding water to your system, it will be substantially less than the soil-based garden as hydroponic growing trials have been shown by NASA that these growing methods grow plants three times faster and produce 30% greater yields on average while using only 10% of the water a traditional soil-based garden would use to grow the same food.
INCREASE PLANT PRODUCTION: As your bush beans are growing, be sure to pick each day to encourage growth and plant output. Same is true with tomatoes… as they begin to ripen, pick often to encourage further fruit set.
PUMPKIN PLANTING TIME: Plant that big pumpkin for Halloween this month and give it plenty of room to sprawl. If you have a fisherman in your family, save a fish head and toss in to the hole before planting your pumpkin seedling into the ground.
JULY PLANTING CALENDAR: And finally, here is a quick cheat sheet you can print off and reference for what you can plant each week through either direct sowing (DS) into the ground or sowing indoors (SI).
If you have a specific question that you would like to ask, feel free to add in the comments below and we will be sure to answer them in the next Facebook Live Wednesday Walk Through Event mark your calendar for Wednesday, June 24 at 7 am Eastern (Atlanta, GA).
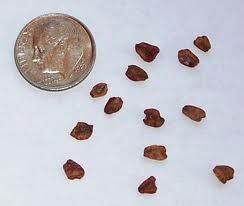
This Black Seeded Simpson seed was packaged in 2014 and we just did a germination test. We placed on a wet paper towel under bright light (lettuce needs light to germinate) at 70°F for 24 hours, covered in darkness overnight and found germination! Six-year-old lettuce seed properly stored germinated! It amazes me the life that is contained in one little seed.
Doing a quick germination test like this prior to ordering seed can save you the hassle and money of purchasing new seed. To calculate your germination rate, take the number of seeds that germinated (evident by the radical root emerging from the seed casing) and divide by the total number of seeds you put in your tray — that will give you the germination rate of your seed.
Because I use rockwool for hydroponics, we can use seeds from this germination test and transfer them into wetted rockwool and continue to grow them in ideal seed started conditions (warming mat to 70°F and bright lights). No seed is wasted! This also helps me conserve my rockwool.
To transfer germinated seeds, I take a tweezer with (the kind with a flat edge) and clean them with rubbing alcohol and finish off with a quick rinse of water. I gently pick up each germinate seed with the tweezer and drop it into the hole of my rockwool making sure to not plant the seed too deep. General rule of thumb whether sowing soil or into another planting medium like rock wool is to plant seed as deep as it is wide. I sometimes use the plastic tip of my nearby plant marker to slide it off of the tweezer tip as we don’t want to crush the seed embryo (still inside seed casing). I also plant two seeds per rockwool cube (in case one doesn’t make it for some reason.) I can always thin out to one plant as the seed grows into a seedling.
If you want tips on how long seeds can last when properly stored, check out our handy guide here.
Happy Growing!
— Erin
PS: Food for thought… Jesus said you need only to have faith in Him — even if it’s as small as a mustard seed… Think of how much life is just within a little tiny seed. The giant redwood tree, for example, comes from something that is so tiny… if God can create a magnificent and awe-inspiring tree, how much MORE amazing and beautiful are you who is made in His own image.
“He told them another parable: “The kingdom of heaven is like a mustard seed, which a man took and planted in his field. Though it is the smallest of all seeds, yet when it grows, it is the largest of garden plants and becomes a tree, so that the birds come and perch in its branches.””
Matthew 13:31-32 NIV https://www.bible.com/111/mat.13.31-32.niv
Now is the time to take inventory of what you will need for the outdoor growing season ahead using the hydroponic (technically aeroponic) Tower Garden by JuicePlus+. Below are 10 things you need to take inventory of before you start seeds for your spring crop outdoors. Feel free to reach out in the comments below if you have any questions! Happy Planning!
— Erin
Tower Garden Mineral Blend
Specially designed for Tower Garden’s soilless, aeroponic system, Tower Garden Mineral Blend supports superior plant growth and enhanced nutrition from your homegrown vegetables, herbs, fruits and flowers. We ship Mineral Blend with each Tower Garden Growing System. But we offer more for whenever your initial supply runs out. Ships quick leaving JuicePlus+ warehouse in 1 biz day.
Ensuring proper balance of your Tower Garden nutrient solution is simple with this easy-to-use pH kit. A pH kit comes with your Tower Garden Growing System. But there are replacement kits, should you need one including purchasing pH up and pH down separately. Ships quick leaving JuicePlus+ warehouse in 1 biz day.
Made from eco-friendly rock fiber, these soilless seed starter cubes provide plant roots with oxygen and consistent moisture, encouraging rapid, healthy growth. Ships quick leaving JuicePlus+ warehouse in 1 biz day.
Net pots hold rockwool cubes in Tower Garden’s growing ports. Though we ship net pots with every Tower Garden Growing System and can be cleaned and reused multiple times, you may need to purchase more after multiple growing seasons. Ideal for plants with larger roots. Ships quick leaving JuicePlus+ warehouse in 1 biz day.
Plant and harvest your Tower Garden quickly and easily with these reusable Net Pot alternatives. Just like Net Pots, Growing Clips hold plants in place while allowing their roots to grow freely inside your Tower Garden. The difference is that Growing Clips (and the plants they hold) may be removed with less effort. You would use these instead of Net Pots. Works fantastic on microgreen extension. Ships quick leaving JuicePlus+ warehouse in typically 1 biz day.
Note: Tower Garden Growing Clips are designed for leafy greens and herbs. They are not suitable for flowering plants with large root systems, such as tomatoes and squash. For these plants, you should use Net Pots instead.
Some of our favorite seed providers for you to consider:
Seeds Now — Pure NON-Genetically Modified seeds, 100% NON-Hybridized seeds, 100% Heirloom/Open-Pollinated seeds, 100% Raw & Un-treated seeds in smaller packaging so you don’t have to store as much. You can pay less for seed and get a greater variety of seed using this source. (One of our fav’s)
Baker Creek Heirloom Seeds — Read their commitment to quality non-patented seeds here. We love their catalog (best way to shop their seed collection so order one if you don’t have one) and uncommon varieties. This is part of what makes gardening so fun! Mansfield, MO, U.S.
Seed Saver Exchange — Heirloom seeds from Seed Savers Exchange. Buy rare, organic seeds and support our nonprofit mission to preserve garden diversity. Free catalog. Decorah, Iowa, U.S.
Extend your growing season (jumpstart it be 2-3 weeks in the spring and extend it 2-3 weeks in the fall) and protect your plants from overnight frosts in cooler months and midday heat stress in warmer months with this recyclable UV-resistant Weather Protection Blanket made from metalized HDPE. Has grommets for securing it to your Tower Garden. Ships quick leaving JuicePlus+ warehouse in typically 1 biz day.
Didn’t order a rolling base when you first purchased your Tower Garden and realize now that it would more convenient to have one, you can purchase any time. Tower Garden FLEX on a dolly is also an effective way to reduce the heat transferred from the ground in hot weather. Ships quick leaving JuicePlus+ warehouse in typically 1 biz day.


 This Black Seeded Simpson seed was packaged in 2014 and we just did a germination test. We placed on a wet paper towel under bright light (lettuce needs light to germinate) at 70°F for 24 hours, covered in darkness overnight and found germination! Six-year-old lettuce seed properly stored germinated! It amazes me the life that is contained in one little seed.