We have been making our own Sourdough Starter for some time now to use in making our own bread (and we use a Spelt Sourdough Starter in particular because Spelt is said to be easier on your digestion system. But that’s for another conversation.)
Exciting news (especially for any of your folks that like sustainable organic gardening)! There’s yet another use for our sourdough discard! Chemical-free, pesticide-free, and organic slug bait! Yes, you read that correctly. Sourdough starter discard can be used as an organic option for rounding up slugs and snails.
Recently, Oregon State University (OSU) researcher, Rory McDonnell, led a multi-institutional research collaboration and found that a simple mixture of flour, water and yeast (bread dough) attracts slugs and snails in droves.
McDonnell theorizes that it is the fermentation process that draws them in saying, “We gave them a choice of food and they consistently went for the bread dough. They really, really like it. They went bonkers for it. Bread dough outperformed everything (even better than beer).” In fact, in one instance, over 18,000 snails were trapped within 48-hours according to McDonnell! Research also revealed that it can be effective in the field in Oregon for at least 8 days if the bread dough is kept moist.
Don’t have sourdough starter discard? No problem! You can make your own slug and snail slurry any time using whatever flour you have on hand along with yeast and water. Here is the recipe McDonnell recommends:
500 g of All-Purpose Enriched Bleached Flour
500 mL of water
2 packets of Active Dry Yeast (0.25 oz packet size)
Note: You do not need to use any particular brand of flour or active dry yeast
Instructions: 1. Mix all three ingredients thoroughly until combined. (If you already have sourdough starter discard, simply feed your discard with equal amounts of water and flour to the weight of your discard and mix ingredients thoroughly.) 2. Apply dough directly to the ground leaving a little distance away from the plants you want to protect. Simply remove the slugs or snails as they arrive. 3. Alternatively, you can also sink a shallow container into the ground and add the bread dough / sourdough starter discard. If you add water to make it a bit more watery, they may simply drown and then you can toss the jar contents periodically, rinse out, and replace with fresh sourdough starter discard or bread dough.
McDonnell also suggests, “The dough works best when it is moist. If it dries out, it will not be as attractive, so in dry weather we stir the dough daily and then replace it if it starts to get dry.”
If you grow anything in the mint family, know that during wetter weather, snails and slugs will especially be attracted to these plants. Have a non-toxic slug or snail plan in place like bread dough.
Also, NASA spotted El Niño precursor from space (May 21, 2023) and says that in the Southern part of the United States we may see wetter weather more than usual. This is actually something I’ve been noticing in our own garden (and I’m totally enjoying this cooler spring) — the snails and slugs have been out in full-force.
I will be implementing this sustainable gardening practice bread dough tip from the OSU right away! Be sure to let us know in the comments below if you try it in your area and if it works for you.
PS: OSU has a slug portal (yes, I’m not making this up) if you want to learn more about the latest news on slug identification and management using sustainable practices. You can check that out here if you are interested. (Also great for any homeschoolers out there who want to learn more!) 😉
Yet another outbreak due to tainted lettuce salad in the first few months of 2022. At latest report, 17 have been sickened across 13 states and two unfortunate deaths in a recent listeria outbreak according to the U.S. Centers for Disease Control and Prevention (CDC).
The salads, which were recalled by Dole in December and are currently under an active investigation by the CDC, include a variety of different mixes. They were sold in either bags or plastic clamshell packaging, according to the agency, which said they include Caesar salads, mixed greens, and garden salads.
The salads that were tainted are sold under several different brand names such as Ahold, Dole, HEB, Kroger, Lidl, Little Salad Bar, Marketside, Naturally Better, Nature’s Promise, President’s Choice, and Simply Nature, the alert said.
The recalled salads have “Best if used by” dates between Nov. 30, 2021, and Jan. 9, 2022, the CDC said. They also have lot codes that start with the letters “B,” “N,” “W” or “Y.”
For those who suspect they may have the salad in their refrigerators, the CDC recommends to “throw them away or return them to where you bought them.” The agency further recommends that people clean their refrigerators, surfaces, or items that might have touched the recalled products as listeria can survive “in the refrigerator and can easily spread to other foods and surfaces.” If you suspect you have this in your refrigerator or have consumed this product, please reach out to the CDC immediately.
This is not the only incident. The CDC said that it is also investigating another listeria outbreak connected to Fresh Express packaged salads, which occurred in December of last year and led to 10 hospitalizations and one death. That recall includes use-by dates with the product codes Z324 through Z350. Affected brands include Bowl & Basket, Giant Eagle, Fresh Express, Marketside, O Organics, Little Salad Bar, Signature Farms, Simply Nature, Weis Fresh from the Field, and Wellsley Farms, said the agency.
According to the Mayo Clinic, a “listeria infection is a food borne bacterial illness that can be very serious for pregnant women, people older than 65 and people with weakened immune systems.” And that “healthy people rarely become ill from listeria infection, but the disease can be fatal to unborn babies, newborns and people with weakened immune systems.” Symptoms include fever, muscle aches, nausea, chills, diarrhea, while more serious symptoms can include stiff neck, headache, convulsions, and a loss of balance, the clinic’s website says. “Symptoms might begin a few days after you’ve eaten contaminated food, but it can take 30 days or more before the first signs and symptoms of infection begin.”
This is not the first time outbreaks that result in the loss of life have been cause by those eating bagged salad or greens purchased from big box retailers. In the busyness of life, we trade food security and nutrition for convenience.
I didn’t learn until about five years ago, that most of our lettuce comes from Salinas, California. For those of us living on the East Coast, that means our greens have to travel approximately 3,000 miles which takes on average about 10 days to go from field to our table. When you think about nutrients lost for every day post-harvest, we are simply eating old food.
Here’s the thing… it doesn’t need to be this way. With changing a few habits, we can have greens at home in a number of ways, but the easiest by far that I have found is growing greens in my hydroponic / aeroponic growing system, the Tower Garden. I can start seeds for greens every couple of weeks and have a constant supply of greens, right in my home, 365 days a year. And when I harvest the greens, I can simply go from my vertical garden growing system to my table within literally minutes with a quick wash and spin dry if I wanted to do so! (Normally I harvest my greens in the morning when they are at their peak nutrition and the chill them after cleaning the leaves and spinning the leaves dry before fixing a salad.)
I’ve heard it time and time again when people balk at the price of a hydroponic / aeroponic Tower Garden. I don’t blame them. I know I did the same thing at first. And then my husband had a heart attack and suddenly the price of that tool to grow food seemed to PALE in comparison to the medical bills that piled up and the new life of treatment we faced post-heart attack.
I remember, one of THE BEST decisions I made following his heart attack was to purchase three Tower Garden vertical garden growing systems (we got the three Family Pack). We opted for the payment plan and paid on them for only a year. We looked at it as if we were paying for insurance but instead investing in the health of our family. Boy were we right! Now, we are going into our fifth year of growing food in these full- paid-for vertical garden growing systems. They have easily paid for themselves over and again; I cannot begin to describe how many fresh greens we have eaten off of these Tower Gardens!
We learned in growing our own food hydroponically, that our Rainbow Swiss Chard roots were the same color as the stalks! How cool is that?!Bibb Lettuce greens growing on hydroponic Tower Garden.Spinach Leaf from spinach plant grown on the Tower Garden vertical garden hydroponic aeroponic growing system,Basil growing on indoor hydroponic Tower Garden growing system.
If you aren’t willing or able to invest in a growing system like this, at least start with something smaller, like an Aerogarden that can sit on your kitchen counter. There are outdoor options you can cover as well if you prefer that use soil, but I’ve found that using a growing system that circulates the same water and nutrients not only saves water, but it frees me up from having to babysit watering something growing in soil every day. I’m a busy homeschooling mom of five — I need things automated as much as possible. I simply add checking on the Towers 1 – 2x a week to my work flow at home and smile big when I have the food and herbs at my fingertips when it comes time to make dinner. You can learn more here if you’re interested or send us a message and we will reach out to you to answer any questions.
And if you’re buying salad kits…. Stop. Stop trading what seems to be a convenience for what you think is healthy. They are not healthy. You’re eating old food. Unless it says right on the packaging that it was grown locally, do not buy it. Grow it at home. And be careful of anything that had to be processed (ie: cut and assembled). You’re putting a lot of faith into someone else.
Learn how easy it is to grow your own greens at home. Let us help you on that path of discovery. Just ask in the comments below and we will be happy to answer any question or click on the pictures below which will take you to further information.
Both of these systems can grow food indoors. The Flex system on the right can ADD additional sections on top and grow higher (more food per square foot) with the proper pump. Be sure to reach out to us at hello@growyourhealthgardening and we’d be happy to answer any questions about growing food the EASY WAY hydroponically in a vertical garden like the Tower Garden growing system.
Full disclosure: I am a Tower Garden Rep (Erin Castillo). Helping families lead healthier lives using modern tools and hydroponic / aeroponic organic growing methods.
Learn how to grow your own arugula at home hydroponically / aeroponically from certified hydroponic grower, Erin Castillo of Grow Your Health Gardening and GYHG Seed Co.
Why you should be growing your own arugula instead of buying from the grocery store or Big-Box Retailer
You know how you go to a fancy restaurant and they bring you your salad course and before they leave your table they offer fresh pepper for your salad and with your permission proceed to grind cracked pepper onto your salad? Think of arugula as your cracked pepper of the salad world.
Why Grow Arugula and How To Use It
I wanted to feature Arugula, because I just don’t think people understand how versatile this plant truly is and that it is beneficial in so many ways. It is chalk-full of beneficial nutrients (which we will cover later in case you wanted to know) while also being low in calories.
It is ideal for new home gardeners in building confidence of gardening skills as it grows quickly from seed (aptly nicknamed “Salad Rocket” in some countries) and can begun to be harvested off of and tossed into salads with other greens when the leaves are still young and small at 2″-3″ in length. (Note: If you leave the center 3-4 leaves, it will continue to produce as a cut-and-come-again plant.) Arugula is often found in the produce aisle in salad greens mix and called “mesclun”.
Mature Full-Grown Leaves and How to Use Them
I as a mother of five know that life can get busy, so if you fall behind on harvesting leaves when small and the plant gets more mature, that’s okay! It will be “spicier” or “peppery” in taste as a mature plant. Take these 6″-8″ long leaves and slice them from tip to base into 1/4″ or thinner strips and sprinkle over your salad or mix in (think of it like your freshly ground peppercorn). Diced leaves can even be added to dishes that call for cilantro or parsley, or mixed into pastas, side dishes, put on top of sandwiches, in wraps and/or added to soups. Its flavor compliments goat cheese, balsamic vinaigrette, tomatoes, olive oil and garlic, making it perfect to blend into dips or spreads.
Arugula can also be added to your basil pesto as added flavor or if you like the peppery flavor, you can substitute arugula in place of basil and make an entire pesto out of arugula leaves. We like this happy medium of a pesto recipe in particular over at PCOSbites. It’s great if you are looking for something that isn’t the same ol’ pesto recipe, but full of nutrients while still tasting delicious. We think of it as the new “elderberry syrup” as an immune-boosting meal for our family.
We also love to add arugula baby leaves to our sun-dried tomato, goat cheese, and pine nut mini pizzas! The kids don’t bat an eye-lash at the greens on their personalized pizzas because these taste so good!
Mature leaves can also be cooked or sautéed much like you would cook collards. With a TBSP of sherry, soy sauce, minced garlic, and vegetable oil + 1/2 tsp of salt and granulated sugar you can have a quick healthy side dish to accompany your sun-dried tomato mozzarella chicken. YUM!
If you don’t plan on eating a salad and just want to move it out of your system to put something else in, simply clean harvested leaves with water and pat dry with paper towels and spread out on a dehydrator. Dehydrate at 110ºF for 6 hrs until it breaks crisp (no moisture left in leaves.) Do not crush leaves, but place in a glass jar with an oxygen absorber and put in your spice and seasoning cabinet. When a recipe calls for pepper or if you’re making a soup, simply add in your dried arugula. BAM! (As Emeril would say…) or YUMMO! (As Rachel Ray would say…) You will get a hint of that pepper flavor as well as all the amazing nutrients that this little power-packed leaf holds.
Tip: After you dehydrate your arugula, don’t crush the leaves. Store the leaves as one piece as much as possible. When you “crush” or break up the leaves, it releases the flavonoids and other beneficial nutrients. We want those to stay in tack until we are ready to consume it in our cooking, so I always encourage folks to hold off crushing your leaves for this reason. This is also why you may notice your home-grown herbs and spices have so much more flavor than the crushed and processed ones from the grocery store.
—Erin Castillo, Owner Grow Your Health Gardening and GYHG Seed Co.
Nutritional Benefits You’ll Get from Eating Arugula
So, we’ve covered how to use arugula. Let’s briefly touch on why you should be eating this green. According to the USDA, a half cup (approximately 10 grams) of raw arugula has about:
2.5 calories
0.4 gram carbohydrates
0.3 gram protein
0.1 gram fat
0.2 gram fiber
10.9 micrograms vitamin K (14 percent DV)
237 international units vitamin A (5 percent DV)
1.5 milligrams vitamin C (2 percent DV)
9.7 micrograms folate (2 percent DV)
16 milligrams calcium (2 percent DV)
In addition, this leafy green contains some iron, magnesium, phosphorus, potassium and choline. It also is rich in phytonutrients offering 1,424 mg of Beto-Carotene B
Did you know that one cup of Arugula can meet over a quarter of the daily recommended value of Vitamin K? Vitamin K is essential to blood clot formation and bone formation. Some researchers even believe that vitamin K may be a key factor in bone development, more so than calcium. I want my children to have strong bones as they grow and I encourage them to eat salads daily. One way to help provide their bodies with what they need is to mix in some arugula into their daily salad.
Tip: If you’re having difficulty getting your children to eat greens, involve them in the growing process. Give them a garden that is completely their own area to tend and help them grow plants from seed. As they feel more connected to their food, their natural curiosity will kick-in and they will willingly try the food they have patiently waited for to grow.
—Erin Castillo, Owner Grow Your Health Gardening and GYHG Seed Co.
How to Grow Arugula in a Hydroponic System
In this article, I’ll focus on growing it hydroponically, because that’s my preferred method of growing, but a lot of the same tips can be applied to growing in soil.
You can grow arugula in any hydroponic or aeroponic system. In a vertical garden growing system like the Tower Garden or Farm Stand, you’ll want to place this plant towards the top as you will most likely be harvesting from it continuously and keeping the plant size small.
Starting your arugula from seed: Choosing your arugula variety
If you’re growing in a hydroponic / aeroponic system, we strongly recommend you opt of seed that has already adapted to these growing conditions. Can seed from soil-grown parent plants grow hydroponically? Absolutely, but plants adapt epigenetically each growing season, so you’ll have a stronger healthier plant if you start out right with seed that has already adapted to the growing conditions you want to match. According to growers at the Seed Savers Exchange, seed DNA can hold 5+ years of growing seasons in which it can tap to survive and thrive. Choosing your seed stock source is more important than most realize.
Our arugula seed has been grown outdoors in the cool season of the Southeast in Zone 7 (not mentioning the zone here because it’s a perennial, but to help you get an idea of where the seed is grown so you can best match it to your own growing conditions.) GYHG Seed Co arugula seed can handle heat and humidity to a point before it bolts, but definitely plan on growing this during the cool season and start your seedlings 2 weeks before your last average frost date with the intention to move it outdoors as a transplant.
How many plants should you plant:
If you are wanting arugula on hand to pick fresh and mix into salads, I recommend planting four plants on a rotation (see below charts.) Place in upper level of Tower Garden or Farm Stand.
This is also a seed that you will want to plant on a continual basis on a four to five week cycle, so if you don’t have a Seed Starting Station set up already, you will want to read up about how to get one set up here. We recommend to plant four plants and keep them in your upper level of your Tower Garden or Farm Stand vertical garden growing system.
Week 1
Week 2
Week 3
Week 4
Week 5
Start 2 rockwool cubes
Nurture Week 1 seeds
Start 2 rockwool cubes
Nurture Week 3 seeds
Start 2 rockwool cubes
Transplant Week 1 Seedlings into TG
Transplant Week 3 Seedlings into TG
Harvest baby leaves
Harvest baby leaves
Copyright 2021 Grow Your Health Gardening
Week 6
Week 7
Week 8
Week 9
Week 10
Nurture Week 5 seeds
Start 2 rockwool cubes
Nurture Week 7 seeds
Start 2 rockwool cubes
Nurture Week 9 seeds
Pull Week 1 Plants. Transplant Week 5 Seedlings into TG
Pull Week 3 Plants. Transplant Week 7 Seedlings into TG
Continue pattern of pulling older plants and transplanting seedlings
Outdoor planting in a hydroponics system: If planting in the spring, you will want to start your seeds indoors or in a greenhouse so that your seedling start will be about two to three weeks old by the time your last spring frost date rolls around. If planting in the fall, you’ll want to factor in your harvest date range and count backwards 4-6 weeks from your frost date.
Arugula likes to live around 45° to 65°F (10-18°C). Plant arugula so that it comes to harvest in cool weather. It may fail to germinate if it’s too warm. Use a UV light system of some sort to grow your seedlings indoors keeping the light source 8″-12″ if LEDs and 5″-6″ away from seedlings if fluorescent lighting.
How many seeds to plant per rock wool: We recommend planting about 3-5 seeds per rock wool cube. Arugula typically germinates within 4-8 days. Be sure to use seed that is packaged for the current growing season as it will aide your ability to germinate the seeds. You can always remove any excess seedlings down to two plants as the plants mature if you are concerned about crowding. Our philosophy is start out with more and thin down as needed (but don’t toss those microgreens you pull — they are healthy for you to eat as micro-greens).
How much nutrients you should give your seedlings: Keep rockwool moist to the touch but not drenched. When you see a sprout, you can add a tsp of kelp to your water and water the young seedlings while giving them bright light from a grow light.
Thinning out your seedling starts: As the seeds germinate and grow, you will want to pull (or also called “thin out”) the weaker seedlings from the rock wool. (Remember, this is not a wasted plant — you can simply enjoy eating it as a microgreen.) You will want to leave leave 1-2 plants per rock wool to grow to maturity.
Transplanting your seedlings into your hydroponic system: Seedlings should be ready to transplant to your Tower Garden or hydroponic system about 2–3 weeks after sprouting. Seedlings plants should be about 1-2 inches tall, with 3-4 true leaves, before they are ready to leave the nest and enter into the hydroponic / aeroponic Tower Garden or other related system.
Finally, remember that arugula plantings should be staggered in roughly 2-3 week intervals in order to ensure a continuous harvest. If doing a spring planting, your growing season will be longer than a fall planting. You can extend your fall outdoor planting season by adding a professional grade heater to your Tower Garden reservoir keeping water temps in the 50-65º F range for the root zone to continue to uptake nutrients — just be sure to cover your Tower Garden outside with a weather protection blanket like this when freeze warnings appear.
Nutrient levels for optimal growth throughout the growing season for arugula:
Nutrients: EC: 0.8 – 1.2 (We recommend Tower Tonic Mineral Blend™ for a well-balanced nutrient solution to feed your plants the proper N-K-P and micro-nutrients. You can purchase a 1 gallon set of Part A and Part B here.)
PPM: 560 – 840 (We recommend Tower Tonic Mineral Blend™ for a well-balanced nutrient solution to feed your plants the proper N-K-P and micro-nutrients. You can purchase a 1 gallon set of Part A and Part B here.)
pH: 5.5-6.2 (pH is essential to help the plant uptake nutrients.)
Light: (Amount of sun or light exposure throughout the day) Hydroponic arugula should get between 10 and 14 hours of light per day.
Arugula Temp Tips: (Root zone temp is essential to help the plant uptake nutrients)
Maximum Temp 75º Degrees Fahrenheit
Optimal Day CycleTemp 65º – 70º Fahrenheit
Optimal Night CycleTemp 60º – 65º Fahrenheit (Note: arugula can handle some frost so long as the root zone stays above 50ºF, so use a water heater in your reservoir if you want to try pushing the limits on it growing in the cold.)
Seed Storage 40º to 70º degrees Fahrenheit
Germination 60º to 75º degrees Fahrenheit
Companion plants:
SOIL Growers: Note — Do not grow in soil with pole beans or strawberries. Good companion plants are bush beans, celery, carrots, nasturtium, mint, dill, lettuce, cucumbers, onions, rosemary, potatoes
HYDROPONIC Growers: See first chart on Cool Season Plants on this page for reference of what grows well at similar PPM ranges and pH ranges in a hydroponic / aeroponic system.
Harvesting your arugula:
Make a note of how many days to maturation on the variety of arugula you are planting and mark your calendar or in your gardening journal. When your plants have reached the baby leaf stage, take a sanitized clean pair of hand trimmers or scissors and cut the outer leaves of your arugula plant, leaving at minimum three center leaves to continue to grow. The plant will continue to produce leaves for you but will become spicier as the plant matures. If you don’t want spicier leaves, simply pull the mature plant at 5-6 weeks of age and replace the plant with a new transplant (see chart above). Ideally, your arugula should be eaten within a few hours of harvest; however, if storage is necessary, the correct conditions to prolong shelf life are rapid cooling down to 34°F (we accomplish this with an ice bath of water) and then spin the leaves dry and place between dry paper towels in a sealed lettuce container with and 95-98% percent humidity.
How to store arugula that is not consumed right away:
If you have more arugula producing faster than you can eat, there are a couple of options: dehydrating or freezing. To dehydrate your arugula leaves, place on a dehydrator rack at 110º F for 6-24 hours. When the leaves are crunchy (you can break them in half), remove from the dehydrator and place in a tightly sealed pouch or Mason jar with an oxygen absorber. Dehydrated arugula can be used in soups and ground into a powder to add to pestos, soups, or even on meats for additional nutrients.
You can also freeze your crop in an air-tight bag or container and use in smoothies or defrost and use in recipes that may call for herbs.
Let us know if you have any questions in the comments below and happy growing!
As committed Seed Stewards, we understand the importance of good quality seed, because strong seed means strong plants that can better fight-off pest pressure and diseases … and strong plants also mean the best nutrition possible for your body. It’s important to know where your seed comes from because the plant that seed came from has adapted to its growing environment — and if it’s different than your environment, that plant may struggle which means you struggle.
But it doesn’t have to be a struggle to grow your own food — in fact, we think it is FUN to be connected to your food from seed to harvest! Our seed for sale has been cultivated from seed and nurtured using organic growing methods on through to harvest by our family of seven. We take great pride in our seed stock knowing each generation of plants we grow only strengthens our exclusive line of seeds. We are thrilled we can now share our extra seeds with you!
We are unique in that we have thoughtfully chosen heirloom and open source varieties of vegetables, herbs, and greens (and sometimes extremely rare seed) and have grown these varieties out in one season adapting them to hydroponic, aeroponic, and aquaponic growing conditions in the Southeast region of the United States.
As a friend of GYHG and follower, enjoy today through November 14, 2021, 21% off your first seed order! Enter code: GYHG-LOVES-ME-21 when you check out.
Thanks and we hope that this year is the year you especially grow your health gardening!
There are several ways to extend your growing season when growing in a Tower Garden by Juice Plus+ FLEX outdoors. Consider this your friendly “heads-up”, so you’re ready when that first freeze warning comes and not left panicking about plants not making it through the night. Here are our Grow Your Health Gardening three strategies for managing the cold that will inevitably come…
Strategy #1: Weather Blanket + Water Heater
Okay y’all — you want to get NOW in order to extend your harvests another 4-6 weeks into the growing season this fall. With the pandemic still being an issue, everything is selling out early, so think ahead and get your weather blankets ordered now. Like today.
For those of you who need a little more info before deciding if a weather blanket is what you need or not, read on…
You’ve gone through the effort to plant a crop, the last thing you want to do is see it all come to an abrupt end the first time you get a cold frost at night. Enter the weather blanket. This light weight “blanket” protects your plants from frost. Even our warm season jalapeños lasted well into November last year here in Zone 7B when we covered the Tower Garden with weather blankets.
They’re made of a quality space-age metallic -type light weight material that holds in warmth and deflects the cold. Technically its made of UV-resistant blanket made from metalized HDPE. Think of it as thermal underwear for your plants.
I typically cover my plants early evening before temperatures drop before sunset. The weather blanket is extremely light weight, but even still, if I have larger plants towards the top of the tower that could get their leaves crushed, I’ll add a heavy clay pot to the top of the Tower and drape the Weather Blanket over the pot to take off any pressure on those upper level plants. Works like a charm. In the morning, when temps raise to around 60ºF, I’ll uncover the Towers and set the blankets to the side and replace them at evening if another Freeze Warning occurs. There will come a point where the day time temps are just too cold to grow outside, so bear in mind that these are not a year-round solution — they will simply extend your growing season by several weeks to a month (depending on what your weather patterns are in your growing region.)
Pictured above right: Tower Garden Weather Blankets covering plants on a Tower Garden vertical hydroponic aeroponic growing system.
The weather blankets are also weighted at the bottom and have grommets on the corners if you need to tie down and secure your crop. (In five growing seasons, I have never had to tie mine down here in Georgia, but if you live in a windy area or have a storm threatening, those grommets could come in handy for sure.) The grommets also enable you to suspend your blanket tied to poles or trees in the summer heat of positioned above the Tower Garden acting as a shade cloth of sorts for extreme heat waves that could damage plants. The weather blanket is in the shape of a circle so it also fits perfectly over a Tower Garden with enough to reach the ground in case any plants spill over into that region.
And remember, you are not limited to using the weather blanket solely on the hydroponic Tower Garden. You can also use these elsewhere in the garden. For example, I used one to protect my large Gardenia Bush from a freeze and it didn’t get any damage one cold winter, because I used the blanket.
My weather blankets come out in early spring and late fall/autumn and are wonderful workhorses in my garden. When not in use I simply roll them up (like you would a sleeping bag) and wrap a bungy cord around it and store it on my shelf in the garage until needed. I’m going on my fourth season with my weather blankets and they’re still going strong. But if you have any additional doubts, Tower Garden offers an easy one-year limited warranty.
If you don’t know your first frost date, I like this one on Dave’s Garden. Begin by entering your zip code and then you will get several reference charts based on weather stations that are near your zip code along with probability percentages of when the freeze or frost will occur based on cumulative data. Here’s an example of the results I get in my growing region…
For those of you in Zone 7 or higher, here’s a friendly countdown of how many days you have left to grow in this region (think cool season crops) before possible frost hits.
2020-10-24T19:44:00
days
hours minutes seconds
until
Days left in Zone 7 Growing Season
So to sum up, grab your Weather Blanket now. It’s a tool that will allow you to keep growing food on your Tower Garden beyond the date listed above.
And don’t forget about your water temp… Even cool season plants have a threshold with how cold those roots will go and things still grow, so you may want to order a water heater before that first frost date as well. It’s best if you keep your root zone around 65ºF or warmer and as temps drop, a water heater will keep your cool plants happy. This is the one that I use… I got mine off of Amazon for $24 (free ship with Prime).
In my first growing season I used a glass-based aquarium heater and by December, I remember going to check on my plants outside and a snow had come and it had shattered — the glass heater just couldn’t keep up and it made it tricky to clean all that glass out of my reservoir. (If you can believe it, my tomatoes were still fruiting that year until that snow came thanks to the water heater!) I also like this one shown above, because it is designed for up to a 60 gallon system. Even though the Tower Garden has a 25 gallon reservoir, for a few extra dollars I have a waterheater that can handle the rigor that outdoor temps throw my way. Remember, it’s not going to make the water into a sauna — it’s designed to warm temps up to a point. There will be a threshold where your outdoor growing environment temps may exceed what even this water can handle. I typically use it to extend the season another month or two here in Zone 7 and then around the end of November, I pull my Towers inside my garage and attach their Grow Lights. I have a water heater for each of my Tower Gardens that move into our garage as a way to keep water warmer as the garage floor and ambient temp gets colder than the rest of our house. (Another quick tip to keep water temps in the right zone… I keep all my indoor Tower Gardens on a rolling dolly so it’s not sitting directly on a cold concrete floor in the garage.)
Strategy #2: Dolly + Garage + Water Heater
And for those of you who have your sunny patch near your garage, you could also forgo the Weather Blanket and just do a rolling cart base and roll it into your garage before the sun sets and roll it out in the morning when temps are above 60ºF. The one thing to keep in mind with this option are your existing cords that run your pump. They will need to be out of the way so that you do not jar your Tower Garden when rolling it in and out of the garage. Rolling over the cord creating a jaring effect could cause damage to plants that are growing in the system — for a rolling dolly method to work, you need a smooth glide in and out of the garage. The wheels on the Tower Garden custom-fitted base are definitely able to handle the weight of the Tower Garden and move the tower with ease. I also like how on this rolling cart it custom fits the base of the Tower Garden and the wheels can lock the cart in place. These ship for $90 (price of shipping included in price, tax additional).
I’ve also seen some growers use this dolly off of Amazon for $37 which is cheaper, but it doesn’t have the lip and custom fit like the Tower Garden dolly, so bear that in mind when choosing your options. I can not vouch for if this would be tippy or not — just sharing another cheaper option in case others are looking for a cheaper option. Remember, cheaper does not always equate to better. I DO LIKE the ability to move my Tower Garden as needed indoors and I like having it up off the ground — especially cold cement in a garage. Whatever you choose for a dolly, just make sure it has a flat surface. The weight of the water in the reservoir needs a flat surface beneath it to support the weight. Any uneven stressors beneath your reservoir can put pressure on your reservoir and cause it to crack for the weight of the water and plants above so I can’t stress this enough — keep a flat base under the entire reservoir and grow system. Also make sure your wheels on your dolly lock. You don’t want any run-away Tower Gardens rolling down the driveway. 😉
For those of you in colder regions that get snow and don’t want to mess with a Weather Blanket, you may want to find your frost date and prepare to clean your Tower Garden shortly after that date and then move your Tower Garden inside and put a set of lights on it. They are currently selling a lot of lights right now, so order them even if it says it is back ordered and you’ll be next in line for getting them as soon as they come off the production line. I recently had a customer order a set and they were only on backorder for a week. With that said though… order early to ensure availability when you really need it. The Grow Lights work on both the FLEX and HOME systems and come with a built-in timer where you can “set it and forget it” to come on and off automatically (remember, price listed on Grow Light ordering page includes shipping, but not tax).
I like how these lights adjust to move in closer to younger plants and move out further away from plants as they mature. Some folks do have light sensitivity to these bright grow lights, so be sure to consider that when placing your Tower Garden in your home.
So there you have it — three strategies to extend your growing season using the Tower Garden hydroponic / aeroponic growing system. Remember, once you have any of the above tools you can grow, and grow, and grow food! That means food security for you and your family… that means clean eating with no chemicals sprayed on your food to ripen them early or kill pests… and that means the best nutrients for your body because you are picking the plant when it is at it’s peak and it’s going straight to your table to enjoy.
Have a question on how to make the most of your growing season? Leave a comment below and we will help in any way we can… in the meantime, Happy Growing (and make a plan now to order what you need before the rush hits!)
July is just around the corner and it’s time to start thinking about the fall garden if you can believe it! Here in the SE, we are blessed to have two growing seasons if the timing is planned right.
THINKING ABOUT WHAT YOU WILL PLANT FOR YOUR FALL CROP AND WHEN TO PLANT IT: All it takes to maximize your growing season is to know when your frost dates are for spring and fall. You’ll want to google what your last frost or freeze date is for your area. There is the traditional Farmer’s Almanac you can use, or I like Dave’s Garden’s resource as it gives a range of dates based on statistical data of when the first and last frost date has occurred. You’ll want to check this date each season prior to planning when to start your seed. I tend to lean on the 30-40% dates as my target date to plan off of and watch as the time gets closer. For our purposes, we will be looking at a freeze possibly happening between Oct 16-Oct 20, so I’ll split the difference and use Oct 18th as my first frost date and count back from this date based on the number of days (found on seed packet) for the plant will reach maturity and add in a 20 days for the plant to produce and bring a harvest in before a cold snap hits.
FINAL PLANTING OPPORTUNITY OF WARM SEASON PLANTS: If you are growing in the southeast (we are in Atlanta in planting zone 7B), plant the following vegetables no later than July 20th to allow time to mature before frost: tomatoes, okra, corn, pole beans, lima beans, cucumbers, squash and snap beans. If you have a sucker growing on one of your existing tomato plants, now is the time to start a new tomato plant which will continue to grow and fruit until hit with a freeze. Toward’s the end of July, start your final crop of snap beans as these can be planted by August 15 as seedlings into the garden for fall harvest.
Now is the time to also plant Zinnia seed. These heat loving annuals sprout in six days and bloom in a few weeks in the heat of the summer. Plant more Caladiums and Coleus as they’ll look better in the fall than the plants often started in May.
You can also plant another crop of Gladiolus for another flush of blooms for summer and into fall. Now is also a good time to divide Daffodils using caution not to cut into the bulbs as you dig into the ground.
AN EASY TASK TO LIMIT PESTS AND DISEASES: As you are harvesting your crops and cleaning off any dead leaves or removing leaves that have been attacked possibly by insect pressure, be sure to place these leaves in a 5 gallon tote to toss at the end of the day. You don’t want to leave dead leaves on the ground next to your growing plants as they will attract insects and promote disease which can transfer to your healthy growing plants. Keeping the ground around your plants tidy is a simple way to keep your plants thriving through the growing season.
CONTINUE TO FERTILIZE: For annuals, you’ll want to continue to fertilize at two-to-six-week intervals. When using granular products, make sure to water afterwards to encourage the nutrients to filter down to the root zone of your plants. For soil, you can use “organic” fertilizers like manure (cattle or chicken), blood meal, and/or fish emulsion. Dr. Tim Smalley, horticulture professor at the University of Georgia, has shown that composted hen litter continues to release food for four years after a 2-inch layer is worked into flower beds. Patio tomatoes (in a container) need to be fed consistently because constant watering rinses fertilizer out of the soil.
WATERING PLANTS: Be sure to keep tabs on watering soil-based plants. If you have had a good heavy rain, your watering tasks are probably eased for the day, but if it hasn’t rained, you’ll want to make sure you water deeply as needed to prevent drought stress. You can prevent root rot by watering deeply once per week and mixing plenty of organic amendments into the soil before planting and adding mulch to the soil surface beneath growing plants.
For plants growing in a hydroponic or aeroponic vertical gardening Tower Garden system, be sure to check your reservoirs at least twice a week as things warm up outside. If you’re growing tomatoes, tomatillos, eggplant, squash, kale, or beans, you’ll want to check your reservoir daily (or every other day) and top off the reservoir and add nutrients as these are “heavy feeders” meaning they take up a lot of nutrients when they are producing fruit, veggies, or legumes. Even though you are adding water to your system, it will be substantially less than the soil-based garden as hydroponic growing trials have been shown by NASA that these growing methods grow plants three times faster and produce 30% greater yields on average while using only 10% of the water a traditional soil-based garden would use to grow the same food.
INCREASE PLANT PRODUCTION: As your bush beans are growing, be sure to pick each day to encourage growth and plant output. Same is true with tomatoes… as they begin to ripen, pick often to encourage further fruit set.
PUMPKIN PLANTING TIME: Plant that big pumpkin for Halloween this month and give it plenty of room to sprawl. If you have a fisherman in your family, save a fish head and toss in to the hole before planting your pumpkin seedling into the ground.
JULY PLANTING CALENDAR: And finally, here is a quick cheat sheet you can print off and reference for what you can plant each week through either direct sowing (DS) into the ground or sowing indoors (SI).
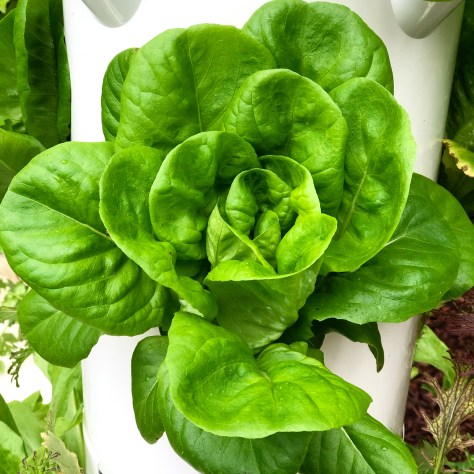
Whether it’s on a sandwich or in a salad, the refreshing crunch of lettuce is unmistakable. And there’s nothing quite like walking over to your Tower Garden and harvesting a crisp leaf to munch on.
Lettuce is a great starter plant for those new to gardening because it’s:
Fast-growing, and can be ready to harvest in as little as 3 weeks.
But first, before we dive in… it’s important to know WHY we need to grow our own lettuce. So many consumers blindly are trusting the food system and don’t realize that our current mass-produced lettuce is picked before it’s prime, often travels many food miles to the consumer, and the lettuce food system has had 46 outbreaks nationally between the years of 2006-2019 (and most of those cases have happened in recent years!)
Dangers of Store-Bought Lettuce
Let’s first look at if organic lettuce can really be trusted… According to Consumer Reports, 72 percent of Americans try to avoid GMOs when they shop. And more than half seek out the “organic” label. But is organic lettuce really pesticide-free? Just because it’s organic, doesn’t mean it’s pesticide free… Despite being natural, spinosad, pyrethrin, azadirachtin, and other approved ingredients can still be harmful. (They are toxic pesticides, after all.) And in some cases, farmers must spray greater volumes of natural solutions because they aren’t as effective as their non-organic counterparts. In fact, up to 20 percent of organic lettuce may contain pesticide residue. And as though that weren’t enough, one study found that organic produce is more likely to play host to pathogens, such as E. coli and Salmonella. This is likely because it’s grown with organic fertilizers (e.g., manure and compost).
And that doesn’t even account for what is used as irrigation to grow the lettuce. Recent outbreaks were said to occur because of feed lots up stream tainting the irrigation supply. Hmmm….
Did you know that from 2006 to 2019, leafy greens like Romaine, Spinach and bags of Spring Mix from Salinas, CA and Phoenix, AZ accounted for at least 46 national outbreaks of E. coli. Check out this article and news report. (You may be more at risk of you’re purchasing a salad kit? The last outbreak sickened 11 people in Washington State. As of December 2019, there were two simutaneous outbreaks. “The FDA is investigating two other E. coli outbreaks, each caused by strains that are different from each other and different from the larger outbreak.” See report here.)
“Fresh-picked salad greens can have a higher nutritional value than store-bought greens. The flavor of homegrown salad greens is also noticeably better, as most kitchen gardeners will affirm. This is due to the extreme freshness of your salad, when you can use the instant “pick and plate” approach to preparation. Once you taste salad greens straight from the garden, you’ll be spoiled for life.
But arguably the greatest benefit is that of human health. In recent decades, there has been an increase in the percentage of foodborne illnesses related to produce, and greens have been one of the biggest culprits. This is mainly due to the soft leaves of the greens, which retain any germs they come in contact with. The CDC estimates that roughly 22 percent of all foodborne illness is caused by leafy greens. This has grown from less than one percent 40 years ago. This may be the best reason to grow your own leafy greens: while store-bought produce must be thoroughly washed to reduce the risk of illness, you can be sure that greens grown at home are much safer.” — Fix.com
The seriousness of these E. coli outbreaks have not only health impacts, but financial ones as well. According to Marler Clark, a law firm reprenting 28 victims from just one ecoli incident, said “Illness typically lasts from 1 to 12 days; however, E. coli patients who develop hemolytic uremic syndrome (HUS), a complication of E. coli infection, can remain hospitalized for months. They often require kidney dialysis and extensive supportive care. The cost of hospitalization for an E. coli case can range from several hundred dollars to tens or even hundreds of thousands of dollars.”
Store Bought Lettuce Food Miles and Nutritional Value
The other factor to consider is how far your lettuce has had to travel to get to your plate. Food miles are the distance food travels from where it is grown to where it is ultimately purchased or consumed by the end user. The term, “food miles” was originally penned from a study in Iowa that focused on how far food had to travel.In 2011, lettuce was grown on 206,000 acres in California (most coming from Salinas, CA), which represented 73% of the total U.S. acreage (Source: Lettuce_Production_CA). If trucks were to drive a straight line (which in reality they don’t — they make pit-stops at processing centers and go to distribution centers before traveling to our local grocery store), lettuce harvested in Salinas, CA must travel a minimum of 3,000 miles to Atlanta, GA and is at least 4-5 days old by the time it reaches our grocery store. It’s estimated that it take an average of 10 days to go from farm to our plate! Are you even getting any nutritional value from eating it at this point? We’ll explore that in a minute…
One thing to note, since the 2019 E Coli outbreaks, the lettuce industry has incorporated a standard of placing labels on packages of romaine to indicate where the lettuce originated from so that the CDC can better track down the source of contamination. (Yes, I’m trying to shake you out of denial — it’s really that bad.)
The other factor at play with store-bought lettuce is the depletion of nutrients from the time the lettuce is harvested to the time it reaches our plate. Like mentioned earlier, it takes upwards of 10 days from farm to plate in our traditional food system. Did you know that the nutritional value found in the plant actually starts to deteriorate within the first day or two of harvesting? University of California studies show that vegetables can lose 15 to 55 percent of vitamin C, for instance, within a week. And some spinach, for example, can lose 90 percent within the first 24 hours after harvest!
Here are our tips for growing lettuce with the hydroponic Tower Garden system.
Best Growing Conditions for Lettuce
Of the many varieties of leaf and head lettuce, most prefer full sun and temperatures between 45–80˚, making lettuce a good cool season crop. Lettuce can withstand light frosts. But in hot weather, it will easily bolt (i.e., quickly grow vertically, flower and produce seeds)—and this process typically makes lettuce bitter. So if you grow lettuce in warmer conditions, plant it in partial shade or grow heat-tolerant varieties, like these:
There are five distinct types of lettuce: Loose-Leaf (45-60 days), Cos or Romaine (~70 days), Crisphead (75+ days), French (50-75 days), and Butterhead (55-75 days). With a variety of colors, shapes and flavors available, plant several types of lettuce for tasty and interesting salads. Keep in mind, all varieties of lettuce grow very well indoors with grow lights.
If you want fresh lettuce every day for salads or other dishes, we suggest growing approximately 2-3 heads of lettuce per person. The cool thing about the Tower Garden system is you can grow in up to 28 ports (base Tower Garden with one extension) in less than a 2.5′ x 2.5′ space. That means in the corner of your kitchen or dining room or on your back deck, you can have instant access to your greens any time and harvest Tower to table within a matter if minutes — not hours — not days — MINUTES! This means you and your family will get optimal nutritional value from each plant because it is being harvested at it’s peak and consumed right away.
For leaf lettuces, plant 2–4 seeds per rock wool cube. And for head lettuces, plant only 1 seed per cube. Lettuce seeds need light to germinate and usually germinate within 1–2 weeks.
Keep under bright lights and use a warming pad (we like this one). Can’t stress enough how much a warming pad and a good full-spectrum LED grow light will help your success rate.
Seedlings should be ready to transplant to your Tower Garden 10–14 days after sprouting, or whenever they have at least 2–3 leaves and a visible root structure. When transplanting, keep in mind that lettuce is a good crop to plant near the top of your Tower Garden.
Once you’ve transplanted lettuce into your Tower Garden, keep the pH between 5.6-6.2 as this will help the plant uptake available nutrients in your water promoting growth. Using the Tower Garden Nutrient Solution, keep the PPM range between 560-840 or an EC of 0.8-1.2 for ideal continuous growth. Ten to twelve hours of light will be sufficient. Check the back of your seed packet for maturation as it varies by lettuce type and variety (typically between 30-85 days). Also, some lettuces can be cut and come again meaning if you cut about 2″ from the base of the plant, it will regrow new leaves and thereby extending your harvest.
Download our lettuce cheat sheet that can be sliced down and put into a standard ziplock sandwich bag and used for seed storage and/or as a growing journal for what happened with your crop (we put ours on a clipboard. | download PDF |
Tower Tip: For step-by-step instructions on starting seeds and transplanting seedlings, reference page 7 of the Tower Garden Growing Guide (PDF).
Common Lettuce Pests and Disease
Growing lettuce with Tower Garden decreases the chance of pests and plant diseases. But just in case, here are some potential problems:
Aphids are small insects that typically feed on young plant growth, causing it to appear puckered or deformed.
Cabbage loopers are green caterpillars that feed on the underside of lower leaves and in the center of the head of lettuce.
Cucumber beetles are yellow-orange beetles with black markings that sometimes feed on lettuce seedlings. Take care not to confuse these with ladybugs.
Botrytis, a gray-brown fuzzy growth, thrives in cool environments and can appear on plant debris that has fallen from the plant.
Downy mildew looks like fine white cotton or frosting and often infects lower plant leaves first. It can spread rapidly and kill plants in cool conditions.
Powdery mildew forms a white-gray powdery growth, usually on the upper surfaces of leaves. You’re most likely to see this common disease in late summer.
Tower Tip: Lettuce doesn’t typically suffer with aphids, especially if you’re interplanting basil at the same time (it is a deterrent to aphids.) Learn how you can naturally beat bad bugs and prevent plant diseases.
How to Harvest Lettuce
Since they grow so quickly, lettuces will be ready to harvest within a few weeks after planting. You can harvest lettuce in 2 ways:
Whole head. Remove the entire plant and net pot from your Tower Garden, or cut all the leaves off at the base of the plant. If you choose this method, be sure to have replacement seedlings ready.
Individual leaf. This technique keeps the plant alive and encourages continued production. When there are plenty of mature leaves present:
Harvest only a few leaves at a time, from the bottom of the plant upward.
Allow 2–3 leaves to remain so the plant may keep growing.
Repeat every 2–3 days until the plant bolts, or begins flowering.
After bolting, replace the plant with a fresh seedling.
We also have a handy resource that you can print off and cut down and slide into any sandwich-size Ziplock bag and use to store your seeds (limits oxygen and moisture which can be harmful to seed saving. We also print an extra sheet for our garden journal to keep records of how our crop performed so we can learn and remember what worked for the following year.
My father loved a well-manicured lawn (and still does) and we had an acre of it. (I jokingly called it a golf-course.) The dandelion was a weed to him and it was engrained in me from a young age that dandelion that had gone to seed were not to be blown for wishes. In my father’s defense, if we are to look at what a weed is, the definition states that “a wild plant growing where it is not wanted and in competition with cultivated plants.” So, in his situation, it wasn’t wanted in that space for his intended purpose. But if you grow it intentionally to use medicinally and for improving your health, we’ll then it wouldn’t be a weed, would it! In fact, I think the dandelion should return to it’s rightful status to be known as an herb — not a weed — and grown intentionally. Here’s why…
DANDELION GREENS ARE CHOCK-FULL OF NUTRIENTS
My mother shared with me recently that as she was growing up on the farm, my grandmother would go out in early spring and collect dandelion leaves to eat when fresh greens were scarce and the garden wasn’t producing yet. My grandmother was an expert in preparedness having lived through the Great Depression as a child and every year canned hundreds of fruits and veggies to use throughout the winter. The dandelion in spring was a source of vitamins A, C, K, and E, for her along with folate and small amounts of other B vitamins. The leaves also have a substantial amount of minerals, including iron, calcium, magnesium and potassium. Picking them in early spring as she did also meant the leaves would be smaller and less bitter.
DANDELION GREENS ARE RICH IN THE PREBIOTIC INULIN
Dandelion greens are also rich in a particular prebiotic fiber called inulin. David Perlmutter, M.D. who is an expert in the human microbiome, a board-certified neurologist, Fellow of the American College of Nutrition, America’s brain-health expert and #1 New York Times best-selling author has this to say about dandelions:
“Inulin, also found in foods like chicory root, Mexican yam, and Jerusalem artichoke, enhances the gut’s production of friendly bacteria like the bifidobacteria group. Boosting bifidobacteria has a number of benefits including helping to reduce the population of potentially damaging bacteria, enhancing bowel movements, and actually helping boost immune function. And new research demonstrates that higher levels of bifidobacteria may reduce colonic enzymes that may be involved in enhancing the carcinogenic effect of certain chemicals.” —David Perlmutter, M.D.
The dandelion belongs to one of the largest plant families — the sunflower. There are more than 20,000 species within this plant family, including daisies and thistles. Botanists consider dandelions to be herbs and typically use the leaves, stem, flower, and root of the dandelion for medicinal purposes.
Flückiger and Hanbury in Pharmacographia, say that the name was conferred by Wilhelm, a surgeon, who was so much impressed by the virtues of the plant that he likened it to Dens leonis. In the Ortus Sanitatis, 1485, under ‘Dens Leonis,’ there is a monograph of half a page (unaccompanied by any illustration) which concludes: ‘The Herb was much employed by Master Wilhelmus, a surgeon, who on account of its virtues, likened it to “eynem lewen zan, genannt zu latin Dens leonis” (a lion’s tooth, called in Latin Dens leonis).’ — Botanical.com
A DIURETIC FOR DEALING WITH EDEMA
The root of the dandelion can be dried and chopped up to make Dandelion Tea. It acts as a diuretic, helping those with edema. Diuretic, tonic and slightly aperient. It is a general stimulant to the system, but especially to the urinary organs, and is chiefly used in kidney and liver disorders. According to a 2009 study published in the Journal of Alternative and Complementary Medicine, participants showed a significant increase in frequency of urination after the first two doses of Dandelion tea. Water weight, and subsequent bloating went down. Cautionary Note: “Before you begin to use dandelion tea medicinally, you may want to discuss it with your doctor – especially if you’re pregnant or have an irritable bowel,” warns Dr. Manglani.
AIDS IN DIGESTION & HELPS TO COMBAT UTI’S (UNIARY TRACT INFECTIONS)
It can also aid stomach irritation and aid in digestion. “Dandelion tea can have many positive effects on your digestive system. It improves appetite and soothes digestive ailments,” says Dr. Ritika Samaddar, Head of Dietetics at the Max Super Speciality Hospital. “According to various studies, dandelions aid our digestive system by maintaining the proper flow of bile. Dandelion tea helps with mineral absorption and soothes the stomach lining,” says Dr. Manoj K. Ahuja, Fortis Hospitals.
LOWERS BLOOD SUGAR
Various studies have shown that dandelion tea lowers levels of blood sugar and can in turn treat diabetes. It removes excess sugar that is stored in the body due to its diuretic properties and helps in stimulating the production of insulin from the pancreas. It is a great way to fight diabetes naturally,” adds Dr. Manglani.
CANCER-FIGHTING PROPERTIES
And lastly on the topic of dandelion tea… according to Dr. Sharma, dandelion tea contains anti-cancerous properties. A study conducted in 2011 by the Department of Chemistry and Biochemistry at the University of Windsor in Canada found that dandelion root tea was effective in killing different types of cancer as a result of its free radical-fighting abilities.
If you are growing your own dandelions for harvesting (recommended vs. risking a plant that may have been sprayed or encounter animal feces — I know, ewwwe), make sure your plant is two years old and the roots about 1/2″ thick. You’ll want to harvest around February/March when the the Inulin (a sort of sugar which replaces starch in many of the Dandelion family, Compositae) contains about 25 per cent insoluble Inulin. If growing for root production, I recommend planting in a loose soil rich in compost. Be sure to keep heads of dandelions trimmed so they don’t propagate and frustrate your neighbor’s lawn efforts.
SUPPORTS LIVER HEALTH & MAY HELP WOMEN WITH PCOS A study from 2010 showed that dandelion had a favorable affect choleretic (choleretics are substances that increase the volume of secretion of bile from the liver as well as the amount of solids secreted), anti rheumatic (agents used in the therapy of inflammatory arthritis, predominantly rheumatoid arthritis, but also idiopathic juvenile arthritis, psoriatic arthritis, ankylosing spondylitis and others) and diuretin (increased urination as a diarrhetic) properties. They examined the effects of dandelion consumption in rabbits and found that dandelion root and leaf could help lower cholesterol in animals on a high-cholesterol diet. Another study in mice found that dandelion consumption reduced total cholesterol and levels of fat in the liver. Mice that were on a high-fat-diet supplemented by dandelion leaf extract dramatically reduced hepatic lipid accumulation compared to mice only receiving a high-fat-diet alone.The researchers concluded that dandelion might one day help treat obesity-related nonalcoholic fatty liver disease affecting 15 percent to 55 percent of women with Polycystic Ovarian Syndrome (PCOS).
My hope is that this gives a little bit broader insight into the dandelion and I hope that you consider growing it as a green to add to your salads when the leaves are small and if you have the ability to keep up on the bloom cycles, grow it for two years and harvest the roots to make your own dandelion tea. There are also several brands that carry Dandelion Tea — check your local health food store. I like to fix mine with a little slice of ginger and a dash of local honey. I am getting to the point where I actually prefer it over coffee (gasp)!
Let me know what you think if you try growing it or try dandelion tea in the comments below!
Happy Growing!
—Erin
DANDELION SEED
Taraxacum officinalis. Perennial.
This strain forms lush heads of leaves that will rival your favorite lettuce. The leaves are tender, fleshy and dark green.
The plants spread up to 2 ft and the vitamin rich leaves can be eaten raw, boiled, stir fried and used in soup.
The roots can be eaten raw, cooked or roasted and made into a coffee substitute.
The flowers can be used to make fritters, tea and dandelion wine.
Sampler pack of 100 Seeds $0.99 1,000 seeds $4.99
| Order Seeds |
New to growing your own food in a Tower Garden? First off, kudos on your decision to take control of your own health and it all starts at the foundational level of the food we put into our body. It actually can go even deeper than that… it all starts with the parent plant that made the seed that we collect and then grow and then harvest to put into our body. But I digress…
When considering what to put into your Tower Garden, there are certain vegetables and herbs that grow well together. I have grouped these plants based on shared PPM (parts per million) values. You will need a PPM meter to measure what your water’s PPM is with the nutrient solution added.
When determining our list below, we look for areas where PPM levels share common ground (see blue vertical bars to highlight overlapping plant PPMs)… Note: this PPM reference chart is available in full for all our Tower Garden and hydroponic clients, but here’s a little snippet:
Note that some plants can tolerate higher levels of nutrients than mentioned here as these are ideal ranges for growth. You’ll know when a plant is getting too high a level when the edges of the leaves get a brown tint (called tip burn). Otherwise, know that these plant groupings are going to grow together fairly well at certain PPMs and that you can push some of the plants that are below the PPM level to the next level up in some cases…
based on the PPM of 775 and a pH of around 6.0, you could grow these plants together using the Tower Tonic Minerals Formula Parts A&B: Arugula, Artichoke, Basil, Calendula (petals of flower are edible), Cilantro/Coriander, Dandelion (leaves edible & root used in tea), Fennel, Lavender, Lemon Balm, Menarda (Bee Balm), Mustard Greens, Nasturtiums (leaves & flower are edible + plant deters some insects), Oregano, Pansies (flower petals are edible), Parsley, Rosemary, Sage, Thyme, Violas(petals of flower are edible), Watercress.
based on the PPM of 1000 and a pH of around 6.0, you could grow these plants together using the Tower Tonic Minerals Formula Parts A&B Artichoke, Basil, Chives, Fennel, Kale, Leek, Lemon Balm, Menarda (Bee Balm), Mustard Greens, Oregano, Parsley, Peas, Rosemary, Sage, Thyme, Watercress
(Lettuce/Romaine may grow in this range as well, just watch for tip burn on the leaves — some varieties may tolerate the PPM level)
based on the PPM of 1265 and a pH of 6.0, you could grow these plants together using the Tower Tonic Minerals Formula Parts A&B: Artichoke, Beetroot, Bok Choy, Broad Bean (Fava Bean), Carnation (2′ tall, but petals of flower are edible), Cauliflower, Celery, Chives, Cucumber, Kale, Leek, Marjoram, Menarda (Bee Balm), Mustard Greens, Parsley, Peas, Purslane, Pumpkin, Spinach, Summer Squash, Strawberries and Swiss Chard, Turnip Greens, Water Cress, Watermelon, Zucchini
based on the PPM of 1490 and a pH of around 6.5, you could grow these plants together using the Tower Tonic Minerals Formula Parts A&B: Beans, Beetroot, Bok Choy, Broad Bean (Fava Bean), Celery, Eggplant, Endive/Chicory, Chives, Cucumber, Kale, Melon, Mint, Okra, Hot Peppers or Sweet Bell Peppers (Note: Planting both near each other may result in cross-pollination if outdoors and open-pollinated by bees and your sweet peppers can get a bit of heat in the flavor department. If growing indoors and hand pollinating blooms, you should be fine.), Purslane, Pumpkin, Spinach, Summer Squash, Strawberries, Swiss Chard, Tomatillo, Tomato, Turnip Greens, Watermelon, Zucchini
Remember to put larger plants like kale and those that vine like peas, cucumber, and nasturtiums towards the bottom and you’ll need a support next to the Tower Garden where the vines can continue to grow out and fruit. Taller plants go towards the top (like Celery and Rainbow Swiss Chard).
based on the PPM of 1990 and a pH of around 6.5, you could grow these plants together using the Tower Tonic Minerals Formula Parts A&B: Beans, Beetroot, Broccoli, Brussels Sprouts, Cabbage, Dill, Hot Peppers, Sweet Bell Peppers, Tomatillo, TomatoKeep in mind that your squashes, watermelons, tomatillos, and tomatoes are going to be heavy “feeders” meaning they will drink up water and nutrients during the hotter summer days.
Okay, so now you have an idea of what plants have similar growing PPM characteristics. Select one PPM group based on vegetables and herbs you like to use every day!
Keep in mind that for most of us, lettuce has to travel quite a ways if you’re purchasing it from a big box store especially. 70%+ of all romaine is grown in Salinas, California. That means that romaine has to travel roughly 3,000 miles to get to my plate here in Atlanta, Georgia. They say on average it takes 10 days for a harvested romaine to get from the farm to our dinner plate! This is unacceptable! Especially since we know from industry studies that due to respiration rates of plants, nutrient availability decreases within the first 24-48 hours! That translates into you losing out nutritionally on the very purpose of eating that salad! So, with that in mind, simply starting by growing greens is a great place to start. I also like greens because of they mature in 4-6 weeks meaning you get to see your success (and enjoy the fruit of your efforts) earlier rather than later.
The other thing to consider regarding a salad is the number of varieties you have probably never tried because the grocery store only carries 3-4 options. I have found that some of my best salads incorporate a variety of greens and textures. Have fun exploring greens you’ve never tried before — you might find you really like them fresh off of your Tower Garden. I had always shy’d away from Bok Choy in the grocery store because it looked limp and lifeless, but when I grew it in the Tower Garden it was super tasty and I learned that I could keep harvesting for 2 months until the plant flowered. Now it’s something I always plan on growing because it can be added to soups, quinoa, and salads.
If doing a greens selection to grow on your Tower Garden, I like to recommend my clients include a nasturtium on the lower part of their Tower Garden because a) you can eat both the leaves and the flower, b) most people have never tasted a nasturtium because they are not found readily in the grocery store and most often found on the fine diner’s plate, c) they are so pretty to look at on your tower and d) they are companion plants meaning they are good to grow next to other plants to help deter certain pests… When planted alongside cucumbers. eggplant, tomatoes, or squash plants, nasturtiums may repel cucumber beetles, whiteflies, aphids and squash bugs. There are other edible flowers in this range that would be fun to explore if you’re willing to be adventurous.
If you decide to do a vining crop with a higher PPM, keep in mind space (tip: put a trellis next to where the plant’s port is and it can grow off to the side. These vining plants are often water hogs and love the sun, so plan accordingly for anything planted above them — those plants will also need to be heat tolerant. I always recommend including a flowering plant as it will attract pollinators and pollinators (aka: bees) will plump up your fruit and leave your flowering plants in a better state than how they found it.
Tomatoes are the most popular thing to grow. Ideally, you’ll want to look for varieties that have compact traits, but if you do have room next to your outdoor Tower Garden, make sure you can handle the growth habit on a trellis. My favorite tomato is an heirloom variety, Cherokee Purple, and it’s vining can reach up to 10′ or more if it’s given the nutrients it loves. (And BOY do they taste AMAZING!!!!) Cherry Tomato varieties are going to be prolific, so plan a space to support their growing needs to you have airflow and are able to easily keep pests from moving in on your crop.
Tip: If you are putting large vining plants in the lower ports of your Tower Garden. Plant to the left, right and on the back side leaving the front port open. (You may want to cover that port with a rubber disc like this.) The reason for leaving the front port unplanted is you need access to your water reservoir opening and some vines take over and make it difficult to reach it.
And my last thing to highlight is the pepper — remember that if you are growing outdoors and have hot peppers and sweet peppers both growing in your Tower Garden, you may get some cross-pollination through open-pollination and your sweet peppers might be hotter than their parent plants. It’s a good idea to just pick either hot peppers or sweet peppers if growing outdoors. Now if you’re growing indoors under lights, you can plant both hot and sweet in the same system in ports on opposite side of the Tower Garden because you will have to self-pollinate your flower buds anyway (turn a fan on to give your tower a light breeze or hand-pollinate with a toothbrush or paintbrush).
This should get your started. If you’re looking for Seed Providers, you can check out our article here.
Happy Planning!
— Erin
PS: If you want a printable version of the information above to print off and to use as a reference in your garden journal, simply click here: Growing by Common PPMs.
If you have found this information to be helpful, we appreciate any donation large or small to continue our research and to keep GrowYourHealthGardening.com available as a continued resource. Thank you!
This Black Seeded Simpson seed was packaged in 2014 and we just did a germination test. We placed on a wet paper towel under bright light (lettuce needs light to germinate) at 70°F for 24 hours, covered in darkness overnight and found germination! Six-year-old lettuce seed properly stored germinated! It amazes me the life that is contained in one little seed.
Doing a quick germination test like this prior to ordering seed can save you the hassle and money of purchasing new seed. To calculate your germination rate, take the number of seeds that germinated (evident by the radical root emerging from the seed casing) and divide by the total number of seeds you put in your tray — that will give you the germination rate of your seed.
Because I use rockwool for hydroponics, we can use seeds from this germination test and transfer them into wetted rockwool and continue to grow them in ideal seed started conditions (warming mat to 70°F and bright lights). No seed is wasted! This also helps me conserve my rockwool.
To transfer germinated seeds, I take a tweezer with (the kind with a flat edge) and clean them with rubbing alcohol and finish off with a quick rinse of water. I gently pick up each germinate seed with the tweezer and drop it into the hole of my rockwool making sure to not plant the seed too deep. General rule of thumb whether sowing soil or into another planting medium like rock wool is to plant seed as deep as it is wide. I sometimes use the plastic tip of my nearby plant marker to slide it off of the tweezer tip as we don’t want to crush the seed embryo (still inside seed casing). I also plant two seeds per rockwool cube (in case one doesn’t make it for some reason.) I can always thin out to one plant as the seed grows into a seedling.
If you want tips on how long seeds can last when properly stored, check out our handy guide here.
Happy Growing!
— Erin
PS: Food for thought… Jesus said you need only to have faith in Him — even if it’s as small as a mustard seed… Think of how much life is just within a little tiny seed. The giant redwood tree, for example, comes from something that is so tiny… if God can create a magnificent and awe-inspiring tree, how much MORE amazing and beautiful are you who is made in His own image.
“He told them another parable: “The kingdom of heaven is like a mustard seed, which a man took and planted in his field. Though it is the smallest of all seeds, yet when it grows, it is the largest of garden plants and becomes a tree, so that the birds come and perch in its branches.””
Matthew 13:31-32 NIV https://www.bible.com/111/mat.13.31-32.niv
Tips for Hydroponic, Aquaponic, and Soil-based Gardening Methods


 If you want fresh lettuce every day for salads or other dishes, we suggest growing approximately 2-3 heads of lettuce per person. The cool thing about the Tower Garden system is you can grow in up to 28 ports (base Tower Garden with one extension) in less than a 2.5′ x 2.5′ space. That means in the corner of your kitchen or dining room or on your back deck, you can have instant access to your greens any time and harvest Tower to table within a matter if minutes — not hours — not days — MINUTES! This means you and your family will get optimal nutritional value from each plant because it is being harvested at it’s peak and consumed right away.


 Keep in mind that for most of us, lettuce has to travel quite a ways if you’re purchasing it from a big box store especially. 70%+ of all romaine is grown in Salinas, California. That means that romaine has to travel roughly 3,000 miles to get to my plate here in Atlanta, Georgia. They say on average it takes 10 days for a harvested romaine to get from the farm to our dinner plate! This is unacceptable! Especially since we know from industry studies that due to respiration rates of plants, nutrient availability decreases within the first 24-48 hours! That translates into you losing out nutritionally on the very purpose of eating that salad! So, with that in mind, simply starting by growing greens is a great place to start. I also like greens because of they mature in 4-6 weeks meaning you get to see your success (and enjoy the fruit of your efforts) earlier rather than later.
 Tomatoes are the most popular thing to grow. Ideally, you’ll want to look for varieties that have compact traits, but if you do have room next to your outdoor Tower Garden, make sure you can handle the growth habit on a trellis. My favorite tomato is an heirloom variety, Cherokee Purple, and it’s vining can reach up to 10′ or more if it’s given the nutrients it loves. (And BOY do they taste AMAZING!!!!) Cherry Tomato varieties are going to be prolific, so plan a space to support their growing needs to you have airflow and are able to easily keep pests from moving in on your crop.


 This Black Seeded Simpson seed was packaged in 2014 and we just did a germination test. We placed on a wet paper towel under bright light (lettuce needs light to germinate) at 70°F for 24 hours, covered in darkness overnight and found germination! Six-year-old lettuce seed properly stored germinated! It amazes me the life that is contained in one little seed.

