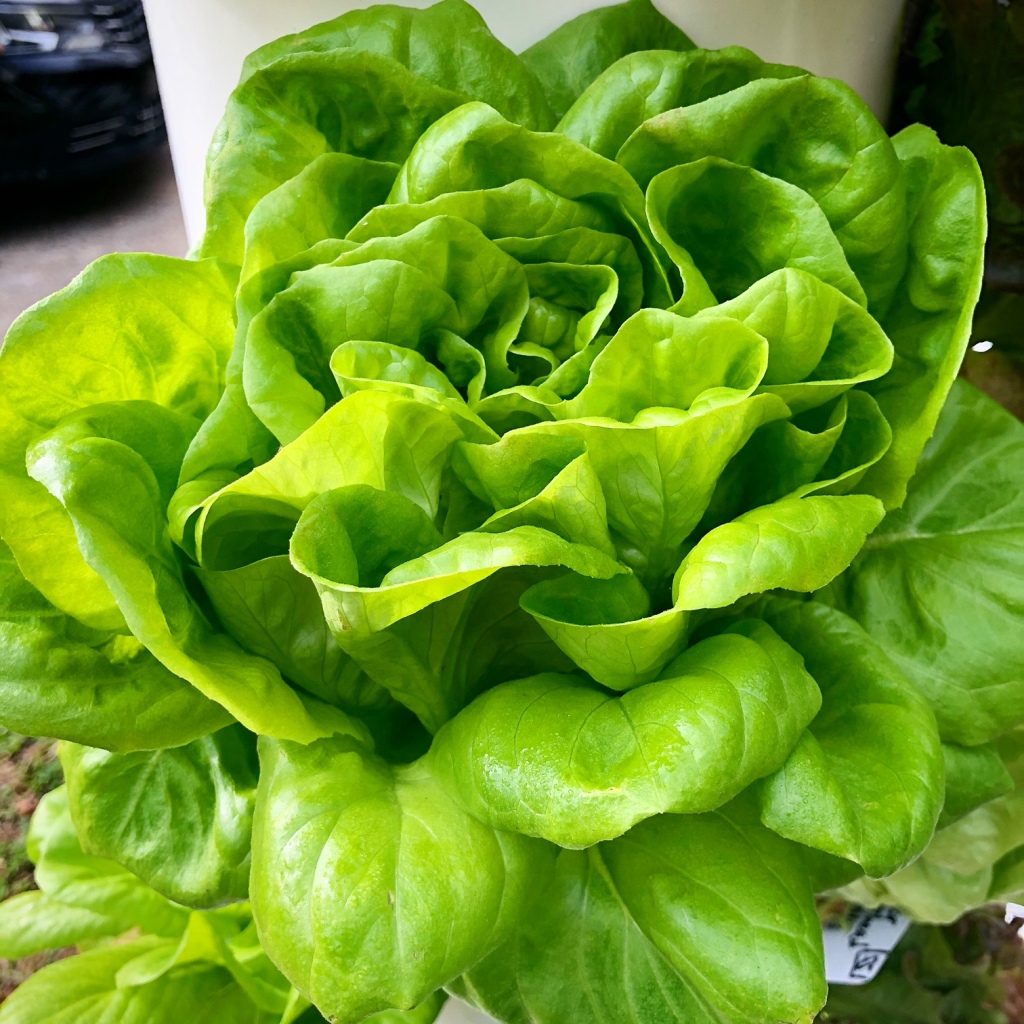
The Tower Garden has been recently featured on “Daily Mom” in their list of “unique gardening equipment, gear, and fall decoration for outside.” [Link below] Although we run our Tower Gardens from April to October outdoors, these hydroponic systems really shine indoors where you can grow food 24 hours a day, 7 days a week using built-in automation through timers that turn on the pump and light without you having to do anything once it’s been set up to run.
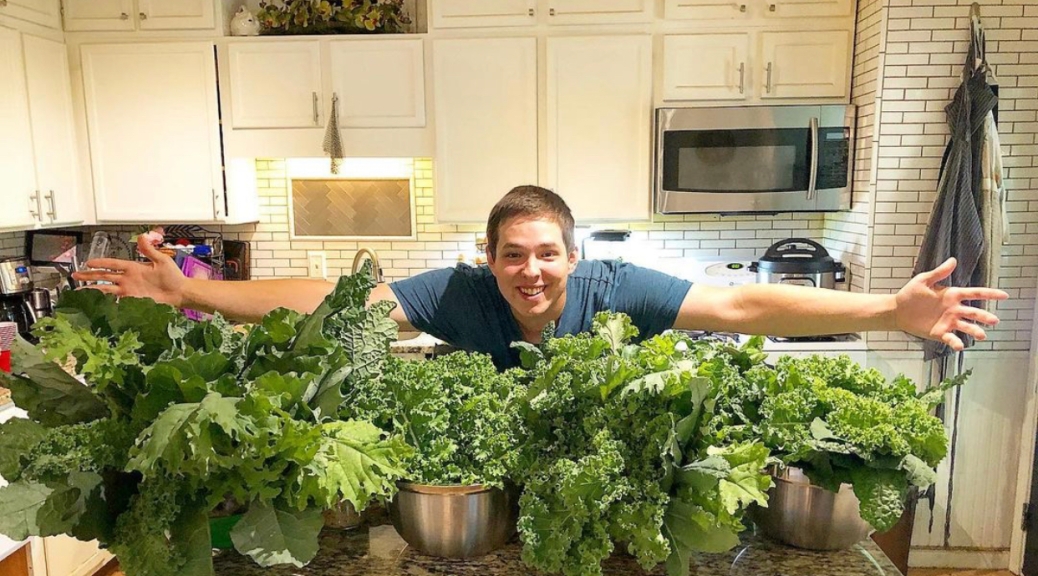
My husband and I see our Tower Gardens as an investment — it is a gardening tool that helps us grow food easily and effectively. As a busy mom of five children running a growing operation, I like any time saving tools I can utilize and my hydroponic Tower Gardens have MORE THAN paid for themselves over the years.
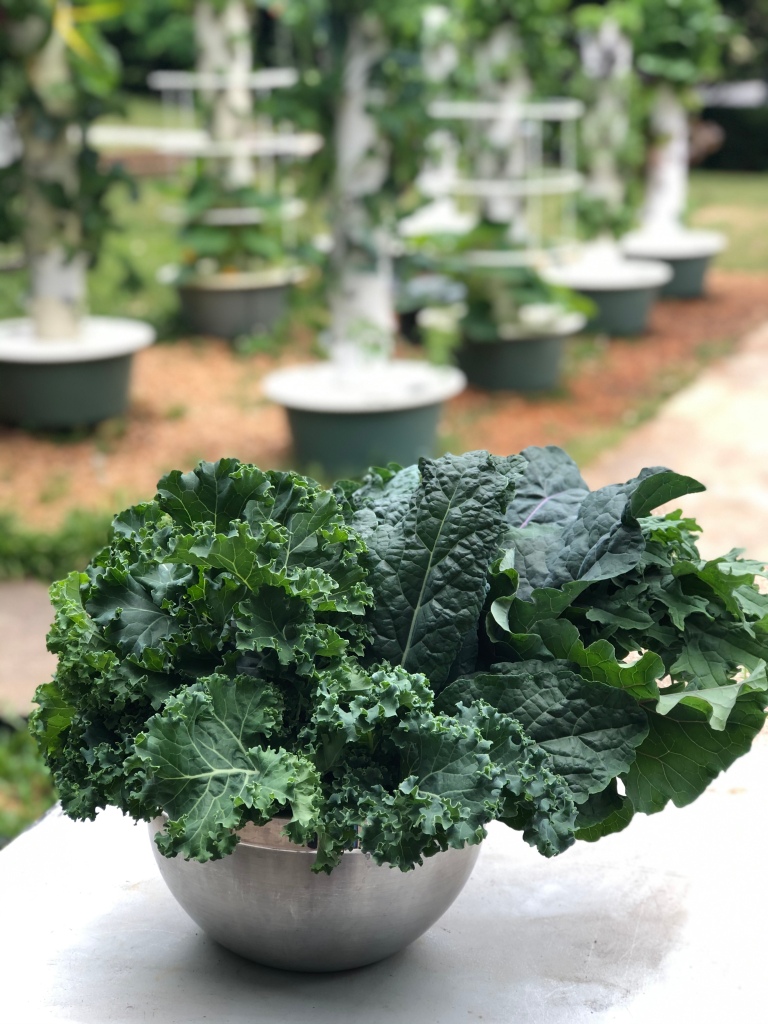
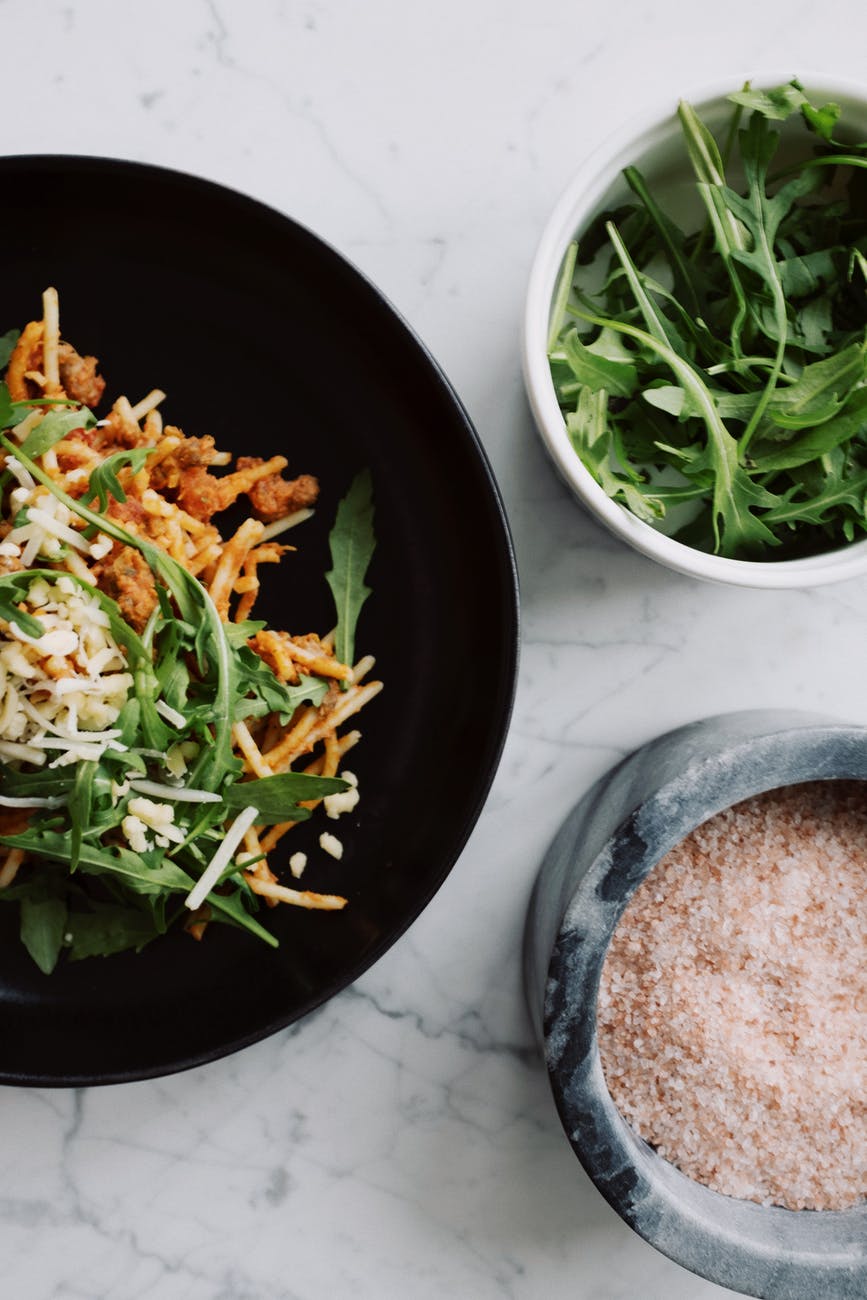
I’m not only saving time, but also a valuable resource: water. Research has shown that hydroponic systems like the Tower Garden grow food 3x faster, 3x bigger all while only using 98% of the water used in traditional soil-based growing systems. I can grow my greens in 2% of the water it would normally take to grow greens in soil! And what’s more, I have less to clean and wash when it comes to harvesting food, because my plants are not in contact with soil which can harbor bacteria.
Lastly, I love that I know what is going into and onto our food. I pick it fresh and eat it the same day for maximum nutrition. Our food is grown with nutrients and minerals mined from the earth and put into a water-soluble form for plants to utilize and grow.
And if I’m not able to eat everything we’ve grown, no problem! We go from harvest to our Harvest Right freeze dryer or dehydrator immediately capturing and sealing in all that nutrition for later use.
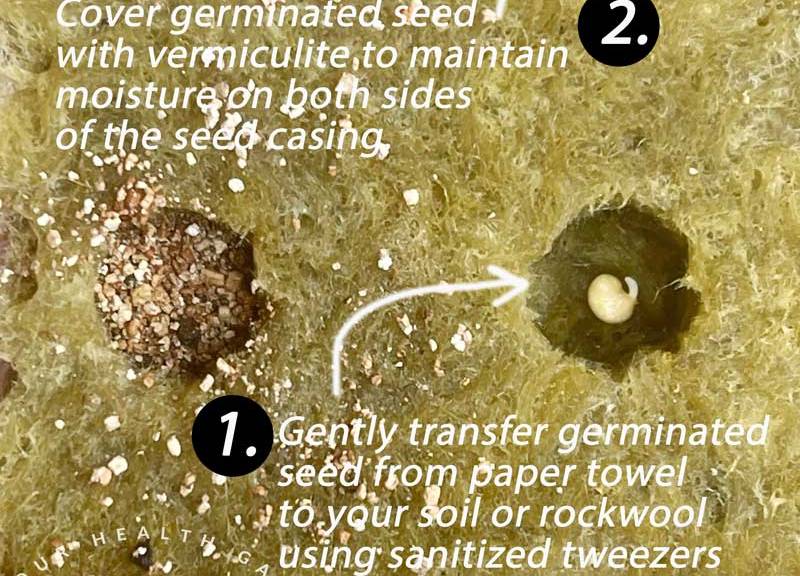
I like to know if a seed has germinated before it ever goes into soil or a piece of hydroponic Rockwool. There’s an easy way to know if you have viable seed and that is through a technique that simply requires a sheet of paper towel, a container with a lid, water and a consistently warm location 72ºF-76ºF. You can learn more about how to set up these pre-germination conditions on our blog here, but if you’re already familiar with this method, here is a quick visual of what you’re looking for with pepper seeds and when to transfer them to either soil or Rockwool (Rockwool is used for soilless hydroponic / aeroponic growing systems).
The seed that is circled in green is ready to gently transfer to soil or Rockwool using a sanitized tweezer. (To sanitize your tweezer, simply clean with rubbing alcohol.) The seed circled in yellow shows swelling and indicates that you should probably check it the next day as the root is getting ready to emerge.
The other seeds are slightly swollen showing that they are still in the process of germinating. Do not give up on seeds that are slower to germinate — sometimes they can take up to 10 days even when you are providing ideal conditions. Check moisture daily and if paper towel smells funky, swap out for a new paper towel and rewet and put back into germination chamber container.
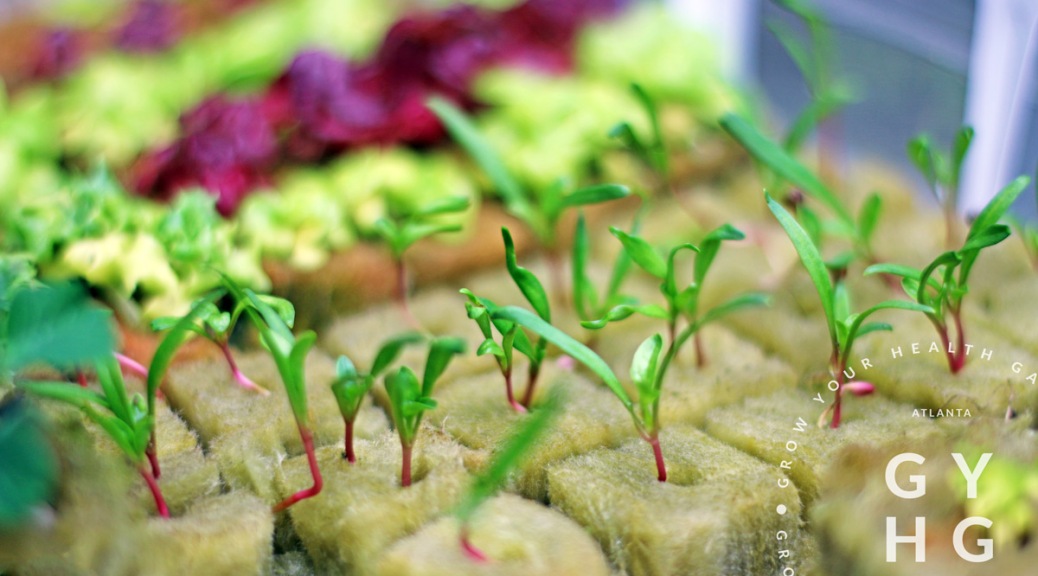
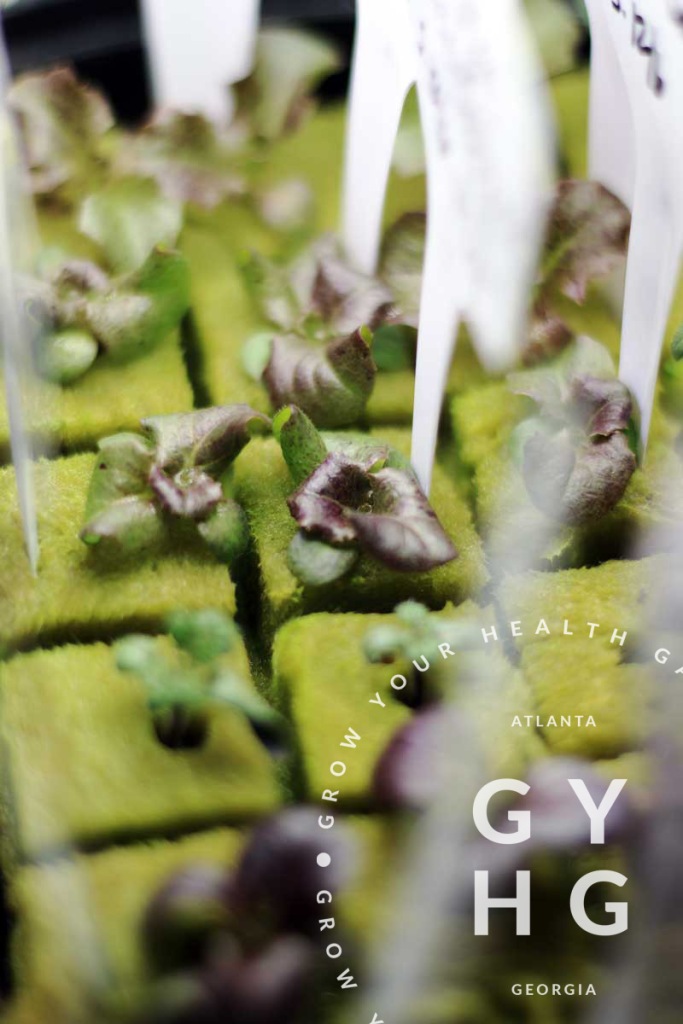
Below is a photo showing germinated seed that has been placed into Rockwool (see number one below). If you are growing in a hydroponic growing system such as a Tower Garden or Aerogarden, you’ll want to place your seed in Rockwool instead of soil. (Coco Coir is also a good alternative growing medium for hydroponics or aeroponics assuming it has support to hold material together such as in a mesh net.)
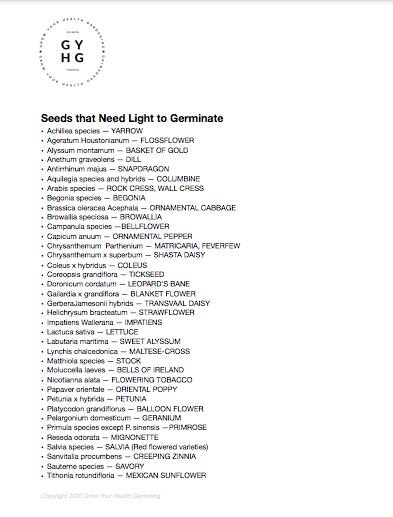
I like to cover my seeds with vermiculite. Some hydroponic growers insist that this step isn’t necessary, but I like to make sure my seeds receive adequate moisture throughout these early stages of growth especially. Strong healthy seedlings, make for strong healthy plants. I use this process for pepper, tomato, and eggplant seeds and any seeds that are not super small. Remember, some seeds need light to germinate (like lettuce), so be sure to reference our cheat sheet before starting seeds to know if your seed needs light, no light, or if it doesn’t matter.
Rockwool is a fantastic growing medium as it has air pockets and is good at holding water. Keep moist, but not sitting in water.
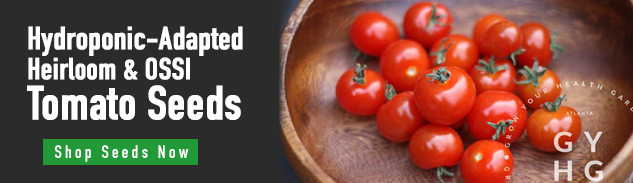
Hope that helps! Remember, we have a great assortment of hydroponic-adapted tomato and pepper seed available in the seed store. Be sure to check it out!
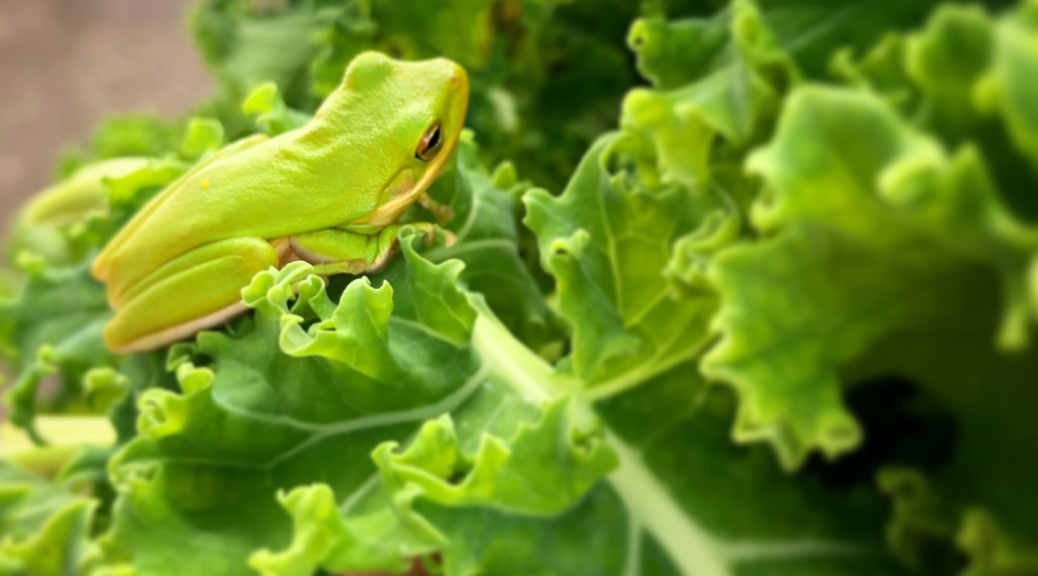
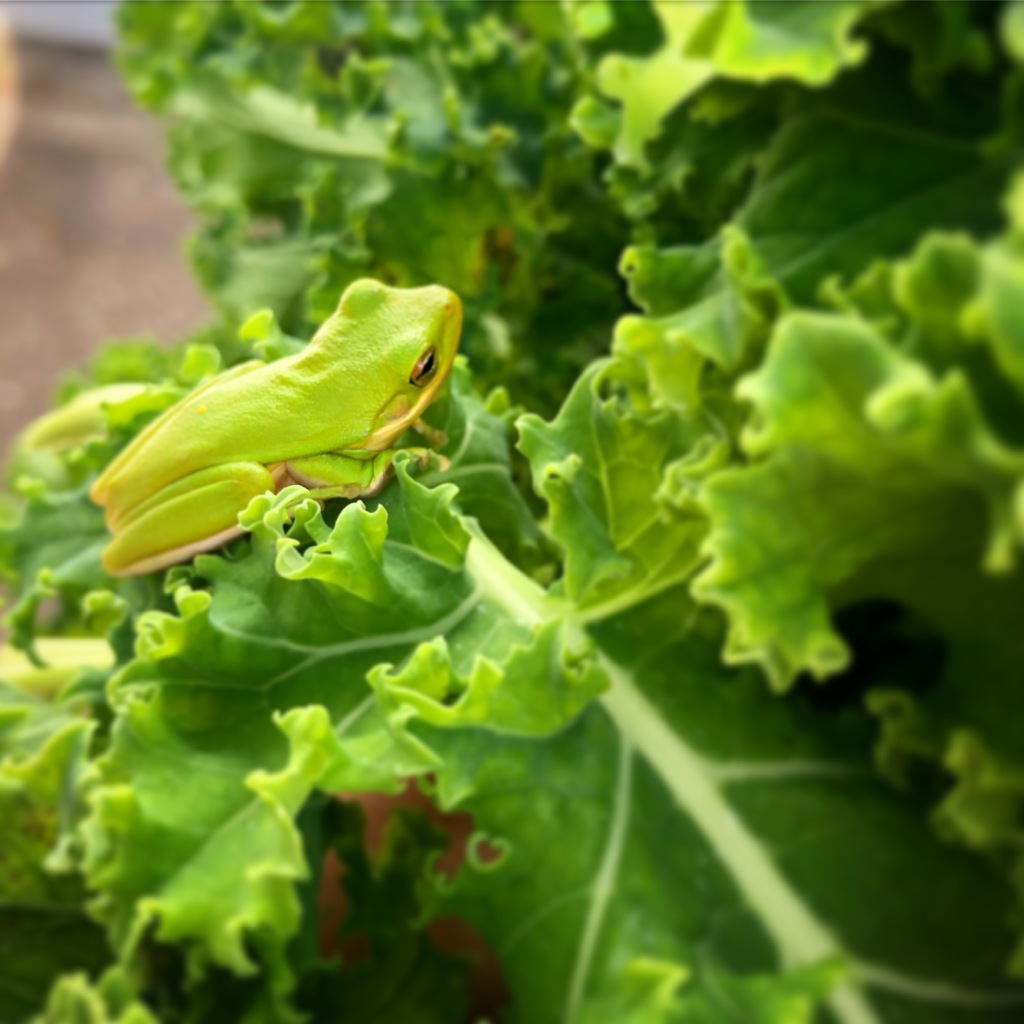
While harvesting some kale this morning, this little guy hopped off of one of my leaves. If you’re a little squeamish of critters, keep in mind that tree frogs like these help eat aphids and other bugs that want to munch on your plants.
We also have green anoles (a type of small lizard) here in Zone 7 near Atlanta, Georgia. We used to spray 15 years ago and I noticed the anoles disappeared — we took away their food source!
Since then I have come to understand that these critters keep a balance to nature and show a healthy eco system is in place. Plus, my kids love to catch them! What helpers have you found in your garden?
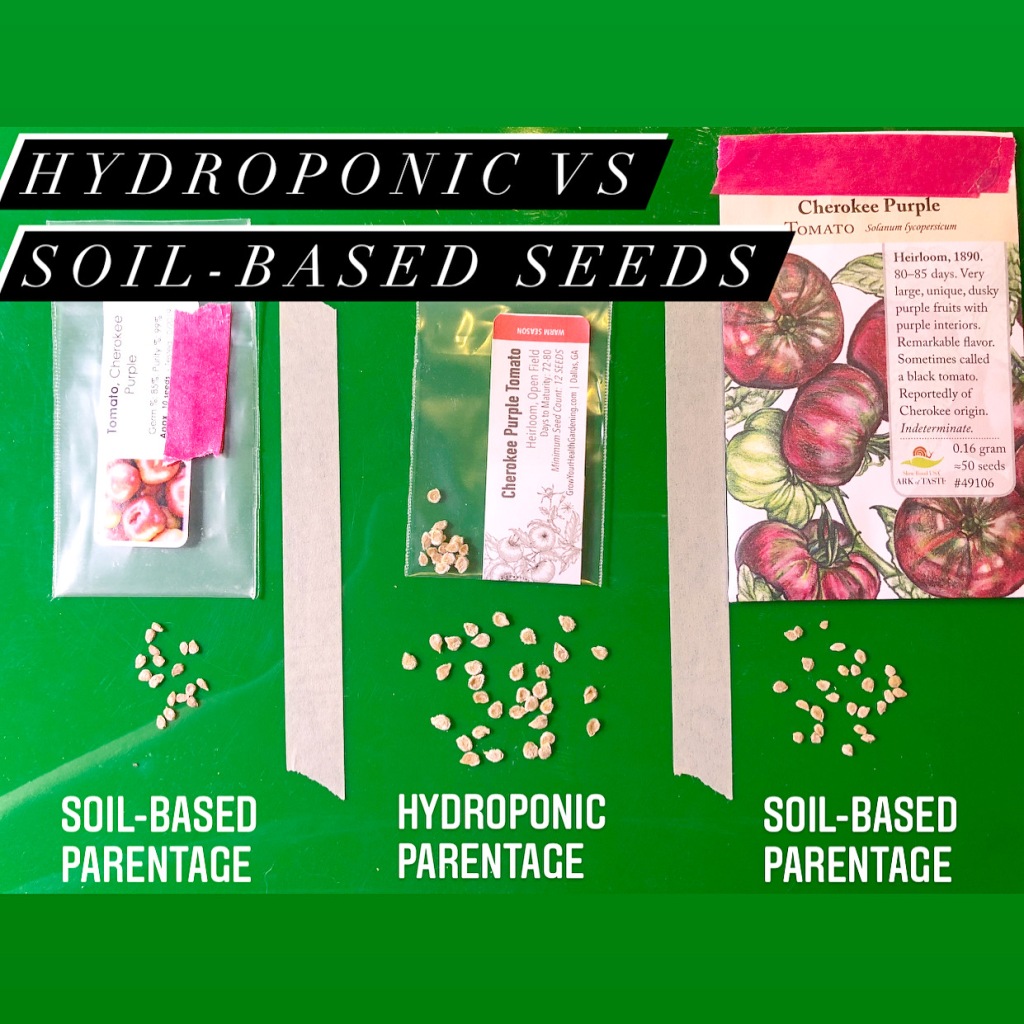
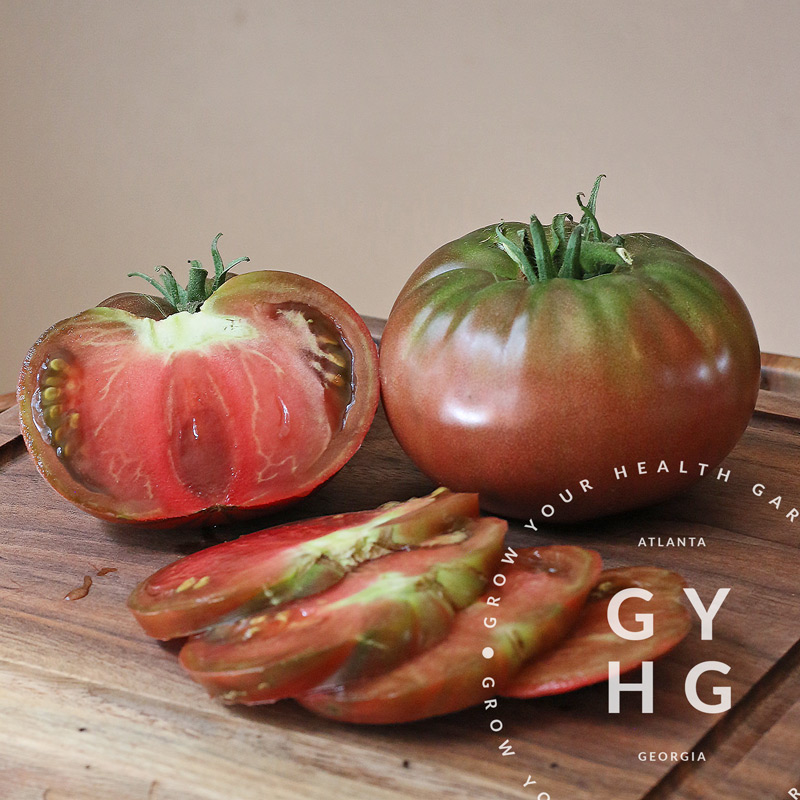
Same variety (Cherokee Purple), but the two on the left and right are soil-based seed. Our hydroponic seed is in the middle. We think there’s not only DNA Epigenetic differences that you can’t see, but also a noticeable visual difference.
Copyright 2021 Grow Your Health Gardening
Tomato World Guinness Record holder, Charles Wilber, talks about the importance of starting with good seed stock. Do you know who grows your seed?
This time of year, many a gardener will begin breaking out their seeds from storage and gather up their recent purchases in preparation for the upcoming growing season. With earnest, one cell tray or by one rock wool at a time, life will begin inside the gardener’s abode, protected from the cold weather outside.
Seed starting, used to be an annual event for me until I realized the importance of succession planting. If I wanted to have a continual supply of greens or move from one season to the next seamlessly, a little bit of planning was all I needed to do the trick.
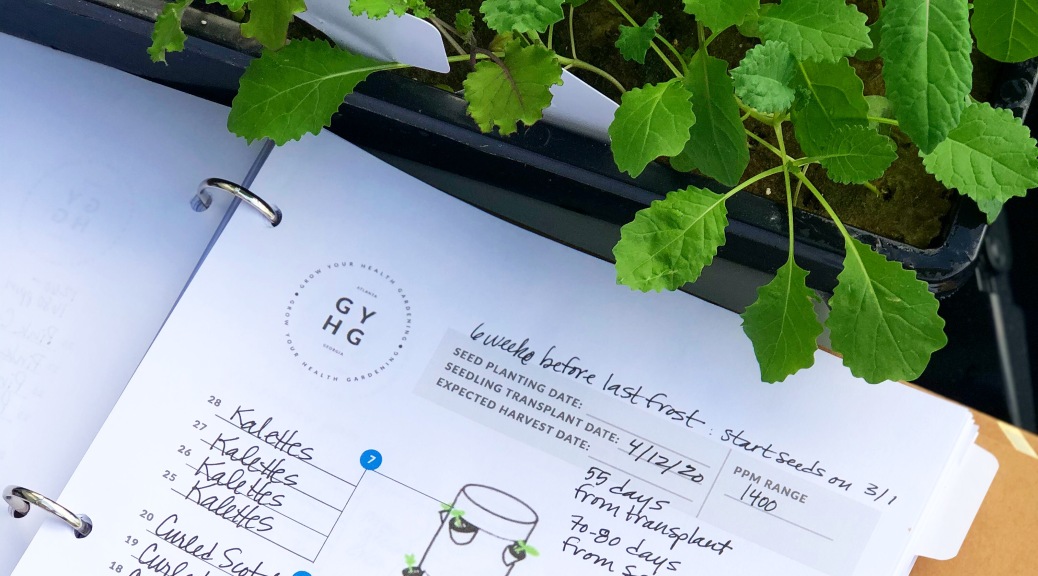
If I was going to do succession planting, I needed to make it part of my everyday planting and tending tasks (even if all it means is a quick glance to check moisture levels or that your “babies” (as I affectionately call them) are growing as they should was the only task that day.) And as an everyday task, it needed to be part of my environment. The end result to succession planting throughout the year? A seed starting station.
If you’re only planting seeds one time a year, I encourage you to read on and challenge yourself to look at seed starting in a whole new light (pun intended). We want to set you up for success for the ENTIRE growing season ahead!
What is a Seed Starting Station?
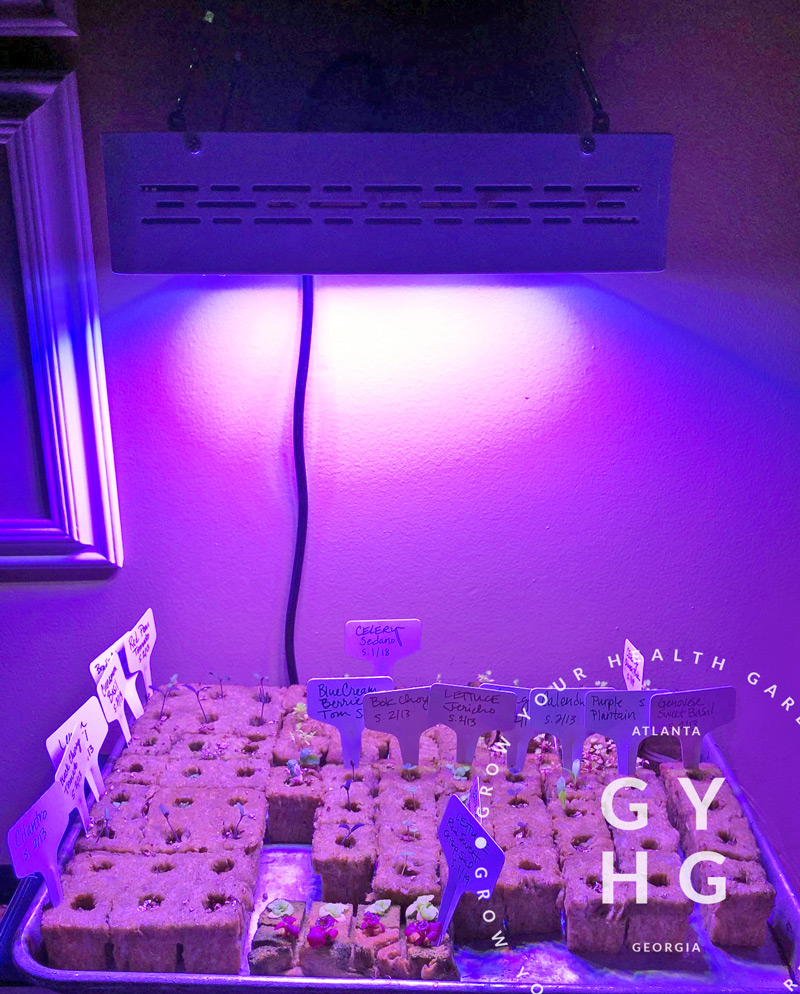
Okay, I’m probably being “Captain Obvious” here, but a Seed Starting Station contains everything you need to start seeds. If I may recommend a few tips as you consider setting up your own Seed Starting Station:Your Seed Starting Station needs to be in a location where you walk by it at least once a day; two times or more a day is even better. Why? Seedlings need nurturing. Watching that they have proper light, temperature, moisture, and humidity levels are all key to successful strong seed starts.
Your Seed Starting Station need to have the proper temperature.
Temperatures do matter with germination and each seed / plant has different temps they prefer to germinate at and a “sweet spot” temperature range. For example, warm season plants typically prefer to germinate at temps above 65ºF. On the flip side, cool season plants, typically prefer to germinate at cooler temps. Spinach, for example, can be started in a container between two wet paper towel sheets in the refrigerator and after about 7-10 days you’ll see the root emerge. At this point, you can move it into soil or a wet rock wool and allow it to continue to grow into a young seedlings under bright light while maintaining high 60º-low 70ºF temps.
Seed heat mats can be a great tool for warming soil or rock wool when you set a tray on it. Just be careful to not overheat the young seeds. A thermostat on your heat mat can keep it in the proper range. Below is a quick cheat sheet for common veggies of optimal temperatures seeds typically germinate at:
Minimum (F)
Optimum Range (F)
Optimum (F)
Maximum
Beet
40º
50º-85º
85º
85º
Cabbage
40º
45º-95º
85º
100º
Cauliflower
40º
45º-85º
80º
100º
Celery
40º
60º-70º
70º
85º
Chard
40º
50º-85º
85º
95ª
Cucumber
60º
60º-95º
95º
105º
Eggplant
60º
75º-95º
90º
100º
Lettuce
35º
40º-80º
75º
85º
Melons
60º
75º-95º
90º
100º
Onion
35º
50º-95º
75º
95º
Parsley
40º
50º-85º
75º
90º
Pepper
60º
65º-95º
85º
95º
Pumpkin
60º
70º-90º
90º
100º
Spinach
35º
45º-70º
70º
85º
Squash
60º
70º-95º
95º
100º
Tomato
50º
70º-95º
85º
95º
Source: PennState Extension. Adapted from Kemble and Musgrove (2006) (Soil temperatures should be taken by inserting a soil thermometer 3-4 inches deep into the soil surface and noting temperature.
Your Seed Starting Station Needs Bright Light
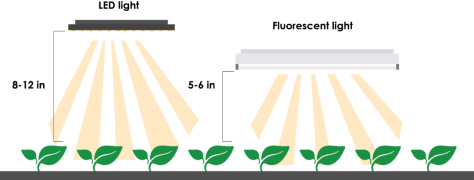
Seedlings need a lot of light once they emerge — a nice bright strong light. If you don’t have a green house that can be temperature controlled for heat and cool air, you will need to grow your seedlings indoors. That means you will need artificial lighting intended for growing plants. Lighting could get real technical quick, so I’m going to try to keep it simple. When it comes to lighting and seed starting you need to keep three things in mind to make adjustments as needed to ultimately save money on seeds:
INTENSITY: You need to have enough lighting. • LED bars: 8–10 inches apart from each other • T5 fluorescents: 4–5 inches apart from each other
COVERAGE: You need to place lighting in the sweet spot — not too far from seedlings. • LED bars (like Phillips): 8–12 inches away from seedlings • T5 fluorescents: 5–6 inches away from seedlings
DURATION: You need to leave lights on long enough. 14-18 hrs a day
Your light needs to be bright (this is like the one we use) and you need to have a way to adjust the light so that it is the correct distance from the seedling. And if you’re planting into a hydroponic growing system where your seedling will mature into an adult plant, you’ll want lights that can be adjusted distance-wise from the plant (closer when they are young and further away about 8″-10″ when they are older). If you’re using a Tower Garden HOME or Tower Garden FLEX, these are the lights you will want to invest in as they can be adjusted from the plant as it grows and they have a built in timer making it easy to set it and go about your life never having to worry about the lights turning on and off again.
Don’t rely on a window with sun coming in as it will make your seedlings “leggy” where they stretch for the light and ultimately that makes them weaker plants as they mature. Today’s windows have a UV rating which actually blocks the essential UV light that seedlings crave. The window is designed to protect your home interior textiles such as the furniture, drapes, and carpet from fading — it is not taking into account seed germination needs at all.
Some love to say “You can just start your seedlings in your Tower Garden — I do it all the time.” A couple of cautionary words are needed when you hear or read this advice posted in social media groups. Simply, don’t do it. Seedlings started in this manner often become leggy and are overall weaker plants when they mature. Secondly, you can “burn” your tender seedling with high levels of nutrients that other mature plants may be getting within your growing system, as seedlings don’t require as much nutrients when they are teeny tiny. Remember to, instead, start your seedlings off strong in a Seed Starting Station under bright grow lights. Look for a light that has all the color spectrum of the sun and avoid cheap $20-$30 grow lights as they are just not strong enough for seedlings to thrive. We recommend a grow light like this that has a full-spectrum. A decent grow light for seedlings will cost between $60-$100. I’ve also used my Aerogarden Harvest as a light for seedlings when I don’t have anything growing in the ports.
You’ll want to keep a quick reference to the needs of different seeds.
Not all seeds need darkness or to be covered to begin the germination process. Some require light to germinate like lettuce. Some need to be scarified (slightly chipped) or go through a cold period before they will germinate. We recommend printing off our Seeds That Require Special Treatment Reference Chart and laminating it or sticking it in a 3-ring binder sheet protector to use as a quick reference (or just bookmark our reference page and come back to it as you need to).
Click above screen shot to access full list of seeds that have special requirements to germinate.
Your Seed Station needs to have supplies relating to starting seeds and nurturing stored nearby
Here’s a list of some common supplies I use for soil and a list for common supplies I use for hydroponics.
Hydroponics: • 1.5″ rock wool • bowl for soaking rock wool • vermiculite for seeds that need to be covered (see our list here if you’re unsure) • liquid kelp (I add a TBSP to my water soak) • seeds you intend to plant (those that are not in the freezer) • plant tags • permanent marker • access to a water source and/or some sort of watering can to “water in” seeds • and a tray of some sort (I use an old cookie sheet) to rest your starts upon under lights for easy moving around from under your grow light to outdoors as temps allow or to your indoor growing system. • heat mat with temp gauge • grow light
Soil: • Seed starting tray cells, recycled containers that can be repurposed as small pots, or small paper pots • potting mix or screened peat moss • worm castings (to mix into your potting mix) (Note: don’t purchase and ship during hot months as temps of 85ºF in shipment will begin to kill beneficial bacteria in castings.) • access to a water source and/or some sort of watering can to “water in” seeds • seeds you intend to plant (those that are not in the freezer) • plant tags • permanent marker • and a tray to rest your seed starts on and move them easily from under your grow light to outdoors as temps allow. • heat mat with temp gauge • grow light
Now to the best part. Your own personal produce section!
To have a continual harvest, you’ll want to implement a sequential planting system. Pick a day that you are at your leisure (i.e.: Sundays are usually a restful day for most folks) and put a reminder on your calendar to plant at a certain time every week or every two weeks paying attention to your growing conditions (i.e.: indoor, cool season, warm season) and available space.
Let’s say you want to have a continuous supply of Bibb Lettuce. If you have a 28 port Tower Garden, you can plant 4 rock wools with Bibb Lettuce seed making sure to include a couple extra seeds per rock wool of which you’ll thin down as they germinate to the strongest one. You’ll repeat this process, planting several lettuce seeds into a single rock wool cube, filling four cubes total. As shown in the below planting chart, by week 4, your week 1 seedlings will be ready to transfer into your system. With each passing week, you’ll put the four seedlings that are ready from previous week plantings into the next row up of your vertical hydroponic / aeroponic Tower Garden. By week 10, you will have harvested your row 1 Bibb Lettuce (four ports = four heads of bibb lettuce to feed a typical family of four for a week). Once your lower lettuce has been harvested (pulled out of the port), the following week, replace the net pots and wipe down the port entrance with a cotton ball with alcohol on it and put a new clean net pot in it’s place. You are ready to plant the next set of four seedlings in these empty ports. As you continue to harvest up the vertical garden, you will clean each port and then plant the next seedling into it.
Note, if you are growing outdoors, sequential planting will get trickier, because temperature will be a variable. As temps raise towards summer time, bibb lettuce will begin to bolt (or go to seed) quicker or go limp if it is not a heat tolerant variety. This type of sequential planting works best if growing greens indoors and if the green has a 6-week grow cycle. This could work for Bok Choy and most greens. Consider putting some herbs like chives in the top row… these are cut and come again meaning that once they are a certain height, you can start cutting them 3″-4″ from the base of the plant and they will continue to grow from the center. Keep in mind that at some point, you will need to clean your system and restart the process, but in theory, if growing indoors, plants should continue to grow at a steady rate if you get in the habit of planting enough to fill four ports each week.
BIBB LETTUCE OR BOK CHOY EXAMPLE OF SEQUENTIAL PLANTING SCHEDULE FOR 1 TOWER GARDEN WITH 28 PORTS:
Week 1
Week 2
Week 3
Week 4
Week 5
Week 6
Week 7
Start 4 cubes w/seeds
Start 4 cubes w/seeds
Start 4 cubes w/seeds
Start 4 cubes w/seeds
Start 4 cubes w/seeds
Start 4 cubes w/seeds
Start 4 cubes w/seeds
Trans-plant into Tower Garden…
Week 1 seedlings Btm Row 1 of TG
Week 2 seedlings Btm Row 2 of TG
Week 3 seedlings Btm Row 3 of TG
Week 4 seedlings Row 4 of TG
Copyright 2021 Grow Your Health Gardening
Week 8
Week 9
Week 10
Week 11
Week 12
Week 13
Week 14
4 cubes w/seeds
Start 4 cubes w/seeds
Start 4 cubes w/seeds
Start 4 cubes w/seeds
Start 4 cubes w/seeds
Start 4 cubes w/seeds
Start 4 cubes w/seeds
Week 5 seedlings Row 5 of TG
Week 6 seedlings Row 6 of TG
Week 7 seedlings Row 7 of TG
Week 8 seedlings Row 1 of TG
Week 9 seedlings Row 2 of TG
Week 10 seedlings Row 3 of TG
Week 11 seedlings Row 4 of TG
Harvest off of btm row 1 lettuce
Harvest off of btm row 2 lettuce
Harvest off of btm row 3 lettuce
Harvest off of btm row 4 lettuce
Harvest off of btm row 5 lettuce
Copyright 2021 Grow Your Health Gardening
No matter what you want to grow, evaluate about how long the plant(s) you want to grow take to get to maturity for harvest, calculate when it will be ready for consumption, and enjoy your bounty continuously throughout the season with weekly seed starting in your own personal Seed Starting Station.
Happy Growing! — Erin
PS: Be sure to post your pics of your Seed Starting Station on social media and tag us at #gyhg and maybe you’ll get featured on our Instagram or Facebook channels and get some FREE seeds!
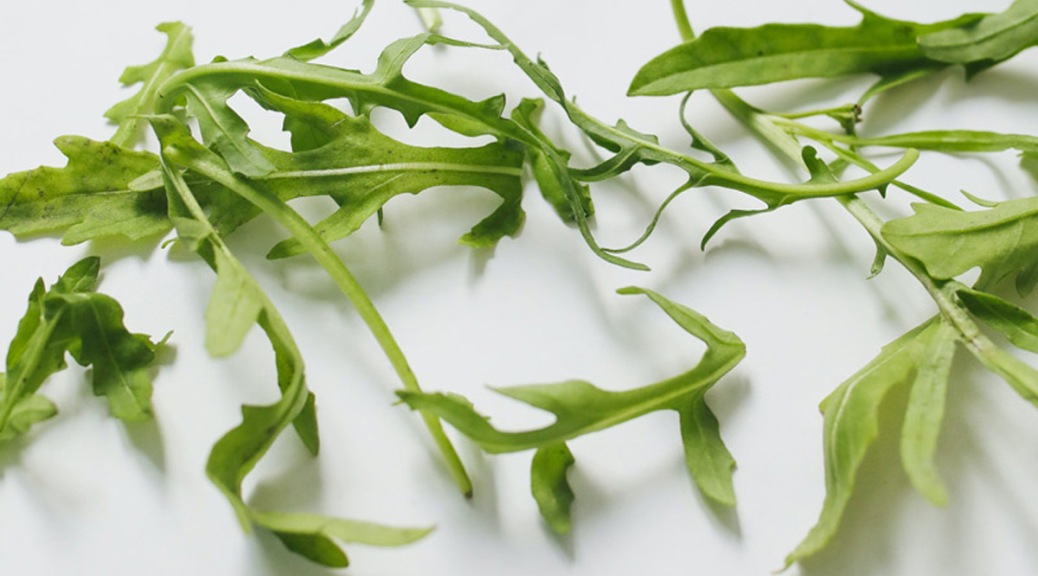
Learn how to grow your own arugula at home hydroponically / aeroponically from certified hydroponic grower, Erin Castillo of Grow Your Health Gardening and GYHG Seed Co.
Why you should be growing your own arugula instead of buying from the grocery store or Big-Box Retailer
You know how you go to a fancy restaurant and they bring you your salad course and before they leave your table they offer fresh pepper for your salad and with your permission proceed to grind cracked pepper onto your salad? Think of arugula as your cracked pepper of the salad world.
Why Grow Arugula and How To Use It
I wanted to feature Arugula, because I just don’t think people understand how versatile this plant truly is and that it is beneficial in so many ways. It is chalk-full of beneficial nutrients (which we will cover later in case you wanted to know) while also being low in calories.
It is ideal for new home gardeners in building confidence of gardening skills as it grows quickly from seed (aptly nicknamed “Salad Rocket” in some countries) and can begun to be harvested off of and tossed into salads with other greens when the leaves are still young and small at 2″-3″ in length. (Note: If you leave the center 3-4 leaves, it will continue to produce as a cut-and-come-again plant.) Arugula is often found in the produce aisle in salad greens mix and called “mesclun”.
Mature Full-Grown Leaves and How to Use Them
I as a mother of five know that life can get busy, so if you fall behind on harvesting leaves when small and the plant gets more mature, that’s okay! It will be “spicier” or “peppery” in taste as a mature plant. Take these 6″-8″ long leaves and slice them from tip to base into 1/4″ or thinner strips and sprinkle over your salad or mix in (think of it like your freshly ground peppercorn). Diced leaves can even be added to dishes that call for cilantro or parsley, or mixed into pastas, side dishes, put on top of sandwiches, in wraps and/or added to soups. Its flavor compliments goat cheese, balsamic vinaigrette, tomatoes, olive oil and garlic, making it perfect to blend into dips or spreads.
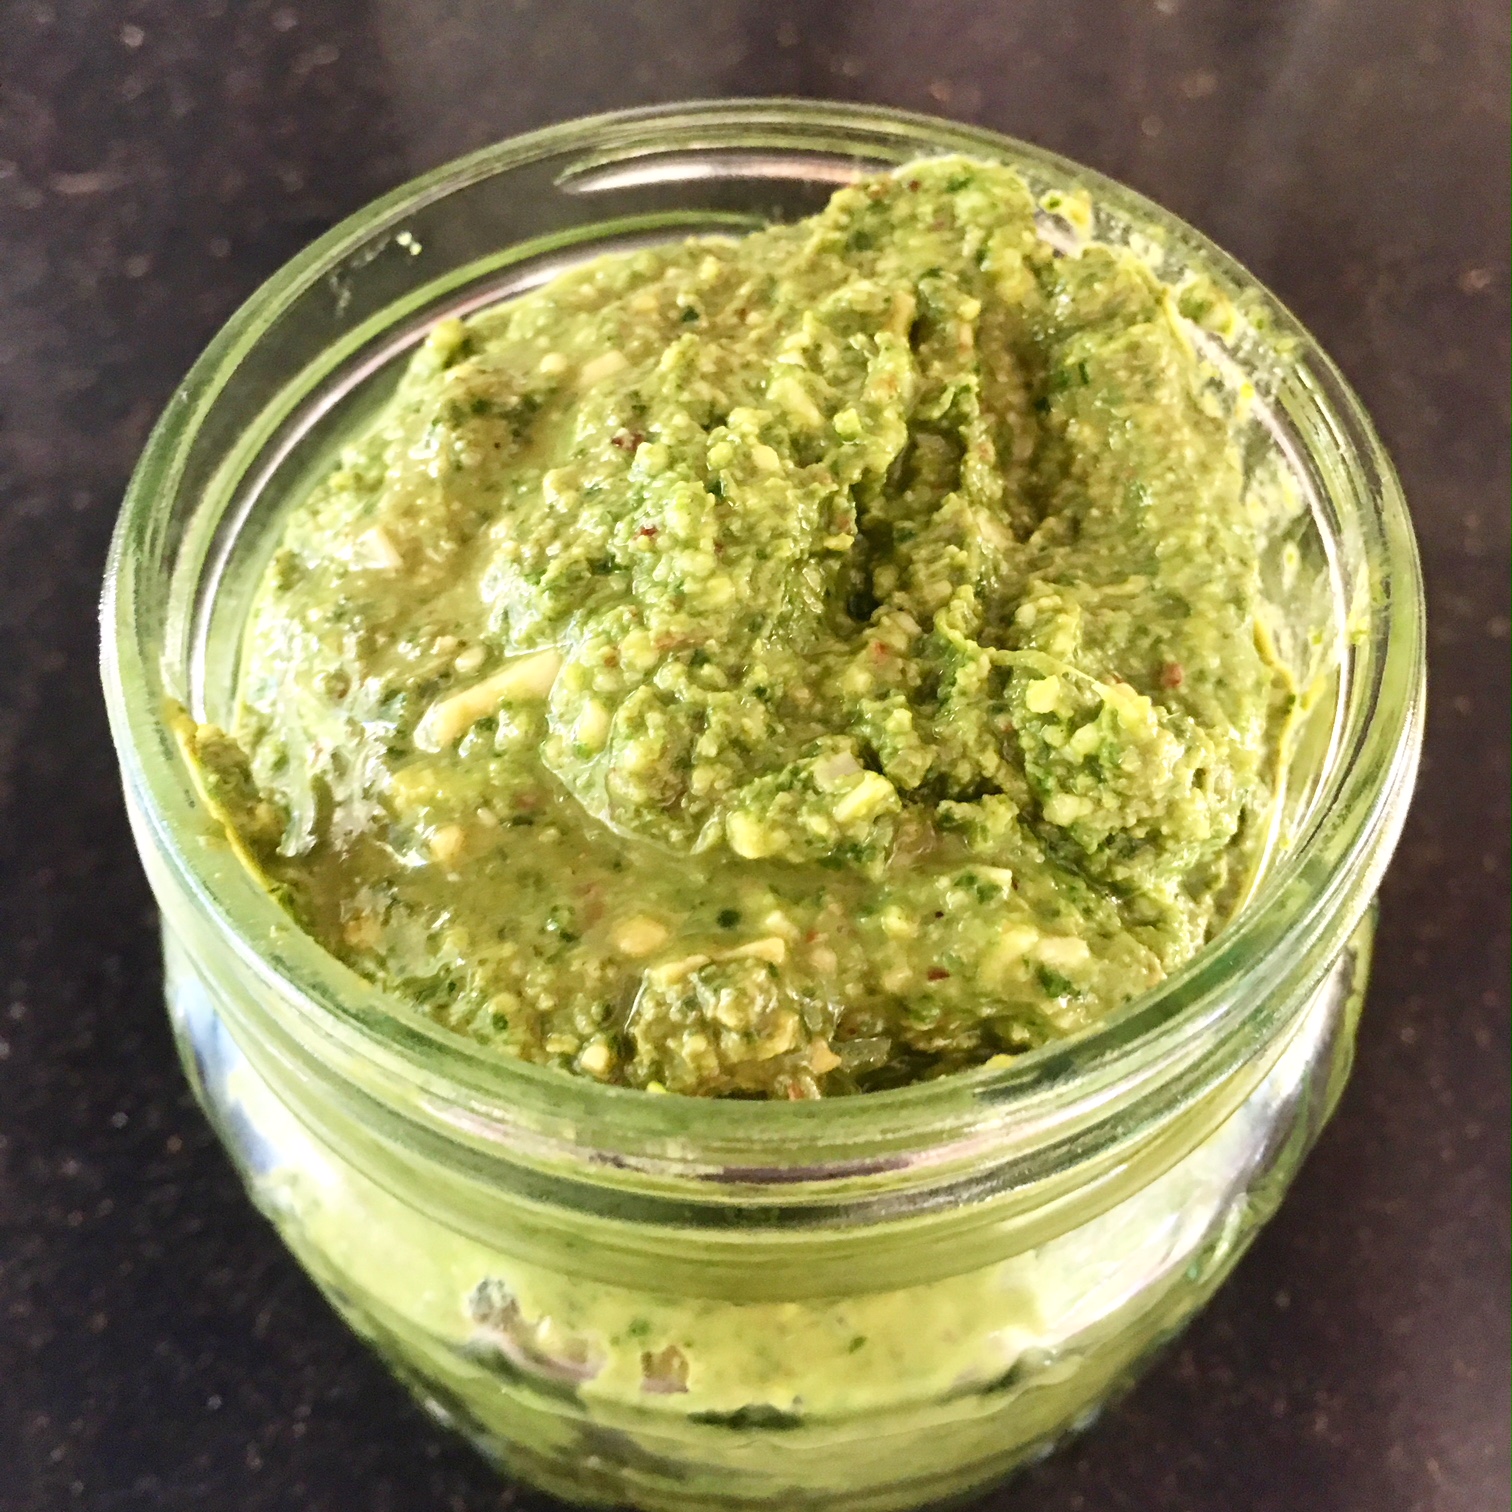
Arugula can also be added to your basil pesto as added flavor or if you like the peppery flavor, you can substitute arugula in place of basil and make an entire pesto out of arugula leaves. We like this happy medium of a pesto recipe in particular over at PCOSbites. It’s great if you are looking for something that isn’t the same ol’ pesto recipe, but full of nutrients while still tasting delicious. We think of it as the new “elderberry syrup” as an immune-boosting meal for our family.
We also love to add arugula baby leaves to our sun-dried tomato, goat cheese, and pine nut mini pizzas! The kids don’t bat an eye-lash at the greens on their personalized pizzas because these taste so good!
Mature leaves can also be cooked or sautéed much like you would cook collards. With a TBSP of sherry, soy sauce, minced garlic, and vegetable oil + 1/2 tsp of salt and granulated sugar you can have a quick healthy side dish to accompany your sun-dried tomato mozzarella chicken. YUM!
If you don’t plan on eating a salad and just want to move it out of your system to put something else in, simply clean harvested leaves with water and pat dry with paper towels and spread out on a dehydrator. Dehydrate at 110ºF for 6 hrs until it breaks crisp (no moisture left in leaves.) Do not crush leaves, but place in a glass jar with an oxygen absorber and put in your spice and seasoning cabinet. When a recipe calls for pepper or if you’re making a soup, simply add in your dried arugula. BAM! (As Emeril would say…) or YUMMO! (As Rachel Ray would say…) You will get a hint of that pepper flavor as well as all the amazing nutrients that this little power-packed leaf holds.
Tip: After you dehydrate your arugula, don’t crush the leaves. Store the leaves as one piece as much as possible. When you “crush” or break up the leaves, it releases the flavonoids and other beneficial nutrients. We want those to stay in tack until we are ready to consume it in our cooking, so I always encourage folks to hold off crushing your leaves for this reason. This is also why you may notice your home-grown herbs and spices have so much more flavor than the crushed and processed ones from the grocery store.
—Erin Castillo, Owner Grow Your Health Gardening and GYHG Seed Co.
Nutritional Benefits You’ll Get from Eating Arugula
So, we’ve covered how to use arugula. Let’s briefly touch on why you should be eating this green. According to the USDA, a half cup (approximately 10 grams) of raw arugula has about:
2.5 calories
0.4 gram carbohydrates
0.3 gram protein
0.1 gram fat
0.2 gram fiber
10.9 micrograms vitamin K (14 percent DV)
237 international units vitamin A (5 percent DV)
1.5 milligrams vitamin C (2 percent DV)
9.7 micrograms folate (2 percent DV)
16 milligrams calcium (2 percent DV)
In addition, this leafy green contains some iron, magnesium, phosphorus, potassium and choline. It also is rich in phytonutrients offering 1,424 mg of Beto-Carotene B
Did you know that one cup of Arugula can meet over a quarter of the daily recommended value of Vitamin K? Vitamin K is essential to blood clot formation and bone formation. Some researchers even believe that vitamin K may be a key factor in bone development, more so than calcium. I want my children to have strong bones as they grow and I encourage them to eat salads daily. One way to help provide their bodies with what they need is to mix in some arugula into their daily salad.
Tip: If you’re having difficulty getting your children to eat greens, involve them in the growing process. Give them a garden that is completely their own area to tend and help them grow plants from seed. As they feel more connected to their food, their natural curiosity will kick-in and they will willingly try the food they have patiently waited for to grow.
—Erin Castillo, Owner Grow Your Health Gardening and GYHG Seed Co.
How to Grow Arugula in a Hydroponic System
In this article, I’ll focus on growing it hydroponically, because that’s my preferred method of growing, but a lot of the same tips can be applied to growing in soil.
You can grow arugula in any hydroponic or aeroponic system. In a vertical garden growing system like the Tower Garden or Farm Stand, you’ll want to place this plant towards the top as you will most likely be harvesting from it continuously and keeping the plant size small.
Starting your arugula from seed: Choosing your arugula variety
If you’re growing in a hydroponic / aeroponic system, we strongly recommend you opt of seed that has already adapted to these growing conditions. Can seed from soil-grown parent plants grow hydroponically? Absolutely, but plants adapt epigenetically each growing season, so you’ll have a stronger healthier plant if you start out right with seed that has already adapted to the growing conditions you want to match. According to growers at the Seed Savers Exchange, seed DNA can hold 5+ years of growing seasons in which it can tap to survive and thrive. Choosing your seed stock source is more important than most realize.
Our arugula seed has been grown outdoors in the cool season of the Southeast in Zone 7 (not mentioning the zone here because it’s a perennial, but to help you get an idea of where the seed is grown so you can best match it to your own growing conditions.) GYHG Seed Co arugula seed can handle heat and humidity to a point before it bolts, but definitely plan on growing this during the cool season and start your seedlings 2 weeks before your last average frost date with the intention to move it outdoors as a transplant.
How many plants should you plant:
If you are wanting arugula on hand to pick fresh and mix into salads, I recommend planting four plants on a rotation (see below charts.) Place in upper level of Tower Garden or Farm Stand.
This is also a seed that you will want to plant on a continual basis on a four to five week cycle, so if you don’t have a Seed Starting Station set up already, you will want to read up about how to get one set up here. We recommend to plant four plants and keep them in your upper level of your Tower Garden or Farm Stand vertical garden growing system.
Week 1
Week 2
Week 3
Week 4
Week 5
Start 2 rockwool cubes
Nurture Week 1 seeds
Start 2 rockwool cubes
Nurture Week 3 seeds
Start 2 rockwool cubes
Transplant Week 1 Seedlings into TG
Transplant Week 3 Seedlings into TG
Harvest baby leaves
Harvest baby leaves
Copyright 2021 Grow Your Health Gardening
Week 6
Week 7
Week 8
Week 9
Week 10
Nurture Week 5 seeds
Start 2 rockwool cubes
Nurture Week 7 seeds
Start 2 rockwool cubes
Nurture Week 9 seeds
Pull Week 1 Plants. Transplant Week 5 Seedlings into TG
Pull Week 3 Plants. Transplant Week 7 Seedlings into TG
Continue pattern of pulling older plants and transplanting seedlings
Outdoor planting in a hydroponics system: If planting in the spring, you will want to start your seeds indoors or in a greenhouse so that your seedling start will be about two to three weeks old by the time your last spring frost date rolls around. If planting in the fall, you’ll want to factor in your harvest date range and count backwards 4-6 weeks from your frost date.
Arugula likes to live around 45° to 65°F (10-18°C). Plant arugula so that it comes to harvest in cool weather. It may fail to germinate if it’s too warm. Use a UV light system of some sort to grow your seedlings indoors keeping the light source 8″-12″ if LEDs and 5″-6″ away from seedlings if fluorescent lighting.
How many seeds to plant per rock wool: We recommend planting about 3-5 seeds per rock wool cube. Arugula typically germinates within 4-8 days. Be sure to use seed that is packaged for the current growing season as it will aide your ability to germinate the seeds. You can always remove any excess seedlings down to two plants as the plants mature if you are concerned about crowding. Our philosophy is start out with more and thin down as needed (but don’t toss those microgreens you pull — they are healthy for you to eat as micro-greens).
How much nutrients you should give your seedlings: Keep rockwool moist to the touch but not drenched. When you see a sprout, you can add a tsp of kelp to your water and water the young seedlings while giving them bright light from a grow light.
Thinning out your seedling starts: As the seeds germinate and grow, you will want to pull (or also called “thin out”) the weaker seedlings from the rock wool. (Remember, this is not a wasted plant — you can simply enjoy eating it as a microgreen.) You will want to leave leave 1-2 plants per rock wool to grow to maturity.
Transplanting your seedlings into your hydroponic system: Seedlings should be ready to transplant to your Tower Garden or hydroponic system about 2–3 weeks after sprouting. Seedlings plants should be about 1-2 inches tall, with 3-4 true leaves, before they are ready to leave the nest and enter into the hydroponic / aeroponic Tower Garden or other related system.
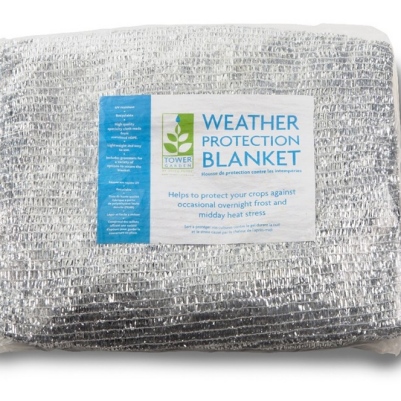
Finally, remember that arugula plantings should be staggered in roughly 2-3 week intervals in order to ensure a continuous harvest. If doing a spring planting, your growing season will be longer than a fall planting. You can extend your fall outdoor planting season by adding a professional grade heater to your Tower Garden reservoir keeping water temps in the 50-65º F range for the root zone to continue to uptake nutrients — just be sure to cover your Tower Garden outside with a weather protection blanket like this when freeze warnings appear.
Nutrient levels for optimal growth throughout the growing season for arugula:
Nutrients: EC: 0.8 – 1.2 (We recommend Tower Tonic Mineral Blend™ for a well-balanced nutrient solution to feed your plants the proper N-K-P and micro-nutrients. You can purchase a 1 gallon set of Part A and Part B here.)
PPM: 560 – 840 (We recommend Tower Tonic Mineral Blend™ for a well-balanced nutrient solution to feed your plants the proper N-K-P and micro-nutrients. You can purchase a 1 gallon set of Part A and Part B here.)
pH: 5.5-6.2 (pH is essential to help the plant uptake nutrients.)
Light: (Amount of sun or light exposure throughout the day) Hydroponic arugula should get between 10 and 14 hours of light per day.
Arugula Temp Tips: (Root zone temp is essential to help the plant uptake nutrients)
Maximum Temp 75º Degrees Fahrenheit
Optimal Day CycleTemp 65º – 70º Fahrenheit
Optimal Night CycleTemp 60º – 65º Fahrenheit (Note: arugula can handle some frost so long as the root zone stays above 50ºF, so use a water heater in your reservoir if you want to try pushing the limits on it growing in the cold.)
Seed Storage 40º to 70º degrees Fahrenheit
Germination 60º to 75º degrees Fahrenheit
Companion plants:
SOIL Growers: Note — Do not grow in soil with pole beans or strawberries. Good companion plants are bush beans, celery, carrots, nasturtium, mint, dill, lettuce, cucumbers, onions, rosemary, potatoes
HYDROPONIC Growers: See first chart on Cool Season Plants on this page for reference of what grows well at similar PPM ranges and pH ranges in a hydroponic / aeroponic system.
Harvesting your arugula:
Make a note of how many days to maturation on the variety of arugula you are planting and mark your calendar or in your gardening journal. When your plants have reached the baby leaf stage, take a sanitized clean pair of hand trimmers or scissors and cut the outer leaves of your arugula plant, leaving at minimum three center leaves to continue to grow. The plant will continue to produce leaves for you but will become spicier as the plant matures. If you don’t want spicier leaves, simply pull the mature plant at 5-6 weeks of age and replace the plant with a new transplant (see chart above). Ideally, your arugula should be eaten within a few hours of harvest; however, if storage is necessary, the correct conditions to prolong shelf life are rapid cooling down to 34°F (we accomplish this with an ice bath of water) and then spin the leaves dry and place between dry paper towels in a sealed lettuce container with and 95-98% percent humidity.
How to store arugula that is not consumed right away:
If you have more arugula producing faster than you can eat, there are a couple of options: dehydrating or freezing. To dehydrate your arugula leaves, place on a dehydrator rack at 110º F for 6-24 hours. When the leaves are crunchy (you can break them in half), remove from the dehydrator and place in a tightly sealed pouch or Mason jar with an oxygen absorber. Dehydrated arugula can be used in soups and ground into a powder to add to pestos, soups, or even on meats for additional nutrients.
You can also freeze your crop in an air-tight bag or container and use in smoothies or defrost and use in recipes that may call for herbs.
Let us know if you have any questions in the comments below and happy growing!
The more plants you begin to grow, you’ll begin to realize the importance of staying organized. As the plant begins to mature, knowing when you started the seed and when it should be mature will aid you in gauging when to begin harvesting or even how old a plant may be and if you should pull it and replace it with another.
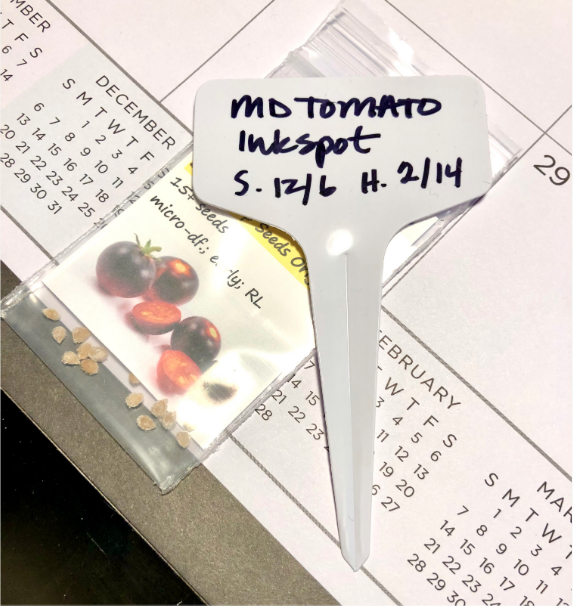
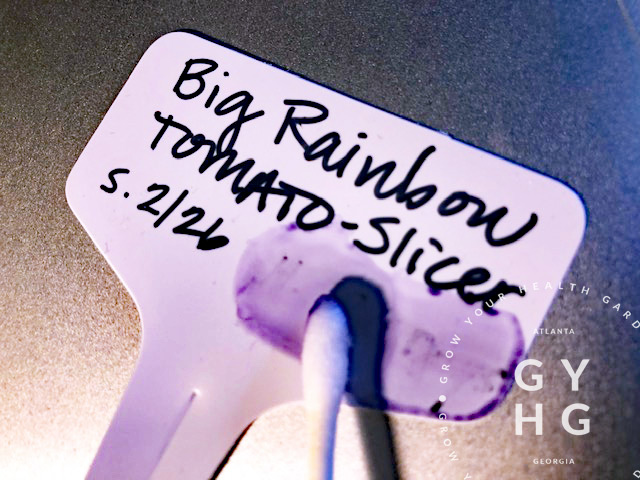
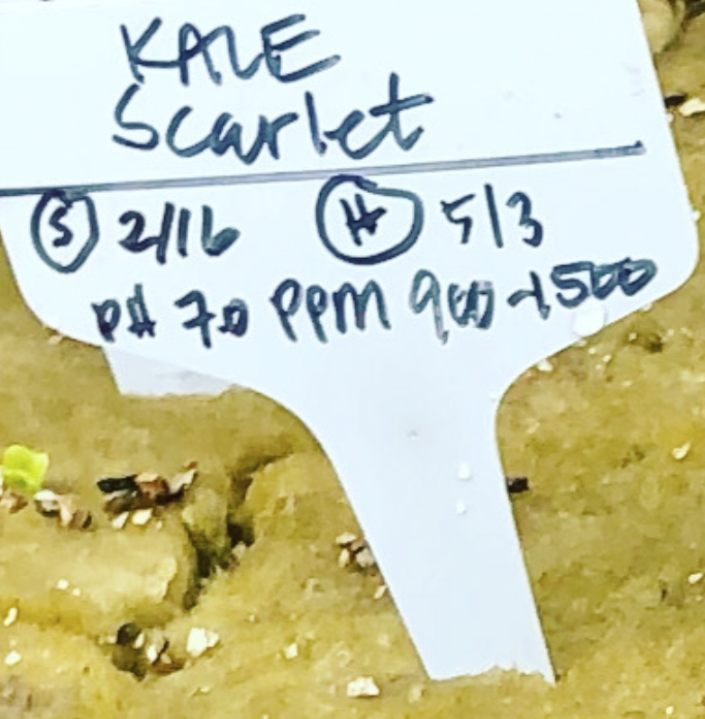
We grow hundreds of varieties of plants per season on our property and have found that labeling is essential. Even if you are not planting many plants, knowing what you planted and having a quick reference will be essential to knowing and learning more about your plants. Here’s what we include on our labels and some tips that help along the way:
Use a label that offers space enough to record data/info
Record plant variety and kind
Record start of seedling date
Record anticipated maturity date for when you should be able to begin harvest
Optional: Record any special characteristic that helps to identify it — especially if you have more than one variety growing of the same kind of plant (ie: seed stock source, ppm range)
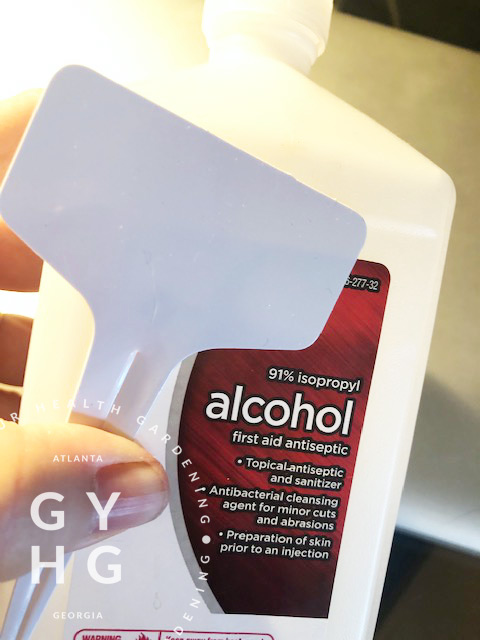
We love the look of bamboo labels, which is a recyclable material, so if your budget allows, this is a great option. This is cost-prohibitive on a larger scale for our seed production, so we opt to use plastic labels and recycle them. When we are finished using the label, we give them a quick rinse with soap and water and then place them in a sealed jar of 91%-94% rubbing alcohol to soak and process them (clean them) during the winter months. After a bit of soaking in 91%-94% Rubbing Alcohol, you can strip off the permanent ink pen writing when you rub with a cotton ball or paper towel and apply a little bit of pressure.
For those growing in soil, if you have access to an old white window covering blind (the kind you put in the window to shade your home interior from the sun), many Master Gardeners like to cut these down and use them as plant markers / labels using a permanent marker or wax pencil.
Tip: If you use plastic labels like the ones shown above and a permanent marker and you make a mistake, simply use 91%-94% isopropyl rubbing alcohol to remove marker.
Use rubbing alcohol to remove permanent marker (Sharpie).
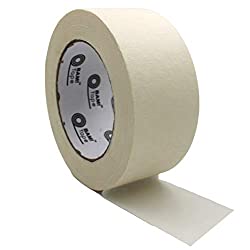
Some Tower Garden or Lettuce Grow Farmstand hydroponic / aeroponic home growers will use painter’s tape and write info on that and stick it to the actual vertical garden growing system. We’ve found that if it is outdoors, it can weather and come off if you have a longer season of growth, but it works great if you’re growing indoors. We like this tape and use it for our Grow Order Client Orders that are grown indoors. We like that it is 2″ wide so we can write our client’s name as well as the plant variety, start date, and harvest date all on the same short strip.
Click photo above to find on Amazon
Tip: When placing tape on your vertical garden growing system, try to place ABOVE the port as sometimes water can drip downwards from a leaf. And try to only use tape if growing indoors as weather can cause removable tape to loose it’s adherence to your grow tower.
Do not, I repeat, DO NOT use duct tape on your hydroponic / aeroponic vertical growing system. It may be difficult to remove and will leave a sticky residue.
We’ve also heard of some people writing directly on their Tower as well. The challenge with using an erasable marker is if the Tower Garden gets bumped in any way, you may lose valuable information. The other challenge is that a vertical garden like the Tower Garden or Lettuce Grow Farmstand will need weekly maintenance of wiping down the exterior so that you don’t get minerals building up in the nooks and crevices. The other factor is if you’re growing outside, you may want to periodically spray down your plants with a shower level of pressure of water to not only rinse off the exterior of your hydroponic growing system. This not only cleans your tower but also helps to knock-off any aphids or bugs that may be hiding underneath leaves or in plant crevices. If you were to have removable ink on your growing system, you would lose valuable information with the introduction of water.
So, when looking at your foundation of the kind of plant tag or plant label you plan to use, consider how the weather (rain and sun) is going to affect it as well as water and routine cleanings around where it will remain.
Record Plant Variety and Kind
We always list variety first and plant kind in caps on the second row. This makes for a quick visual check when grouping similar plants together as seedlings or when placing in a growing area or hydroponic system.
Record Start of Seedling Date
We like to put our seed start date in the left-hand corner of our label and the harvest date on the lower right. The key here is just to be consistent as it speeds up efficiency when you’re in the garden checking on plants. Our eyes scan when they read and having information in the same spot on every plant tag or label will save you time in the long run. Consistency is your friend when your looking to make things efficient in your garden.
Record the Anticipated Days to Maturity Date
Often you will see in seed catalogs or on seed packets “Days to Maturity” noted. This notation is not determined from seed start date, but is intended as what to expect from the date of transplant. To figure out days to maturity, use the following loose formula:
Days to Germination + 2 weeks + Days to Maturity = When you can expect to harvest
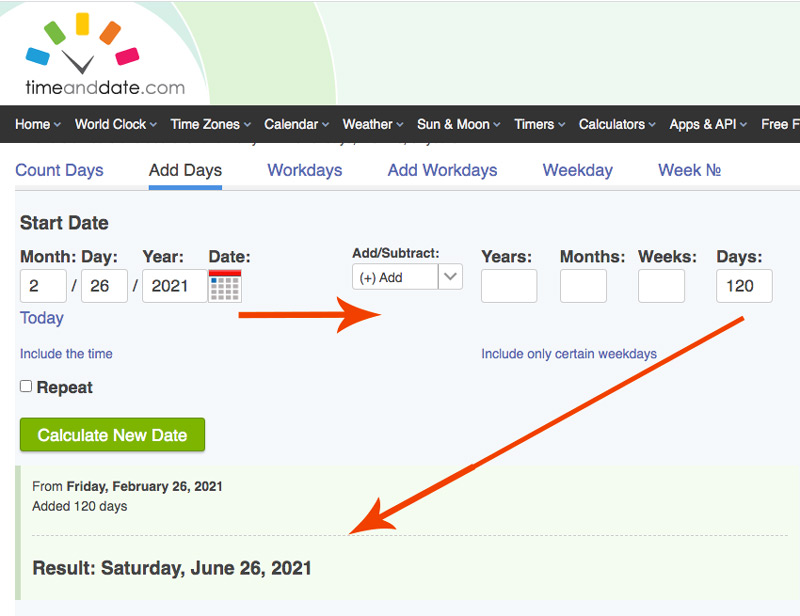
To quickly calculate your harvest date, use the formula above and enter that number into this handy date calculator. (Make sure you use the tab for “Add or Subtract Date”. (See blue line under “Add Days” in example screen shot below.) Begin by entering your date of seed starting and calculate days of germination, plus two weeks for seedling growth, plus days to maturity from seed packet or catalog description. This will give you total number of days. Make sure the Add/Subtract drop down has selected “(+) Add” and then enter a numerical value under “Days” and hit “Enter” on your key pad. Below, you will be given the “Result” date. This is what you will write on your label.
Granted, each plant and growing condition is different (i.e.: plant receives more light and more nutrients and may grow faster than standard days to maturity. Note: If you’re growing hydroponically, realize that plants in general grow 30% faster, so don’t be surprised if you check your anticipated maturity date and your plant is already maturing before that date has arrived.
Record Any Special Characteristic that you want to Remember for Future Reference
When I was starting out growing food hydroponically, I would put PPM ranges on my tag to make sure I grouped plants together that liked the same range. Then I sat down one day and did some figuring and came up with these handy charts for reference. Now, I simply refer to the charts to know what plants go best with each other depending on whether it is a cool growing season or warm growing season. I no longer need to put that information on my label and can use that space for other information.
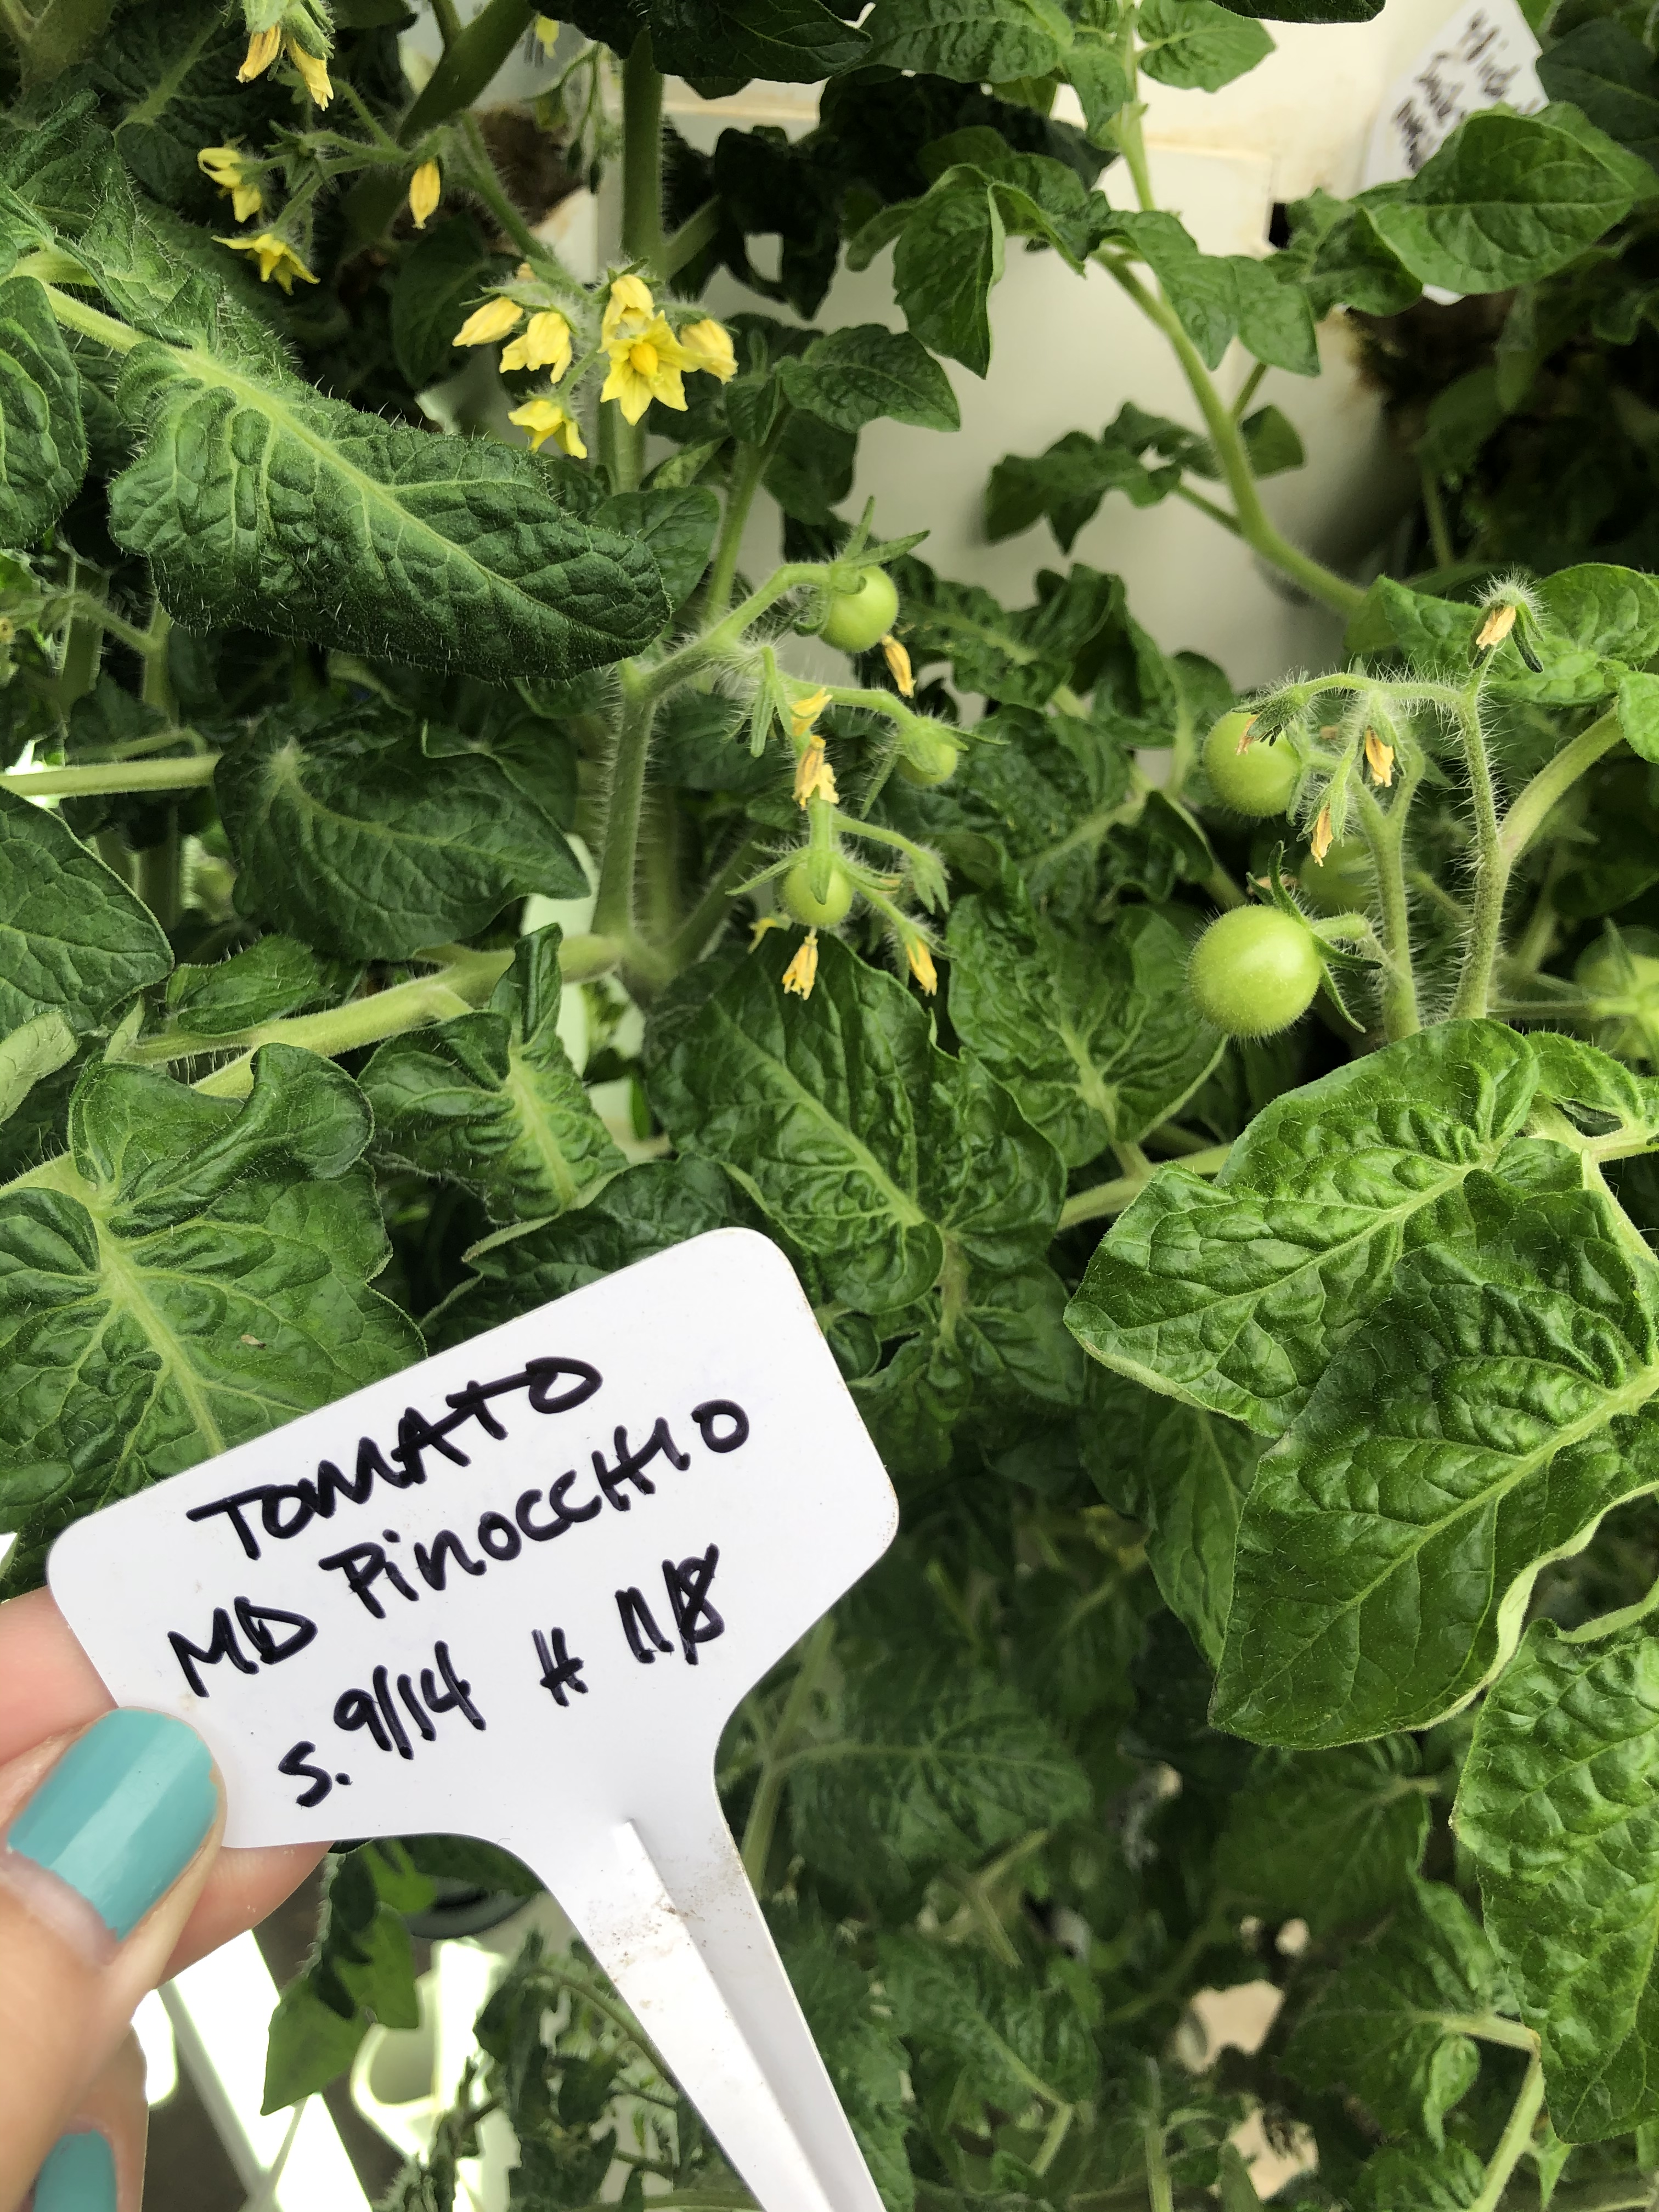
If I am growing a special collection (ie: Tom Wagner Varieties of tomatoes), I may want to grow those plants together so I can observe their growth patterns and development. An indeterminate or determinate tomato would grow differently from one other, so knowing the growing habits of the seedling I’m holding helps me to quickly place it in the best suitable spot in my garden. A micro-dwarf tomato can grow at the top of a vertical garden growing system like the Tower Garden because it is a determinate and will stay a certain small size that doesn’t need support whereas an indeterminate tomato will need to be trellised from the side and grown towards the lower part of the Tower Garden.
Sometimes we grow the same variety using two different seed stock sources. Diversity is good for strengthening seed stock. So sometimes, I will designate the seed stock source so I can compare plants while in the garden to see which line perhaps has more rigor before I do any cross pollination. In these situations, I just use the first letters of the seed stock sources name as a reference (ie: “SSE” would be Seed Savers Exchange).
You may not realize, but some permanent markers are not very permanent when those UV light waves begin to hit them day after day. My sweet son had gotten me some permanent markers from the dollar store with his own money as a Mother’s Day gift and I used them on a few labels and they faded within months. I had to go over them with another type of permanent marker. Here are some options that should last through the season:
Another easy thing you can do to prolong your tag’s writing is point it away from the sun — at least until the plant has developed leaves to shield it from the sun’s rays.
The other good practice you can do is implement a secondary label. I’ve heard of some gardeners who grow in soil, bury a second label under the soil level near the plant for future reference. I tend to forget where I bury things if they are not marked, so instead I like to use these Tyvek wrist bands to loop around the plant as it gets big enough. This is especially helpful on plants that take a good while to mature like tomatoes, peppers, and eggplants. You can create a system of your liking using different colors, but I tend to just stick with neon yellow, because it’s quick to find when I need to find it.
As you tackle your seed starting, I hope this has inspired you to consider what information your plant will need to follow it in it’s journey towards harvest. With just a few simple considerations, you can be set up for success and at the end of the growing season have the information you need to make decisions for the next growing season!
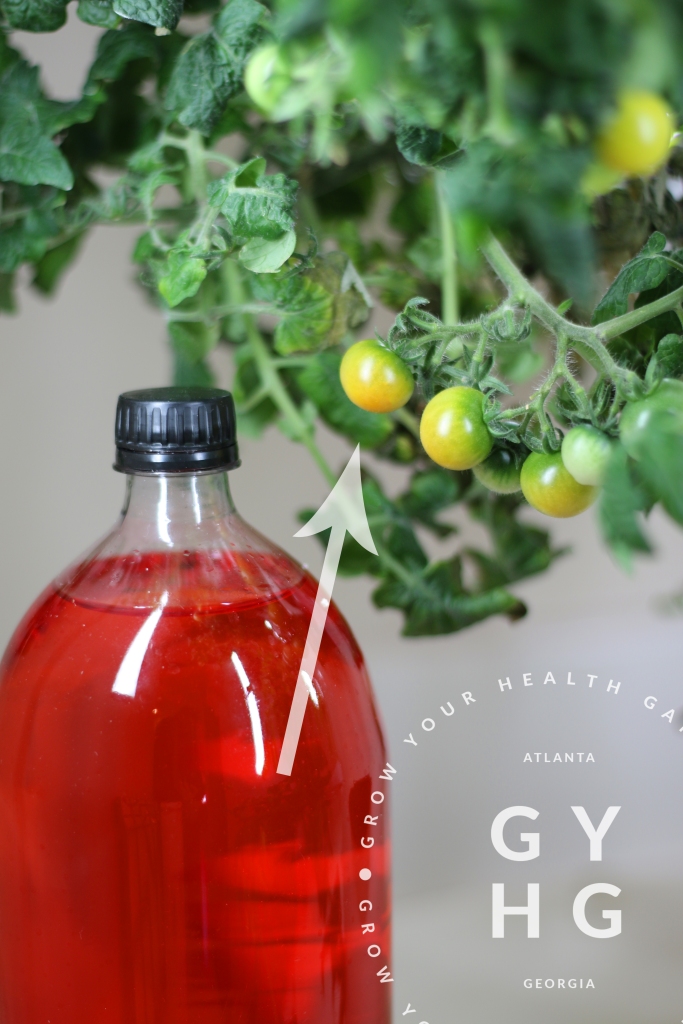
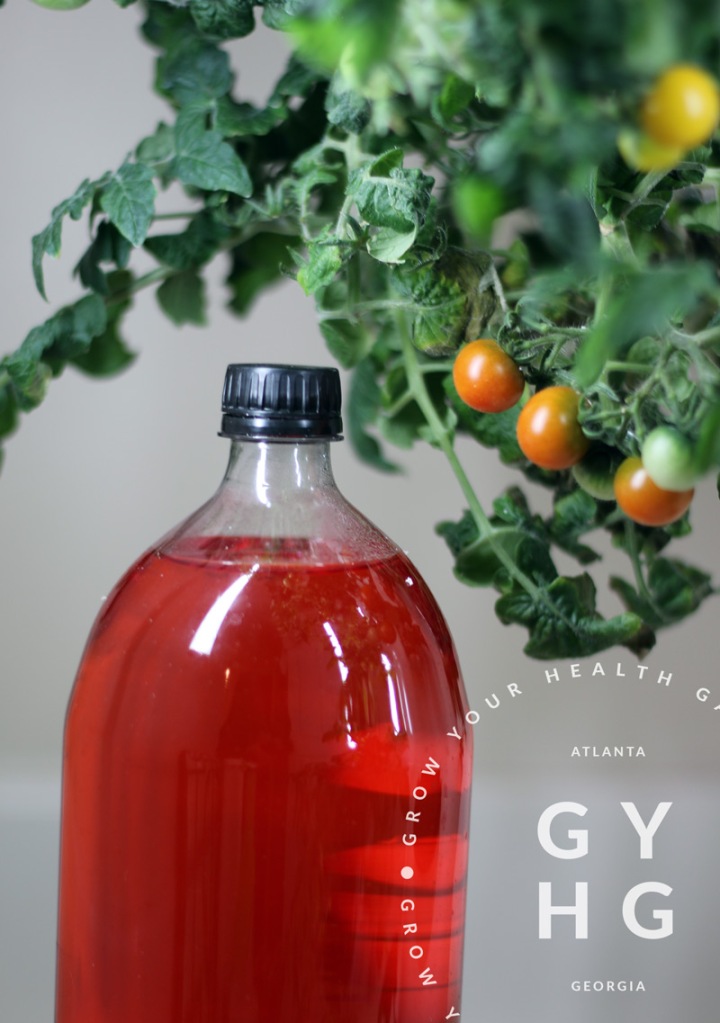
I was listening to a podcast by one of my favorite market growers from Alabama, Noah Sanders, and he had a guest on from Kaleva, (Northern) Michigan, Craig Shaaf, from Golden Rule Farm who mentioned that he put red dye in an empty soda bottle and it helped his tomatoes mature earlier than anyone else’s tomatoes in the area while also sighting a Clemson University Study.
So, being that we drink a lot of sparkling water in our house, I had an empty liter lying around (we typically repurpose these for terrariums in cold hardy annuals but that’s a something to discuss for another day), so I filled it with some water and added several drops of red food coloring to it and sat it on my indoor Tower Garden near some micro dwarf unripened cherry tomatoes I was growing. Low and behold, two days later, the cherry tomatoes closest to the red-colored water began to ripen from the bottom up!
Red reflective Far-Red light encourages tomatoes to ripen.
Studies using Red Plastic Selective Reflecting Mulch (SRM) Show Increased Yields for Certain Plants
Research originally started during the 1980s and led to development of SRM-Red, a selective reflecting mulch that has been available commercially since 1996. Plant physiologist Michael J. Kasperbauer, who retired from the Agricultural Research Service‘s (ARS) Coastal Plains Soil, Water and Plant Research Center at Florence, S.C. found that plastic colored-mulch’s controlling factor is not the colors themselves, but how the colors adjust the amount of blue light and the ratio of far-red (FR) to red light that plants receive reflecting from the ground upwards.
The studies used a red plastic mulch (also referred to as Selective Reflecting Mulch, or SRM for short). It is similar to black plastic mulch used frequently by growers to help warm the soil, prevent erosion, and retains moisture. The red plastic mulch is often thinner than most black weed block and allows more light (and sometimes weeds) through it.
But red plastic mulch’s true strength is in its ability to reflect certain red light waves back onto the growing plant, thereby accelerating fruit production and increasing overall yields. Past ARS work showed that red plastic mulch produced larger tomatoes and produced 20% more than black plastic mulch counterparts and the red plastic mulch also sweeter-smelling, better-tasting strawberries.
Similar results were found on peppers and eggplants as well as with lettuce.
ARS’ also tried the red plastic mulch with cotton, carrots and basil. They found that color of the plastic mulch can affect the roots, stems, leaves and seeds, as well as the fruits, of many other food and crop plants.
Research on cotton showed that cotton fibers grew longer in bolls exposed to increased FR-to-red light ratios. Another study, on carrots, showed that concentrations of nutrients and compounds such as vitamin C and beta carotene in the roots of food crops could be changed by reflecting the right waves of color onto the plants’ leaves.
What’s more, in studies with basil, the amounts of blue, red and FR light reflected onto developing leaves affected their size, aroma and concentration of soluble phenolics. The phenolics are natural compounds, including tannins and pigments that can induce color, some flavors and odors, and antioxidant activity.
Basil leaves developing above red mulches had greater area, succulence and fresh weight than those developing above black mulch. When grown above yellow and green mulches, basil leaves developed significantly higher concentrations of aroma compounds and phenolics than did those of plants grown above white and blue mulches.
The concept of colored mulch sprouted when Kasperbauer wondered whether phytochrome was equally distributed in leaves. He became curious about what would happen if light impinged on the leaf’s lower, rather than upper, surface. “The plant response was the same, no matter which surface received the light,” says Kasperbauer. “Although that experiment seemed somewhat unconventional in 1962, it became highly relevant about 22 years later, when we determined that red and FR reflected from the soil surface could act through the plant’s phytochrome system to enhance yield and quality. That led to our colored-mulch work.”
Red Plastic Selective Reflecting Mulch (SRM) helps to Deter Nematodes
What’s more, tests done by USDA’s plant physiologist Michael J. Kasperbauer and Clemson University nematologist Bruce Fornum showed that nematode damage can be lessened by red plastic mulch. They did an interesting study where they planted tomatoes into sterile soil — some rows covered in black plastic mulch and some covered in red plastic mulch. They then inoculated both rows with 0-200,000 nematode eggs. Their findings showed the black mulch produced 8 pounds of tomatoes whereas the red mulch produced 17 pounds! That’s roughly a 113% increase in yield battling the same conditions.
USDA’s Agricultural Research Service found that red plastic mulch suppresses root nematode damage to tomatoes because the light reflection keeps more of the plant’s growth above ground. The plant’s energy goes into developing fruit and foliage, rather than roots. Nematodes feed on roots. The far-red light reflection to the above-ground plant draws away nutrients from the roots – and nutrients away from the nematodes. Fewer roots mean less food for nematodes. Less food = fewer nematodes.
Things to Consider When Using Red Plastic Selective Reflecting Mulch (SRM)
Carefully secure red plastic selective reflecting mulch underneath your plants so that there is at least a foot on every side of the plant in it’s mature stage of growth.
Do not place the red plastic selective reflecting mulch in walking paths as it is thinner than other weed blocking materials.
Consider placing a weed block material underneath your red plastic SRM to help limit weeds from growing underneath.
Drip irrigation will be necessary underneath
Two other Bonus Tips for Boosting Flavor in Tomatoes:
Place 1-2 TBSP of pure natural Molasses in a gallon of water and stir well to dilute it down and place into a spray bottle and spray your leaves. This will aid in bringing out flavor in your tomatoes.
When your tomatoes are about 18″ tall, a little bit of stress at times can really boost flavor as well. Spray your plants about every 2 weeks with 1 standard strength 325 mg uncoated aspirin tablet mixed in a gallon of water and mix well until the aspirin is completely dissolved and then spray the tomato leaves with the aspirin solution (Salicylic Acid) to trigger tomato defenses. This will especially really beef up your Beef Steak varieties and boost the flavor profile as well.
Find Red Plastic Selective Reflecting Mulch for your Tomato, Pepper, Eggplant, Basil, Cotton, and Lettuce (and more) Crops
As committed Seed Stewards, we understand the importance of good quality seed, because strong seed means strong plants that can better fight-off pest pressure and diseases … and strong plants also mean the best nutrition possible for your body. It’s important to know where your seed comes from because the plant that seed came from has adapted to its growing environment — and if it’s different than your environment, that plant may struggle which means you struggle.
But it doesn’t have to be a struggle to grow your own food — in fact, we think it is FUN to be connected to your food from seed to harvest! Our seed for sale has been cultivated from seed and nurtured using organic growing methods on through to harvest by our family of seven. We take great pride in our seed stock knowing each generation of plants we grow only strengthens our exclusive line of seeds. We are thrilled we can now share our extra seeds with you!
We are unique in that we have thoughtfully chosen heirloom and open source varieties of vegetables, herbs, and greens (and sometimes extremely rare seed) and have grown these varieties out in one season adapting them to hydroponic, aeroponic, and aquaponic growing conditions in the Southeast region of the United States.
As a friend of GYHG and follower, enjoy today through November 14, 2021, 21% off your first seed order! Enter code: GYHG-LOVES-ME-21 when you check out.
Thanks and we hope that this year is the year you especially grow your health gardening!
There are several ways to extend your growing season when growing in a Tower Garden by Juice Plus+ FLEX outdoors. Consider this your friendly “heads-up”, so you’re ready when that first freeze warning comes and not left panicking about plants not making it through the night. Here are our Grow Your Health Gardening three strategies for managing the cold that will inevitably come…
Strategy #1: Weather Blanket + Water Heater
Okay y’all — you want to get NOW in order to extend your harvests another 4-6 weeks into the growing season this fall. With the pandemic still being an issue, everything is selling out early, so think ahead and get your weather blankets ordered now. Like today.
For those of you who need a little more info before deciding if a weather blanket is what you need or not, read on…
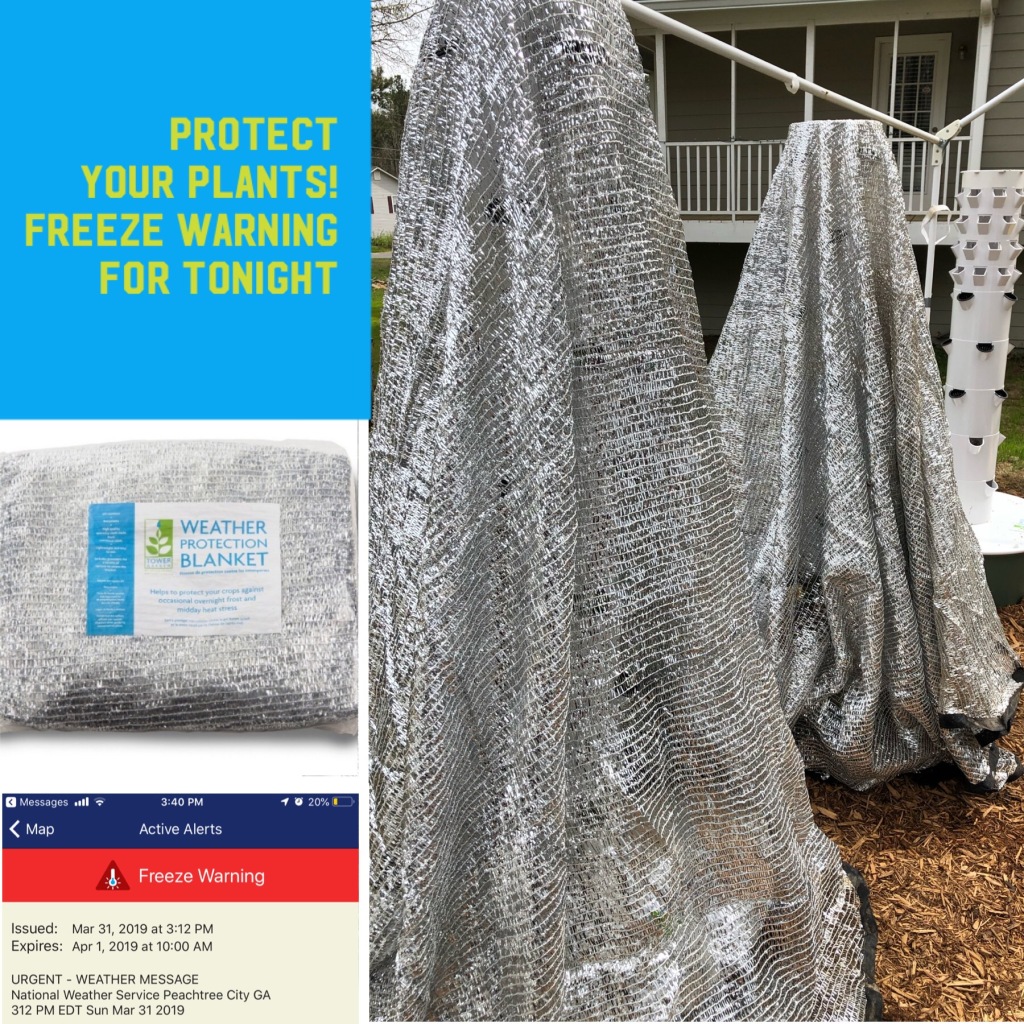
You’ve gone through the effort to plant a crop, the last thing you want to do is see it all come to an abrupt end the first time you get a cold frost at night. Enter the weather blanket. This light weight “blanket” protects your plants from frost. Even our warm season jalapeños lasted well into November last year here in Zone 7B when we covered the Tower Garden with weather blankets.
They’re made of a quality space-age metallic -type light weight material that holds in warmth and deflects the cold. Technically its made of UV-resistant blanket made from metalized HDPE. Think of it as thermal underwear for your plants.
I typically cover my plants early evening before temperatures drop before sunset. The weather blanket is extremely light weight, but even still, if I have larger plants towards the top of the tower that could get their leaves crushed, I’ll add a heavy clay pot to the top of the Tower and drape the Weather Blanket over the pot to take off any pressure on those upper level plants. Works like a charm. In the morning, when temps raise to around 60ºF, I’ll uncover the Towers and set the blankets to the side and replace them at evening if another Freeze Warning occurs. There will come a point where the day time temps are just too cold to grow outside, so bear in mind that these are not a year-round solution — they will simply extend your growing season by several weeks to a month (depending on what your weather patterns are in your growing region.)
Pictured above right: Tower Garden Weather Blankets covering plants on a Tower Garden vertical hydroponic aeroponic growing system.
The weather blankets are also weighted at the bottom and have grommets on the corners if you need to tie down and secure your crop. (In five growing seasons, I have never had to tie mine down here in Georgia, but if you live in a windy area or have a storm threatening, those grommets could come in handy for sure.) The grommets also enable you to suspend your blanket tied to poles or trees in the summer heat of positioned above the Tower Garden acting as a shade cloth of sorts for extreme heat waves that could damage plants. The weather blanket is in the shape of a circle so it also fits perfectly over a Tower Garden with enough to reach the ground in case any plants spill over into that region.
And remember, you are not limited to using the weather blanket solely on the hydroponic Tower Garden. You can also use these elsewhere in the garden. For example, I used one to protect my large Gardenia Bush from a freeze and it didn’t get any damage one cold winter, because I used the blanket.
My weather blankets come out in early spring and late fall/autumn and are wonderful workhorses in my garden. When not in use I simply roll them up (like you would a sleeping bag) and wrap a bungy cord around it and store it on my shelf in the garage until needed. I’m going on my fourth season with my weather blankets and they’re still going strong. But if you have any additional doubts, Tower Garden offers an easy one-year limited warranty.
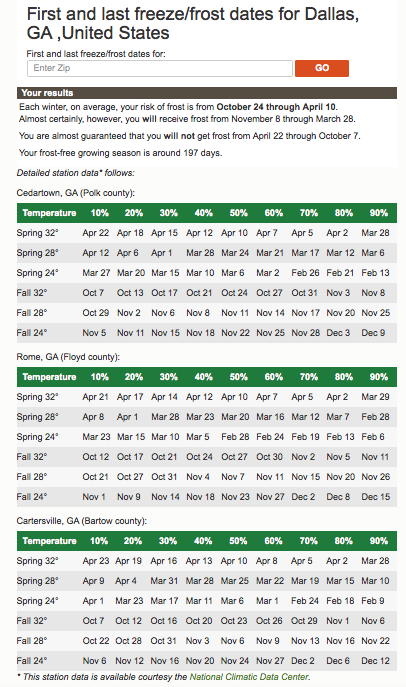
If you don’t know your first frost date, I like this one on Dave’s Garden. Begin by entering your zip code and then you will get several reference charts based on weather stations that are near your zip code along with probability percentages of when the freeze or frost will occur based on cumulative data. Here’s an example of the results I get in my growing region…
For those of you in Zone 7 or higher, here’s a friendly countdown of how many days you have left to grow in this region (think cool season crops) before possible frost hits.
2020-10-24T19:44:00
days
hours minutes seconds
until
Days left in Zone 7 Growing Season
So to sum up, grab your Weather Blanket now. It’s a tool that will allow you to keep growing food on your Tower Garden beyond the date listed above.
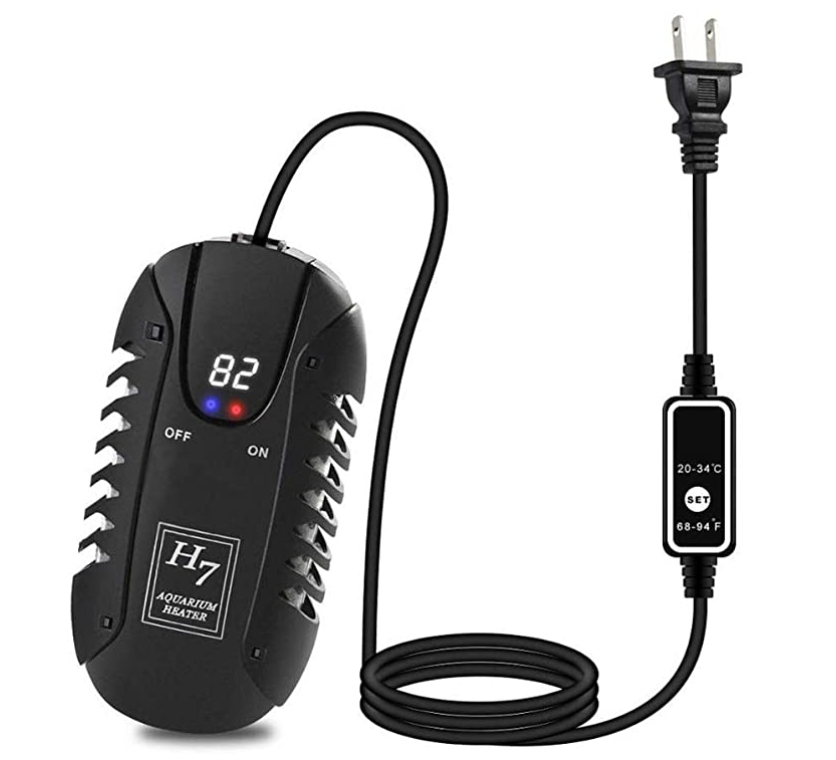
And don’t forget about your water temp… Even cool season plants have a threshold with how cold those roots will go and things still grow, so you may want to order a water heater before that first frost date as well. It’s best if you keep your root zone around 65ºF or warmer and as temps drop, a water heater will keep your cool plants happy. This is the one that I use… I got mine off of Amazon for $24 (free ship with Prime).
In my first growing season I used a glass-based aquarium heater and by December, I remember going to check on my plants outside and a snow had come and it had shattered — the glass heater just couldn’t keep up and it made it tricky to clean all that glass out of my reservoir. (If you can believe it, my tomatoes were still fruiting that year until that snow came thanks to the water heater!) I also like this one shown above, because it is designed for up to a 60 gallon system. Even though the Tower Garden has a 25 gallon reservoir, for a few extra dollars I have a waterheater that can handle the rigor that outdoor temps throw my way. Remember, it’s not going to make the water into a sauna — it’s designed to warm temps up to a point. There will be a threshold where your outdoor growing environment temps may exceed what even this water can handle. I typically use it to extend the season another month or two here in Zone 7 and then around the end of November, I pull my Towers inside my garage and attach their Grow Lights. I have a water heater for each of my Tower Gardens that move into our garage as a way to keep water warmer as the garage floor and ambient temp gets colder than the rest of our house. (Another quick tip to keep water temps in the right zone… I keep all my indoor Tower Gardens on a rolling dolly so it’s not sitting directly on a cold concrete floor in the garage.)
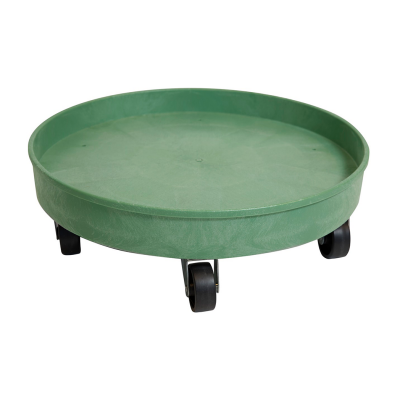
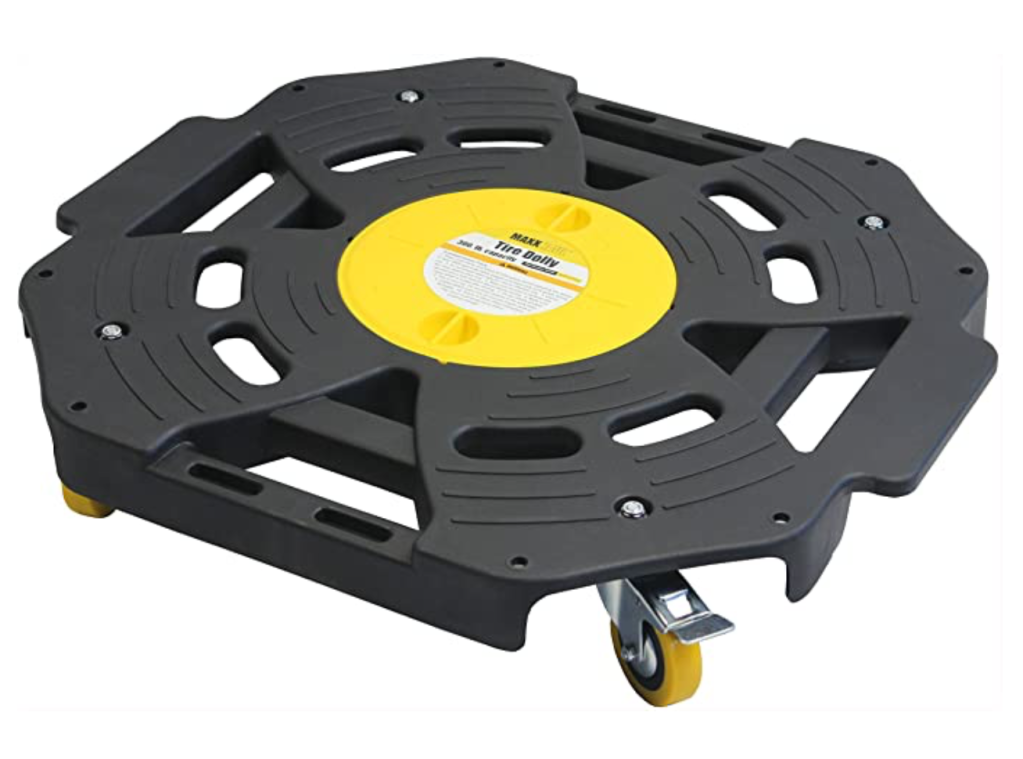
Strategy #2: Dolly + Garage + Water Heater
And for those of you who have your sunny patch near your garage, you could also forgo the Weather Blanket and just do a rolling cart base and roll it into your garage before the sun sets and roll it out in the morning when temps are above 60ºF. The one thing to keep in mind with this option are your existing cords that run your pump. They will need to be out of the way so that you do not jar your Tower Garden when rolling it in and out of the garage. Rolling over the cord creating a jaring effect could cause damage to plants that are growing in the system — for a rolling dolly method to work, you need a smooth glide in and out of the garage. The wheels on the Tower Garden custom-fitted base are definitely able to handle the weight of the Tower Garden and move the tower with ease. I also like how on this rolling cart it custom fits the base of the Tower Garden and the wheels can lock the cart in place. These ship for $90 (price of shipping included in price, tax additional).
I’ve also seen some growers use this dolly off of Amazon for $37 which is cheaper, but it doesn’t have the lip and custom fit like the Tower Garden dolly, so bear that in mind when choosing your options. I can not vouch for if this would be tippy or not — just sharing another cheaper option in case others are looking for a cheaper option. Remember, cheaper does not always equate to better. I DO LIKE the ability to move my Tower Garden as needed indoors and I like having it up off the ground — especially cold cement in a garage. Whatever you choose for a dolly, just make sure it has a flat surface. The weight of the water in the reservoir needs a flat surface beneath it to support the weight. Any uneven stressors beneath your reservoir can put pressure on your reservoir and cause it to crack for the weight of the water and plants above so I can’t stress this enough — keep a flat base under the entire reservoir and grow system. Also make sure your wheels on your dolly lock. You don’t want any run-away Tower Gardens rolling down the driveway. 😉
For those of you in colder regions that get snow and don’t want to mess with a Weather Blanket, you may want to find your frost date and prepare to clean your Tower Garden shortly after that date and then move your Tower Garden inside and put a set of lights on it. They are currently selling a lot of lights right now, so order them even if it says it is back ordered and you’ll be next in line for getting them as soon as they come off the production line. I recently had a customer order a set and they were only on backorder for a week. With that said though… order early to ensure availability when you really need it. The Grow Lights work on both the FLEX and HOME systems and come with a built-in timer where you can “set it and forget it” to come on and off automatically (remember, price listed on Grow Light ordering page includes shipping, but not tax).
I like how these lights adjust to move in closer to younger plants and move out further away from plants as they mature. Some folks do have light sensitivity to these bright grow lights, so be sure to consider that when placing your Tower Garden in your home.
So there you have it — three strategies to extend your growing season using the Tower Garden hydroponic / aeroponic growing system. Remember, once you have any of the above tools you can grow, and grow, and grow food! That means food security for you and your family… that means clean eating with no chemicals sprayed on your food to ripen them early or kill pests… and that means the best nutrients for your body because you are picking the plant when it is at it’s peak and it’s going straight to your table to enjoy.
Have a question on how to make the most of your growing season? Leave a comment below and we will help in any way we can… in the meantime, Happy Growing (and make a plan now to order what you need before the rush hits!)
—Erin
Tips for Hydroponic, Aquaponic, and Soil-based Gardening Methods